
Conditions were about 600 overcast, visibility four miles in haze as I prepared to depart the Santa Maria Public Airport/Capt G. Allan Hancock Field (KSMX) in Santa Maria, Calif. I was flying a well-equipped Beechcraft A36 Bonanza sporting a Garmin 530/430 stack and a Honeywell KFC225 autopilot/flight director—the airplane and configuration with which I’m most familiar and current.
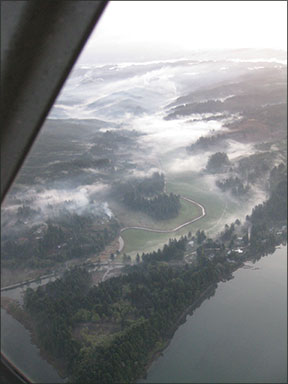
I was repositioning the aircraft to nearby San Luis Obispo, Calif. (KSPB), a mere 22 nm to the northwest of KSMX, where the ceiling was a little higher and surface visibility a whole lot better. Conditions a little further inland were clear and warm as an alternate, Central California in the early spring. It should have been an easy IFR flight. But, owing to the surrounding terrain and airspace, published departure procedures were going to make it challenging.
Start with The ODP
Santa Maria sits wedged between some fairly impressive rising terrain, especially for coastal California. Although KSMX’s field elevation is only 261 feet msl, there are peaks in its immediate vicinity that direct local MEAs to the 6000-foot level. Complicating things, immediately to the west of the airport there are restricted areas associated with nearby Vandenberg Air Force Base. I was stationed at Vandenberg a couple of times during the 1980s in U.S. Air Force missile operations, and remember how adamant the Air Force was about keeping airplanes away from its missile and space launch facilities.
The terrain, a full (statute) mile difference between field elevation and the nearby MEA, and the restricted airspace emphasized the need to do a little preflight investigation to determine the best (read “safest”) way to get from the ground to the en route structure.
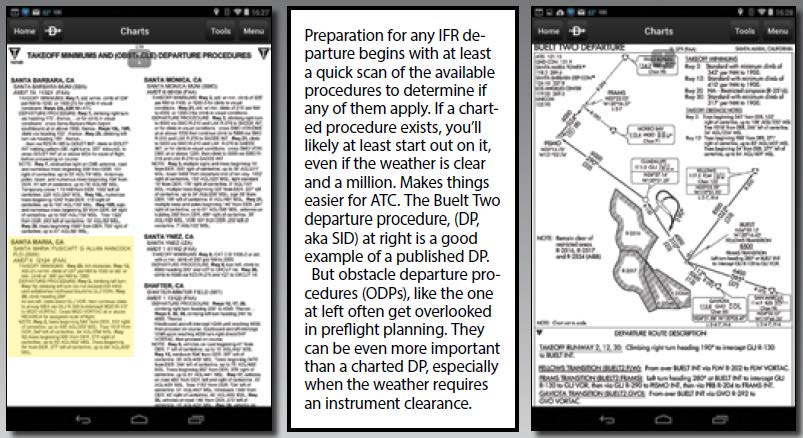
The first place to look is the front of the FAA’s Aeronav instrument procedures book or Jeppesen charts, if you’re using paper charts. Here you’ll find nonstandard takeoff minimums for airports that have them, listed alphabetically by airport name. Along with the takeoff minimums, you’ll find obstacle departure procedures (ODPs) listed by departure runway, if an ODP exists.
Most electronic flight bag (EFB) software (I use the ubiquitous ForeFlight Mobile) allows you to select the takeoff minimums from the airports page under procedures. You can also download the Airports/Facilities Directory (AFD) to your EFB and find any ODPs there. An ODP may exist for one, some or all of a particular airport’s runways, depending on the location of nearby terrain.
Not surprisingly, KSMX has ODPs for all its runways, as reproduced on the next page. Winds were as typical, from the shoreline and flowing around the mountains that form Vandenberg AFB’s east perimeter. This favored Runway 30 for my takeoff. The published ODP for Runway 30 at KSMX is highlighted above. When departing Runway 30, it calls for a climb heading of 294 degrees, direct to the GLJ VOR. After crossing the VOR, fly outbound on the GLJ 300-degree radial, then continue climbing to an adjacent airway’s MEA—presently 4000 feet msl—or as assigned by ATC to intercept the MQO Vortac’s 137-degree radial and fly it inbound. Cross MQO at or above the MEA/MCA for the assigned route of flight. Whoa…this easy flight is starting to get a little complicated!
Meet SID
Before spending much time briefing yourself to fly an ODP, a smart thing to do would be to check if there’s a charted departure procedure (DP, aka standard instrument departure, or SID) for the airport. These also are in the Aeronav charts and Jepp books, and are downloadable as one of the available procedures for the selected airport in EFB software.
As expected, there’s a SID for KSMX. The Buelt Two departure gives us a completely different route to depart Santa Maria in IMC. For a low-altitude coastal airport, this was a pretty complicated-looking procedure the first time I saw it. Take a minute to review the SID, reproduced at upper right, and figure out how you’ll depart following this procedure before you continue reading.
Don’t cheat, brief the SID
Okay, let’s review the departure. Taking off from Runway 30, you’ll make a right turn, the long way around, to a heading of 190 degrees. When will you begin your turn? Because no minimum altitude is called out on the Buelt Two Departure, obstacle clearance is based on the standard of climbing on runway heading until reaching 400 feet agl, about 700 feet msl in this case. You need to climb aggressively, though—terrain avoidance requirements mean you must maintain at least 317 feet of climb for each nautical mile until reaching 1900 feet. Although the charted procedure makes it look like you’ll be south of the airport before you turn to 190 degrees, on my takeoff I actually crossed about over the midpoint of the airport.
Here’s the tricky part. The first time I looked at this procedure, it took a couple of read-throughs to thoroughly convince myself that, although I was headed for an airport to the northwest, near the Morro Bay VOR (Frams intersection on the Buelt Two DP is an initial approach fix for the ILS at KSBP, and about five miles northwest of where you intercept the localizer inbound), the DP requires flying southeast all the way out to the Buelt intersection. The initial 190-degree heading is just a means of intercepting the radial outbound to get out to Buelt, while giving you time to climb to at least 4000 feet along this protected path.
From there, the procedure calls for flying to a VOR in your general direction of flight or, in the case of a departure to the north, to the Frams intersection. That’s how I was cleared: the Buelt Two Departure, Frams transition. For this transition, upon reaching the Buelt intersection the DP calls for another long-way around turn, left, this time, to 280 degrees—a full 210 degrees of turn—to reverse course to intercept the same radial back toward the VOR. On the way to the VOR, you fly almost directly over the departure airport, 10, 15 or more minutes after taking off. I was cleared to 6000 feet after making the turn at Buelt but, regardless, 6000 feet is the DP’s published MEA after passing the Guadalupe VOR. From there the procedure was a piece of cake—out to Pismo intersection (above the famous beach, which is far colder than you’d expect for California), over to Frams and onto the ILS into KSBP. The top image above is an EFB screenshot showing excerpts from the ILS Runway 11 approach plate at KSBP and the pertinent low-altitude en route chart.
GPS, Autopilots and Old-School Navigation
Copy your clearance, confirm your IFR Aresti Diagram is correct for your clearance (see the sidebar above), and load your flight plan. You’ll find that, although your GPS contains the Buelt Two departure and you can enter it into your flight plan, most GPS navigators are going to be of limited use at key points in the procedure. That’s because GPS doesn’t know about headings. Instead, it knows defined routes. So the GPS may go into Suspend mode while you take off and turn to 190 degrees. Meanwhile, some navigators may activate on their own when you intercept the R-130 off GLJ, while others will require you to manually activate the leg once you become established. The same situation occurs when you cross Buelt intersection and need to make the big turn back to the Guadalupe 130 radial inbound.
If your GPS can’t plot the precise ground track itself, your autopilot will require you to use heading mode and manually “bug it” around until you intercept, activate the GPS leg and switch to nav mode. You’ll need to re-enter heading mode for the big turn at Buelt, after which you can go nav mode all the way to KSBP.
But there was a wrench in the works: I was repositioning from KSMX to KSBP to get a GPS antenna fixed, and was flying old-school VORs all the way. In reality, this simplified the flight. I had just a couple of OBS and HSI needles to spin around at the proper times, instead of spinning needles and going in and out of suspend mode. I decided before takeoff that it would be far simpler to remain in autopilot heading mode all the way to the approach at KSBP, making switching modes back and forth between heading and nav one less thing to do on this busy, complicated flight.
Maybe it’s because I learned IFR the old way, with a pair of VORs and, in the beginning, not even a DME, the Law of Primacy makes it comparatively easy for me to default to VOR navigation and using cross-radials on the #2 nav head to find intersections (since the Bonanza’s DME had been removed in favor of the GPS). That’s dating myself, to be sure, and I truly love a good moving map GPS. But it’s almost calming to do things the old-school way when the procedure itself is complicated even when using a GPS.
Then Things Got interesting
Of course, when I intercepted the ILS inbound at my destination, the glideslope never activated. I was in the proper VLOC mode; it turns out the glideslope transmitter on the ground had failed. Complicating things further, unlike most ILS approach charts, which have localizer-only minimums and guidance on the same chart, the KSBP ILS Runway 11 procedure has a note reading, “When GS not used, use LOC 11 procedure”—which references a completely different instrument approach chart.
Luckily, three factors were in my favor: On the transition from Frams, you spend a lot of time on the localizer before the final approach fix; I had looked at the approach chart and noticed the note before I boarded the airplane; and I had an IFR-rated passenger in the right seat with his own iPad whom I could ask to find the new chart and tell me the minimums and what defines the missed approach point (remembering I did not have a working GPS). Missing any one of these three factors, I would have had to have asked ATC for a hold or a vector while I sorted everything out, or alternately flown the published missed approach procedure from the ILS to set up for the localizer approach afterward.
Did I mention this was all in an approved flight training device, or “simulator,” operated by Pilot Workshops LLC in Nashau, N.H., as part of its “IFR Boot Camp” program? The IFR Boot Camp is the most unique, most useful IFR simulator experience I’ve ever had (and I’ve had several), notably because it simulates ATC using real controllers handling as many as a dozen simulated flights or more in the same California airspace, over your personal headset for incredible realism. For more information on the IFR Boot Camp program, see the organization’s Web site, pilotworkshop.com/ifr-bootcamp/info1.
SIDuational Awareness
Some pilots might not see the need to go to so much effort to research, study and brief a departure procedure for such a short positioning flight. Experiencing this very realistic training flight, where the only thing that went wrong was an inoperative glideslope and any errors would have been mine and mine alone in the making, reinforced that my success depended on seven pre-flight steps:
First is visualizing what the SID meant in terms of heading over the airport, flying in the opposite direction of my destination, making a big turnaround to fly back over the airport and on my way, all while climbing fairly quickly to a safe initial and higher, later MEA.
Second, I isolated the portions of the SID I would use on my specific flight, and created a simplified depiction of just that information in the form of an “IFR Aresti diagram” I posted on the panel in my primary scan.
Deciding exactly how I would conduct the flight (VORs, autopilot heading mode) before taking off is the third.
Fourth, thoroughly reviewing the approach chart for my destination airport before taking off on the short trip, including reading the note and remembering that the localizer-only minimums were not on the ILS chart, which is usually not the case.
Fifth, reviewing my panel-mounted sticky note just before takeoff and as needed during the busy part of the SID.
Briefing the ILS approach at my destination before takeoff and creating an “IFR Aresti diagram” for it as well was the sixth step. Look for more on this in a future article.
Finally, using the resources available to me—my IFR-rated passenger; his EFB and his ability to find an approach chart, read me the localizer minimums; and to tell me what defined the missed approach point—and being ready and willing to break off the approach before beginning my descent from the FAF if for any reason he was unable to get me the information I needed in time.
I’m convinced that if I failed to do any single one of those tasks at the time I did so, I would not have been ready to fly this trip without potentially committing serious errors. As it is, although the procedure was hard and the ATC frequency was busy, I never felt behind the airplane—even when re-briefing for a localizer approach in the last few miles before the final approach fix. This was truly a case where preparation resulted in good “SID”uational awareness.


