
When it comes to preflighting an airplane, there is nothing more true. Sure, you can follow the diagram laid out in the pilot’s operating handbook, or routinely drone through a do-list of items a mile long that are spelled out in the aircraft’s preflight check list, but if you don’t understand what problems you are looking for, what’s the point?

The preflight check is not a skill you need to master just to pass a check ride or flight review; it’s a skill you need to have to become and remain a safe pilot. It involves inspecting for mechanical faults, sure, but there are certain things you also must do or know before each flight. Simple stuff, like how will the aircraft perform in these conditions, or have I done this before?
Missing links, or why bother?
Ever participate in the ubiquitous preflight contest typically set up to challenge pilots at air shows? They rig the test airplane with several problems that can be picked up by an astute pilot during a thorough preflight. And some of them begin where all preflights should begin, with the official legwork and paperwork required for flight.
Note: Given today’s plethora of “connected” devices, everything I am about to remind you about doing can be done while sitting in your aircraft cockpit as you begin your cockpit checks and walk-around. Yes, some of it should be done before you get to the airport, maybe even the night before, but all of it can be done on-site these days.
You’d be amazed what people miss. They forget to calculate the runway lengths required for their aircraft based on that day’s weather conditions. Seriously. The FAA’s FAR 91.103 is clear that the pilot must calculate his aircraft’s ability to takeoff and land ahead of time using the POH/AFM for the aircraft in an effort to eliminate tragic takeoff overrun and failure to climb accidents. As Bob Wright discusses in the article beginning on page 4, a Piper Cherokee 180 loaded with four souls and fuel will not be departing Angel Fire, N.M., on a 90-deg. afternoon, not because the 9000-foot-long runway isn’t enough, but because the aircraft won’t climb at the 15,000-foot msl density altitude. Mr. Piper’s engineers went to a lot of trouble developing elegant charts that make the answers quite clear to anyone willing to do the paperwork.

Once you are digging around in the POH, you might as well figure in-flight performance and calculate the fuel you require, estimated times en route based on weather and wind, and refueling stops. The charts will give you fuel burn for each combination of power settings and density altitudes. Be realistic, and remember your required reserves are minimums. Pad them. You’ll thank yourself later.
Weight and balance is just as personal to each craft. A generic won’t do—the aircraft must sport its own, and it has to be current. This little detail puts more aircraft than you think into the non-airworthy category. Again, FAR 91.103 says you’ll do a weight and balance calculation for each flight. This is a good moment to perform it.
Pilots routinely forget to look at the paperwork in the aircraft, too. Think: AROW. That’s Airworthiness (comes from the factory with one), Registration, Official pilot’s operating handbook and individual Weight and balance details. Many don’t realize that a “pink slip” aircraft registration has a limited lifespan. Even more have missed that all U.S. registered aircraft now have to be re-registered every three years. If the owner forgets, the N-number can be reassigned. In any case, the original aircraft is grounded without a current registration.
One detail all of us old-timers might remember is that the FCC used to require U.S. registered aircraft to carry radio station licenses and pilots used to need an FCC radio operator permit, too. That requirement is gone, stateside, but other countries still enforce it. Remember that if you are heading across an international border.
You also will need a U.S. Customs sticker for the aircraft to re-enter the U.S. They are good for a year and can be purchased online. The downside? They are specific to one N-number and must be permanently adhered to the aircraft exterior.
While you are looking for things that adhere to the outside of the aircraft, be sure yours has an external aircraft data plate. This has become the equivalent of the externally visible VIN number on a car. If it’s missing, the machine isn’t legal to fly. Get one. Inspectors from your friendly local FSDO delight in walking the ramp at fly-ins looking for older aircraft that have not had this retrofit.
Let’s walk
There are key items on every airplane’s preflight walk-around that absolutely should not be missed. An item that blows my mind every time I see a pilot whiz by it is “controls free and correct.” They circle the craft and move the ailerons and elevator, but they don’t look in the cockpit to see if the yoke movements coincide correctly with the control positions. In the case of the ailerons I’ve seen a pilot move one, and not look to see if the other moves in the opposite and correct direction simultaneously. Ouch—that’s going to bite on takeoff.
Tires and brakes are other items that are missed with alarming regularity. On low-wing airplanes and/or those with wheel pants, I can see why. Checking the tires requires lying down, opening an access panel, sometimes lying on the ground with a tire gauge in an awkward position, and even moving the airplane to be able to visually inspect 360 degrees of tread for uneven or excessive wear. Inspecting the brakes on some aircraft are almost as challenging.
And if you miss a telltale sign, such as a flat spot on the tire, excessively worn and etched pads, or leaking brake fluid? Ever blow a tire on landing? Ever have one brake simply give up the ghost on an airplane that depends on its brakes for steer-ability on the ground, such as a Grumman American or a Cirrus? Ever deal with a brake fire on a composite airplane (hint: it doesn’t just smell bad)?
One airplane I fly has a solid rubber tailwheel mounted on two strong metal leaves (doubled for strength—your first sign) that flex with each touchdown. You can see the wheel fine from a standing position on the walk-around, but before each flight I lay down on the ground to get a good, close look at it. I’m checking for cracks, and missing clips or springs on the steering cable connections. That’s what breaks. Can I land without it? Sure…once, like a Curtiss Jenny with a tail-skid. Steering, however, becomes challenging (ask me how I know).
Without understanding how and why preflight actions exist and what is most likely to break on you, that long list of do-actions on a typical checklist is pretty much useless. Even worse, it has been proven again and again that misunderstood checklist items are often the easiest to overlook. And overlooked checklist items are the most dangerous items of all.
Sensible Walk-arounds
I’ve said it once and I’ll say it again: The OEM checklists are generally overstuffed with repetitive items and basically stink when it comes to inspiring a good flight. You are better off to work with your CFI—even conference in your mechanic—to come up with a thorough and sensible checklist customized to your specific aircraft.
I want you to do it for two reasons: one, it is going to be the best do-list for your machine; two, the process of creating the list is going to educate you on why these particular items you are checking are so critical to flight.
My walk-around checklist starts as I’m approaching the airplane. And what do I see when I walk up to my bird? As long as I’ve been flying, you might think I’d “see” all the wonderful places I’ve been and the sights I’ve seen. In fact what I “see” when I’m walking up to my airplane before a flight is everything that has ever gone wrong. Yep, I’m remembering what broke, and eyeballing my ride rather meticulously in an effort to preempt the next malfunction. That’s the genesis of my practical preflight.
For example, an airplane I fly has all-electric trim. Lose electrical power completely and you will be left pushing or pulling against the last trim position with every power/pitch change. This is just one reason why there are three redundant electrical power systems in the airplane, as well as a fancy interrupt switch to limit each trim command’s range, and yet another switch to get the trim to reverse if the first switch fails. Beyond that there is a circuit breaker next to the switch. Of course, if I don’t preflight these items, I don’t know for sure that they are there to back me up. And if I don’t preflight the trim function, well, I don’t know how that’s going to function through its range, either.
Where does that fall on my checklist? It’s part of my preflight cockpit duties pre-walk around (control locks off and stowed, switches all off, master on, flaps extended, back-up battery checks, trim checks, fuel quantity check, internal and external illumination check, stall warning check, master off).
Make it flow
From the cockpit, where I typically grab my fuel sampler, I move out and back, keeping my hands on the airplane at all times, while I check ports, pins, panels, propulsion, wheels, skins and wet stuff (fuel, oil and hydraulics). These all are items with the potential for creating problems.
I do this in a logical fashion, literally strolling my way around, under and over the airplane. The flow makes sense and helps me if I am interrupted. A checklist that asks you to jump around from spot to spot on the airframe with no logical flow is just begging you to skip something. That said, the manufacturers usually publish a diagram like the one on page 13. It may or may not be organized like you are, but it’s an approved reference, and you’ll rarely go wrong with the FAA if you follow the published procedures.
Catch the rhythm
I like a checklist with mnemonics. Those are little ditties you can hum, you know, CIGAR TIPS—or in my case—Four Ps, plus WSW. It helps me remember, even with a do-list.
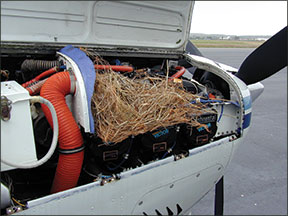
Ports includes the tiny static portals for sensing barometric pressure at altitude, as well as oil doors—there are two—and the oil cap, too, in the cowling. Pins include every cotter pin holding a nut in place or a cable in position. Panels include both inspection panels (I’ve seen them incorrectly reinstalled after an annual) and internal access panels, such as in the baggage compartment, where there is a port for trickle charging the aircraft battery and access panels to the remote-mounted avionics and autopilot. Ports also include the engine cooling air intakes and the air-filter intake. I once found a wrench sitting on the top of an engine by peeking in that cooling air intake.
The air filter box in one of our airplanes sits down under the engine, with its own scoop port, and it’s been known to cause issues, too. Specifically, if there is a tear or leak in its connection to the engine the engine could be engorged with air, ruining the mixture balance causing temporary choking. We’ve got reinforcing safety wire on our installation to provide an extra measure of security after one preflight found it barely connected.
While I’m down there peeking at the air box, I check my tires by rolling the aircraft forward or aft. Tire pressures and brake inspection require that I lay on my back under the wing. An inspection of the exhaust pipes lets me know if the mixture has been too rich (black and sooty) or too lean (white). Tan or gray are good colors. Might as well sump the fuel while I’m down there.
Pins include anything that holds the airplane together. I check all cotter pins, piano hinge pins, nuts, bolts and anything safety-wired. My mechanic has thoughtfully painted reference marks on self-lock nuts so that I can quickly see if they are creeping.
Propulsion includes the engine, as much as you can get to it, taking care to check the integrity of spark plug wires, fuel lines, oil cooler and air filter; and the propeller itself, which I inspect for nicks, cracks, straight track through its arc and general condition of the blade, noting that any scratch on the paint could be a sign that the prop has been hit.
We once found a blade tracking out of its arc so much the entire propeller had to be overhauled. What happened? A telltale mark on the blade indicated that something, possibly a vehicle, had hit it. The airplane had most recently been transient on a ramp where it was moved by a tug. Yep, a $7000 repositioning.
Connectors, specifically rods and cables, are some of my most scrutinized preflight parts. I want to be absolutely sure that when I move the left aileron up, there is a corresponding and correct, and unfettered movement of the cockpit control stick to accompany it. The rod should have some side-to-side play on its ball joint, but very little back-forward play. The cables should be tensioned properly so that the rudder can swing freely in its arc without flopping.
Skins are important, too. I look for undue wear, smoking rivets, seep streaks of oil or fuel, ripples, misalignments, cracks, telltale crinkles or outright punctures that tell me the airframe might be bent from a bad landing or crash encounter with another hard object. I include the lenses encasing aircraft lighting and the windscreen in my “skins” check, since they, too, are often victims of unintended encounters with other solid matter. Hangar rash happens, and, particularly if you use shared aircraft, you don’t want to be blamed for punishment you did not inflict.
Wet stuff is also on my list; making sure there is adequate hydraulic fluid for the brakes and, if you need it, gear or flaps actuation. Beyond sumping after refueling, I measure my fuel with a calibrated dip stick and compare that to the fuel indication in the cockpit. I also always check the security of my fuel caps and verify that the venting system is functioning. Oil is just as critical.
Once upon a time, an inexperienced, somewhat lazy pilot let the line boy add a quart of oil for her, and then on liftoff discovered a spray of oil, then a veritable plume of it coating her windscreen. She returned to the airport post-haste, landing using peripheral vision, only to discover an unsecured oil cap in her engine and two quarts of the slimy stuff coating the top and sides of her aircraft. Never again.
The final details
Now that we’ve hit the high points and the airplane appears both flyable and legal for flight, it’s time to unsecure tiedowns and unchocking the wheels. Put the chocks where you won’t encounter them as you begin your taxi. (If they’re mine, they go in the baggage compartment.)
Once I’m confident the walk-around is complete and squawks have been addressed, I pull the airplane into position for a start, paying close attention to what might be blown behind me, and I climb aboard. And that’s where time slows down.
Take a meditative moment once you’re seated and strapped in to contemplate your checklist and compare it to the position of your panel switches, circuit breakers and flight planning. Glance out and around the airplane before you close and secure the cabin door.
Ask yourself if all is complete and correct. Yes? Then it is time to brief your passengers and begin your start sequence for what is sure to be a great flight.
You probably don’t have to do the weight and balance
Most of us fly the same basic loading on each flight: Say, full fuel, one person, 50 lbs of gear and another 15-20 lbs of cabin equipment and accessories. Do the weight and balance calculations for that flight and you’ve done them for all subsequent flights with similar loading.
Likewise, if you do the takeoff and landing performance charts for the runways at your base airport, you won’t need to do them again for that airplane with that loading under those conditions.
‘Is it supposed to be like that?’
When it comes to inspecting a personal aircraft’s mechanical condition, one of life’s little ironies is that you may not know what to look for if you haven’t seen it before. Obviously, all the big parts need to be there, but where did that screw on the ramp come from? Do you know if your aircraft uses screws like it? Which direction should the pitch-trim tab deflect when you move the primary surface?
The point is some basic knowledge of how the airplane is put together, and how critical components can be inspected without heroic efforts, comes in handy.
It also helps to know whether some condition or instrument indication is “normal” for that airplane. A friend once expressed concern about his oil pressure. I asked him if the reading was normal for his engine, but he didn’t know. For all the times he had looked at the oil pressure gauge to make sure it wasn’t in the red, what it usually indicated never registered. — J.B.


