
Stall. Stalls. Stalled. Few words carry such negative baggage for pilots as the various conjugates of the word “stall.” And it’s even worse outside aviation circles, where the general public and the media frequently and incorrectly use the concept, often blaming the engine for something the pilot did. Veteran pilots know better, because they’ve learned that stalls are a normal part of flying, neither an aberration nor abnormal. They realize and understand stalls are simply what happens at the lowest end of an aircraft’s normal flight envelope.
Stalls when not wanted, not needed, at the wrong time, wrong place bend airplanes and break people. Which brings us to the first and most-important rule to remember about stalls: A stall can occur at any airspeed, in any attitude and at any power setting, from dead engine through full power. But the look, feel, entry method and recovery technique vary according to the stall type. We recognize three basic stall types: power-off, power-on and accelerated.
Practice Makes Perfect
By the book, a stall occurs when an airfoil’s angle of attack (AoA) exceeds a critical point, the one beyond which it’s capable of sustaining lift. Airflow over the wing separates and lift ends. That critical AoA is different for each wing. When we fly the airplane within its operating envelope—a combination of speed, G-loading and AoA—stalls are not a problem. When we move beyond what the aircraft wants, however, and let it stall at the wrong time, the wrong altitude or in the wrong attitude, we get results that feed the word’s ill-gotten reputation.
There are three important factors to remember before practicing stalls out in the airspace: First, start your practice at an altitude that assures you have plenty of air to practice your stall recovery. The FAA, in both the older practical test standards (PTS) and the new airmen certification standards (ACS), recommends at least 1500 feet agl for singles and 3000 feet for twins, or the manufacturer-recommended altitude, whichever is higher. Second, always clear the airspace where you plan to practice.
And third? Always—always!—be mindful of the slip/skid indicator, and use rudder to keep the wings level. Let that black ball of the slip/skid indicator move to either extreme during a stall and you invite the mother of all loss-of-control events: a spin.
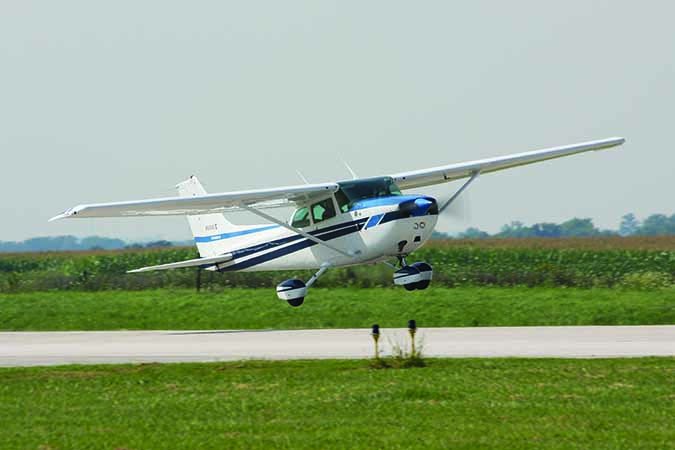
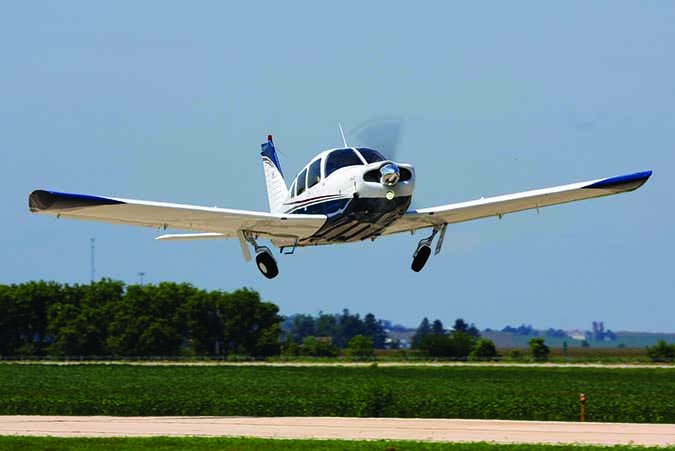
Takeoffs And Landings: The Highest-Probability Flight Phases
The key to saving stalls for when and where we want them is knowing how to do them, and thus how to control them. Presuming we know how to recover from a stall, it’s always better not to get into an inadvertent stall in the first place. But we perform, practice and demonstrate stalls throughout our flying career. And from that training and practice we all should know at least this simple fact: The three basic stall types pose the greatest risks when we’re close to the ground. Inconveniently, takeoff and landing put us closest to the ground, where an inadvertent stall leaves little recovery room. Some of the ways we stall while landing and taking off include:
1. Over-rotation: A rapid pitch up at liftoff can increase G loading to the point of causing an accelerated stall—in straight, non-turning flight.
2. Skidding Turn: Pulling hard and forgetting about the rudder in a steep turn from base to final, as pilots are tempted when they’re overshooting.
3. Faulty Airspeed Control: Getting too slow on final and trying to correct with pitch input only, instead of also adding power.
4. Engine Failure: Failing to get the nose down—now!—when an engine fails after takeoff, or when trying to stretch a glide to the runway.
5. Mishandling Pitch Trim: Setting takeoff trim incorrectly, or allowing a steep deck angle to develop during a go-around, can easily result in a stall if we’re not careful.
Power-Off Stalls
The key to power-off stalls is the power level: The throttle is set at idle, the engine producing no or only residual thrust. Or the engine is stopped and you’re flying toward a dead-stick landing. When practiced, the typical instructional technique follows the old PTS outline: Once the desired configuration (gear, flaps, etc.) is established, reduce power slowly while simultaneously raising the nose to maintain altitude. You want the airplane to slow at a rate of about one knot per second, maintaining 1G.
As the engine drops to idle speed, it becomes necessary to continue raising the nose to maintain altitude until the stall’s onset is signaled by airframe buffet; ideally the aircraft’s artificial stall warning system should already be active by this time, be it a horn or light. This is always a good time to pay attention to what the slip/skid indicator is telling us, and reacting accordingly. It’s always a good idea to stall with the ball centered.
But you’re not truly in a stall until, in most aircraft, the buffeting warning of stall gives way to the nose pitching down—the stall break. Visually, at the break the airplane’s nose will be well above its pitch attitude in normal operations, at least until you’re flaring for the landing. The view out the front should be about the same, presuming you’re practicing your power-off stalls in the landing configuration.
So from that angle of attack the nose falls through; hold the yoke back and the airplane will repeat the process, losing more altitude with each cycle. To end the stall is simple: Ease off the back pressure on the yoke, add power and fly away, climbing back to your entry altitude.
Power-On Stalls
This is where it starts to get interesting. Adding power to the equation increases deck angle and introduces torque and P-factor. Maintaining coordinated flight becomes more important, and the stall break itself usually is more enthusiastic. Depending on the airplane and how it’s loaded, full power may be appropriate, but it’s more likely a cruise setting or less will still be adequate. These are sometimes taught as departure stalls, where high power and deck angles would be the norm, and some instructors prefer to practice power-on stalls to reflect the power and attitude of an aircraft departing a runway.
Once power and configuration are set, the pilot then eases back on the yoke, slowing the plane as it climbs at 1G. Most airplanes will not break until indicating an airspeed well below the power-off stall indication at the bottom of the white arc. When that happens, the airplane wants to accelerate and begin to pitch back up. Now, this description won’t fit equally across the general aviation fleet as the one on power-on stalls. Some aircraft don’t exhibit a clean break during a power-on stall and instead cycle through a nose-high mush while sustaining an accelerated descent rate.
But we don’t want to repeat this cycle, so at the stall break or onset of mush ease off back pressure on the yoke and begin to slowly halt the post-stall descent. No need to over-stress the airframe with a hard pull; remember, you started out at a comfortable altitude, right? And again, use rudder to keep the wings level and the slip/skid ball centered since the airplane may want to roll steeply behind the torque of the engine.
Differences from the power-off flavor? Several. The nose rose to a much higher angle at your full-power stall and the break was more severe. Some breaks briefly move the cabin occupants to a near-weightless state—the plane is descending faster than gravity’s acceleration, if only momentarily.
Accelerated Stalls
A common misconception among primary students is that an accelerated stall involves increasing airspeed. It does not. Instead, the acceleration referred to is increased G-loading, beyond that found in straight-and-level flight. In no case should the airspeed be greater than the manufacturer recommends, or design maneuvering speed (VA), whichever is lower. That said, demonstrating an accelerated stall typically involves slightly higher airspeeds than during the other two basic types. They often occur when maneuvering, since G-loading unavoidably increases in level turns.
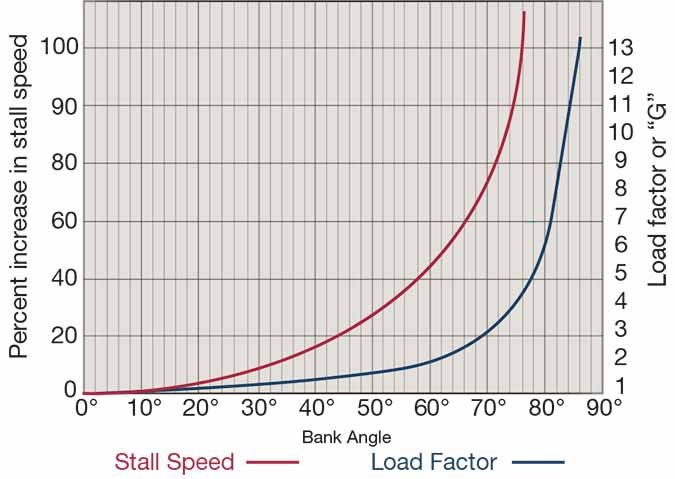
Recall ground school training, where we learned about the vectors in play on an aircraft in level flight, climbing flight, descending flight and turning flight? We learned that stall speeds increase with G loads—by the square root of the G load. So at 1G, the stall speed is one multiple of the stall speed. At 2G, though, the stall speed gets multiplied by 1.41, the square root of 2. This relationship is described more fully in the graph above.
The usual cause of an accelerated stall is abrupt and/or excessive control inputs during hard pull-ups or steep turns. Consider this scenario: The aircraft is in a dive; the pilot pitches up with enough force and speed to raise the G load on airplane to a typical utility aircraft design load factor of 4.4G. The square root of 4.4 is 2.09. So the instant the airspeed falls below 2.09 times the power-off stall speed, the aircraft enters an accelerated stall. For an airplane with a published stall speed of, say, 55 KIAS, a sudden maneuver to the airframe’s load limits at or below 110 KIAS can produce an accelerated stall.
Recovery requires leveling the wings and easing off the back pressure, which reduces the load on the airframe—in turn lowering the stall speed back toward its 1G norm.
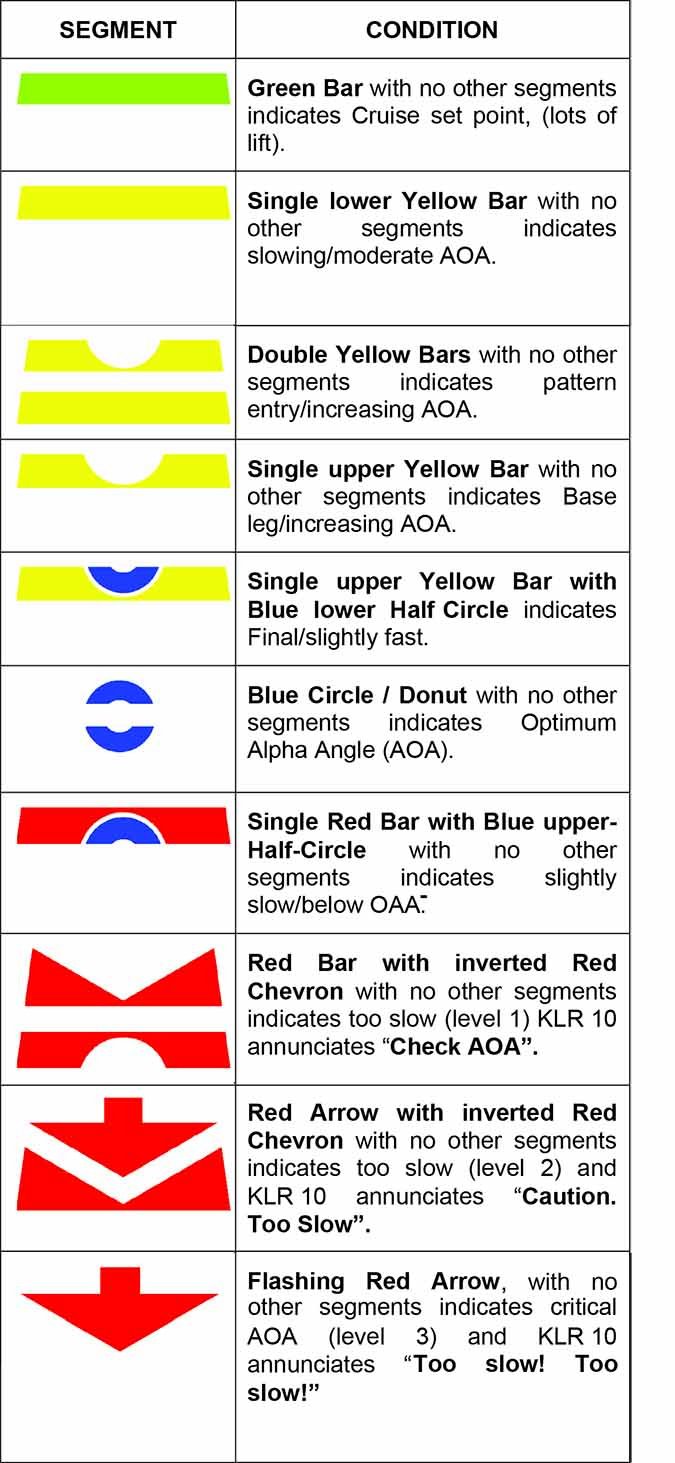
Stalling in the Age of the Angle-of-Attack Indicator
Angle-of-attack indicators, or AoA systems, arguably can be considered the first-born children of the FAA’s expanded policy allowing unapproved devices in certificated aircraft. By showing a product meets ASTM performance standards demonstrating it doesn’t interfere with other aircraft systems, a broad array of AoA indicators have been deemed eligible for advisory use in type-certificated aircraft.
The AoA indicators were first, but are not the last. The FAA has not only signed off on the use of, but issued supplemental type certificates allowing systems from Dynon and Garmin to take the place of TSO’d attitude indicators and other flight instruments as supplementary and for backup.
It was in February 2014—just more than 30 months ago—that the FAA announced it was simplifying design approval requirements for AoA indicators. The FAA’s step was expected by the industry, which had been working on the change through ASTM and the FAA, and the first units hit the market within the next month. There were multiple options available in April at the 2014 Sun ‘n Fun Fly-in in Lakeland, Fla.
Today, dozens of AoA options exist, many of them integrated into electronic instruments, primary flight displays and integrated avionics packages. The AoA indicator has been promoted as a tool for avoiding unexpected stalls since, unlike airspeed indicators, they reflect the angle-of-attack situation relative to stall angle at existing G loading. Airspeed indicators, conversely, can’t tell us when G loads raise the stall speed or lower the relative angle of attack for a stall.
Have AoA indicators been helpful in reducing loss-of-control accidents due to inadvertent stalls? Unfortunately, too little time has passed for meaningful data to exist. The latest Nall Report from AOPA’s Air Safety Institute reflects accident data from 2013, the year before the change. The latest statistics from FAA and NTSB similarly reflect 2014 information, which hardly present a complete picture, since the products were just becoming available.
The anecdotal evidence is generally positive—numerous pilots have remarked that they use their AoA more than the airspeed indicator during departures, pattern work and landings. But their success may be difficult to document, since most safety tracking institutions don’t gather such data.
Start Practicing
With loss-of-control (LOC) accidents at the top of the stats, and stall-related events a leading contender in LOC accidents, there’s simply no excuse for not making stall practice a part of your own recurrent-training regimen. When practiced and performed properly and safely, a stall series can help build confidence while enhancing recognition.
Recognition is the first step to avoidance, and avoidance is the ultimate step in preventing stall-related LOC accidents. You’ve got everything to gain from a little bit of regular stall practice—and a lot to lose in not practicing.
Dave Higdon is a Wichita-based aviation addict who writes about and photographs aviation subjects to fund a flying habit picked up during the Disco Era.


Forgetting about the rudder produces a slip from which it is hard to spin an aircraft. Appling too much rudder (ball of turn coordinator slides to outside of turn) results in too much yaw, a skid which could produce a spin if the aircraft becomes stalled.
I don’t agree that recovery from an accelerated stall requires leveling the wings. If the plane is banked, the nose doesn’t drop toward the earth – it drops in line with the longitudinal axis of the plane. Reducing the angle of attack in line with the longitudinal axis is what is required to break the stall. leveling the wings has nothing to do with it and is not required.
I totally agree. The recovery method described could induce a spin.