
One of the easiest and most worthwhile tasks pilots can perform to maintain their airplanes is changing an engine’s oil and filter. It’s allowed by the FAA under the preventive maintenance provisions of FAR Part 43 Appendix A, it usually doesn’t require special skills and typically can be accomplished by one person in less than an hour, depending on what’s involved in gaining access to the drain plug and filter mounting. If you’ve changed your car’s or lawn mower’s engine oil, there’s little else involved, and you already have the experience you need.
As the FAA requires, you should have “approved data” to ensure you perform this task using the correct oil and filter, and proper torque values. You’ll obviously need enough fresh oil to replenish the engine, a new filter, any gaskets or gasket lubricant required, a wrench to loosen the old filter and secure the new one, and some safety wire, along with safety-wire pliers to install it. Depending on the aircraft, a hose, drain pan and repository for used engine oil likely will come in handy. We’ve found draining oil from a warm engine has better results. You may also want to send out an oil sample for analysis, so you’ll need a kit from the lab doing the work.
Another form of engine oil analysis is to cut open the oil filter and examine what it’s trapped and prevented from recirculating throughout the engine. In addition to being a bit messy, this task may require an oil filter cutter. An oil filter cutter is preferred because alternatives like a hacksaw may contaminate the filter element before you can inspect it. The image on the opposite page is of a filter with a mounted cutter, ready to be cut open, while the one on this page shows a disassembled filter’s various components.
PROCEDURES
Depending on how your filter is mounted, you may want to ensure it’s drained of used oil before removing it. The engine on which we most often change oil has its filter mounted base-down, but not all of the oil in it drains out. That’s why we use a narrow flat-blade screwdriver and a hammer to poke a couple of holes in the top to facilitate draining. We then let the filter sit and drain for a while, often overnight.
When you’re ready to remove the filter, cut away the safety wire, and unthread it from its base. If it’s drained well, there may be no leakage. If not, have at least a shop rag ready to prevent it from leaking all over the engine compartment; catch pans also may be available for your engine/filter combination. Once the used filter is removed, install the new one, taking care to ensure you’ve met recommendations for lubricating its gasket and that it’s not cross-threaded. Follow manufacturer recommendations for tightening and then secure it with safety wire.
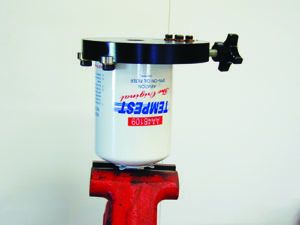
To cut open the filter, secure it and then install the filter cutter to its base as shown and tighten down the cutter’s blade. Rotate the cutter around the base a full turn, re-tighten the blade, rinse and repeat until the filter’s base is removed. Carefully—the can’s cut edges are sharp—remove the filter element and place it on a clean work space.
EXAMINATION
As the image on the opposite page shows, the filter element often is pleated paper, glued to metal ends to prevent it from collapsing in service. The paper pleats must be cut away from the metal ends to remove it, which in our experience is best accomplished with an old bread knife. If you do it right, the result is a single length of filter paper, folded accordion-style, as shown at right.
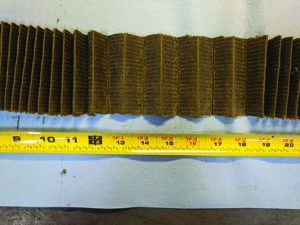
Using a pair of oil-resistant gloves, start at one end and open each pleat to see what’s deep down at the fold. Black, crumbly bits are carbon, which usually isn’t an issue as long as there are minimal amounts. You’re looking for the shiny bits and there also should be very few of them—one or two of no more than a millimeter in size per filter change is nominal, in our book. Anything more begs further investigation. Use a magnet to determine if what you find is ferrous metal, narrowing down your search for the culprit. Consult the oil analysis, if any, for additional details.
PAPERWORK
Once the engine is replenished with fresh oil and a new filter is installed, start the engine, run it up and shut it down and then inspect for leaks. If there aren’t any, there’s one more task to perform: the logbook entry. Because this is a preventive maintenance task allowed under FAR 43 Appendix A, a private pilot or better may perform it and may also make the logbook entry, including signature. If you fly a lot and change your oil a lot, a fill-in-the-blank sticker comes in handy, which you can create on your computer and print on label stock, and then stick into the logbook. Be sure to include the date, aircraft time, the type and quantity of replacement oil, and the new filter’s part number in your logbook entry. Then go fly. It’s that easy.


