
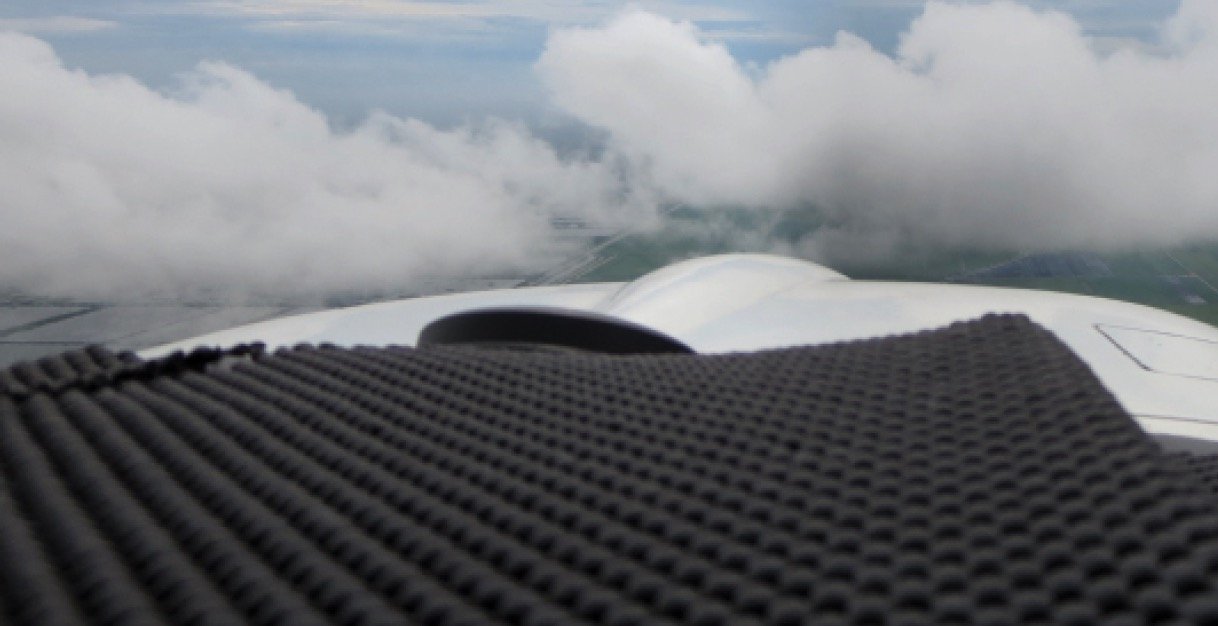
Flying IFR can get deceptively routine. Most of the time, it means taking off, climbing, cruising, descending, and an approach and landing—all along well-defined routes and usually in VMC. The majority of IFR pilots tend to fly the same routes and procedures again and again, to the point they might memorize communications frequencies and even approach minimums. It’s possible to be extremely proficient at the type of flying you usually do while letting other skills atrophy.
Yet when you accept an IFR clearance, you’re accepting the responsibility to perform any task or procedure in the Instrument Flying Handbook—perhaps in new and untested ways. What are some of the little-used IFR skills you may be assigned at any time, without much warning? What unusual tasks should you practice and have in your back pocket every time you fly IFR?
Unpublished holds
Whether it’s a GPS waypoint or an intersection defined by radials, distances or even bearings from ground-based facilities, the sky is full of imaginary parking places. It’s unusual, but not unheard of, for ATC to clear a pilot to hold at a fix lacking a published holding pattern, or even at a location not identified as a fix on any charts. You’re expected to know precisely what to do when told to hold, even if there’s no depicted holding pattern.

Only the most sophisticated flight management systems allow you to create an unpublished hold on your moving map. Everyone else—virtually all of us—will have to improvise to fly the hold. If you’re using VORs only to create this hold—unless you’re going direct to or from a VOR on the inbound course—you’ll have to fly the entire procedure by visualizing it in your head and doing what you can to stay in the assigned airspace. If the inbound course coincides with a radial directly toward or away from the VOR, you can spin the OBS to that radial as you cross the fix (if it’s not aligned already) and at least have the inbound course available on your CDI or HSI. The rest you’ll need to visualize, but at least you’ve got something to intercept each time you turn inbound. The sidebar on the following page encourages you to write it down, on a sticky note or in your EFB’s scratchpad, and offers some suggestions on how to do it.
Most IFR pilots these days, however, are flying with a panel-mounted GPS driving some sort of moving map display. When assigned an unpublished hold, you should draw the same picture and make the same notations on your drawing. Unless cleared differently, go direct to the holding fix using the GPS. As you cross it, turn to the hold entry heading you’ve determined, then engage the OBS mode on your GPS navigator. You’ll see a single, infinitely long line projecting from that fix on your moving map. Spin the course needle on your HSI or CDI and see that infinite line spin around the fix until it is on the bearing you want—in this case, 90 degrees, or due east of the fix. This line represents the inbound course in the hold, the path you’ll intercept each time you turn inbound in the hold. It’s a simulated radial from that fix; use it just like a radial from a VOR.
Since the hold is not depicted on the moving map, your autopilot has no way to know how to fly it. If you have an autopilot and want to use it to fly the holding pattern, you can use the heading mode instead of nav or GPSS.
Terrain/obstacle clearance
Let’s say you’re taking off from an airport that has rising terrain or manmade obstacles off the end of one or more runways. These obstacles may require you to climb more steeply than normal to remain safely above them. How steeply depends on groundspeed, because you need an angle of climb, not a rate of climb. This angle is called the climb gradient, and you can find it using instrument approach charts.
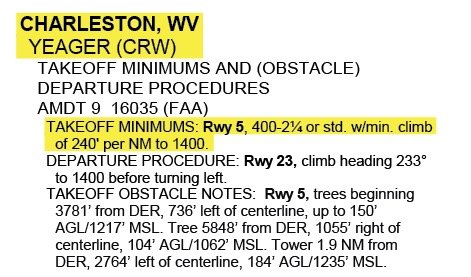
For example, let’s look at Runway 5 at Charleston, W.V.’s Chuck Yeager Airport (KCRW) in the sidebar on the next page. The approach chart for Runway 5 includes a “T” (for takeoff) in a small black triangle in the briefing strip across the top of the chart. This warns you of the need to look in the Chart Supplement (formerly the Airport/Facilities Directory). There, we find takeoff minimums for Runway 5 are a 400-foot ceiling and visibility of 2 sm if you climb using the standard climb gradient of 200 feet per nm. If instead, you wish to take off at the standard takeoff minimum, one mile visibility, you’ll need to climb at least 240 feet per nm until reaching 1400 feet msl.
Why do you need better visibility and a higher ceiling if you climb less steeply, or a steeper climb rate if you depart with lower visibility? So you can see and avoid obstacles visually in the early stages of your climb. The difference between 200 feet per nm and 240 feet nm doesn’t sound like much, but it is at KCRW.
Note that for most Part 91 operations, these takeoff minimums are not required. It’s up to you to decide whether it’s safe to take off under any given set of conditions, all the way down to zero-zero. That said, it’s a very good idea to research and adhere to published takeoff minimums even if they aren’t strictly required.
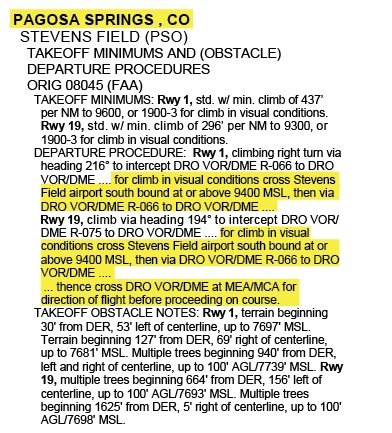
Sometimes—usually in mountainous areas—you’ll see an unusual notation in the Chart Supplement: “for climb in visual conditions….” This notation describes a terrain avoidance procedure used to climb visually while on an IFR clearance, until you are high enough to proceed on your cleared route. It’s called VCOA—a Visual Climb Over the Airport. Often a VCOA includes a route to follow after climbing visually over the airport to a certain altitude. Think of this as a Standard Instrument Departure (SID) that includes an initial visual climb to avoid steep terrain near the airport. The sidebar below has more details.
DME arc
The DME arc was a wondrous invention. Its purpose is to increase approach and landing capacity in IMC by permitting multiple airplanes to be cleared to fly the same approach procedure at the same time. This replaced “stacking” airplanes over a holding fix and shuffling them off the bottom of the holding deck one at a time to fly the approach. The DME arc is all but extinct, replaced by radar vectors and controllers’ ability to command turns and speed changes for spacing. A DME arc is essentially pilot-controlled vectoring for an approach. If the radar system goes down (and it does), or if local procedure calls for flying the arc, it would be a good thing if you know how. The sidebar on the opposite page shows you.
A DME arc is depicted as a smooth curving flight path at a specified DME distance from a facility. Although the charted arc is smooth, the reality is that you’ll fly a series of short, straight segments, ratcheting your way around the arc. These segments allow you to adjust your heading frequently as wind correction angles change along your curving flight path. At any given time your airplane heading should be nearly perpendicular to the specific VOR radial that would be centered at your current location.
You may be directed to intercept the arc anywhere along its path, but typically you’re cleared to an initial approach fix along the arc, then to follow the arc for the approach. Nearing the published DME distance, turn in the correct direction to intercept the arc—frequently, you’ll need to begin your turn about half a mile before the published DME. Assuming you were tracking direct to the VOR when you made this turn, the centered course needle will begin to fall behind the airplane. Spin the OBS to the next 10 degrees ahead of your current radial so the needle shows you have not yet reached that radial. Hold your heading until the needle centers, and then, in this order:
• Turn the heading bug (if you have one). Select 10 degrees in the direction of the VOR to give yourself a target heading for this small heading change.
• Turn the airplane. Make a 10-degree turn, to the selected heading.
• Turn the needle. Adjust the VOR or HSI to the next 10-degree radial ahead of the airplane.
Each time the needle centers, turn the bug, turn the airplane, and turn the needle, and continue around the arc. As you fly the arc, you must crosscheck the DME distance—you should remain within one mile on either side of it. If you are being blown away from the fix, turn a little more than 10 degrees inward next time. Watch the DME for an indication you are getting closer to the arc distance. If you are being blown toward the VOR, the next time the course needle is centered, simply continue on your current heading as you spin in the next VOR radial. Fly outward against the wind and watch the DME distance tick back up. The wind correction angle will change with every heading change you make around the DME arc, so you’ll need to experiment with heading changes each time you turn to remain on the arc.
If the DME arc is taking you to a VOR approach final approach course, and that approach uses the same VOR that you use to fly the arc, then you’ll have to keep the final approach course in mind to avoid flying through it. I use the #2 VOR in this case—with the inbound course already set up—so I can scan there to see when I’m coming up on the inbound turn. If a DME arc is taking you to an ILS or localizer, the approach chart will include what’s called a lead-in radial to indicate when to switch to localizer guidance and intercept it inbound.
The first time an instructor asked me to fly a DME arc to an approach in a GPS-equipped airplane I set up to do the procedures using the VOR as described above. It never occurred to me that the arc is part of the charted procedure and therefore would be in the GPS database. Sure enough, when I selected the approach, I was given the option of flying the DME arc, as well as my choice of the first fix at which I’d intercept it. The arc was painted on my moving map, turning to magenta as I crossed the initial approach fix. More miraculously, the autopilot could fly the DME arc and even automatically sequence to the inbound heading at the lead-in radial. Sure, I still had to manually select the localizer and tune the inbound course, but the autopilot coupled quickly to the change and flew the whole thing for me.
Unpublished holds. Climb gradients and visual climbs over the airport. DME arcs. These are just three of the skills you learn during IFR training but may almost never use routinely in instrument flight. But each is a task you can be called upon to perform at any time. Practice the unusual-for-you procedures so you’ll be ready if called upon.
Unpublished Holds
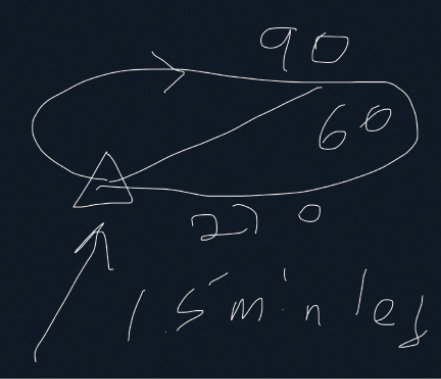
Presume you’re using a GPS with a moving map display and approaching the holding fix from the southwest. As you cross the fix, you’ll turn to a heading of 060 degrees and start a timer (you know, that clock you’re required to have to fly IFR). Hit the OBS button on your GPS box and spin the course needle around to create a 090-degree “radial” east of the fix. Fly outbound one minute, turn right to intercept the 090 “radial” you’ve created—that means a heading of approximately 270 degrees once inbound. Fly the radial to the fix, then make a standard rate right turn to the outbound course of 090 degrees. Start your timer when wings level or abeam the fix (that is, when it is directly on your wingtip). Fly 90 seconds, then turn right to intercept the inbound course. Repeat until cleared to leave the hold.
Visualizing the hold may be problematic. If ATC clears you to “hold east” of some fix, for example, draw a triangle on your kneeboard or tablet-based marking program (you do have some way to write things down at all times, right?) to depict the holding fix, then draw a line from that fix representing your inbound course in the hold. Note the inbound course, because that will become important later. Next, sketch in the holding pattern (holding-pattern turns are to the right unless directed otherwise) and label the outbound course. Now draw an arrow that represents the direction you’re currently flying, toward the holding fix. This tells you the type of pattern entry you’ll use. Determine the heading of your entry leg and write it down on the diagram you’re creating. If there are any other instructions you’ve been given, for example, “five-mile legs” or similar, write that on your diagram as well.
Obstacle departure Procedure (ODP)
You’re departing KCRW from Runway 5 in a Cessna 172 with a 10-knot headwind. Your groundspeed will be about 70 knots; a little interpolation suggests you need at least about 275 fpm climb to maintain 200 feet per nm to 1400 feet. That should be easy.
In a Beech Baron, with an initial climb groundspeed into the wind of about 120 knots, a minimum climb rate of about 400 fpm is necessary. This, too, should be easy—if both engines are working. Lose an engine shortly after takeoff and you probably cannot make either of these climb gradients in a piston twin.
Visual Climb Over the Airport (VCOA)
At right is an example of a VCOA. Departing IFR from Pagosa Springs, Colo. (KPSO), an airport with a field elevation over 7000 feet and ringed by nearby mountains exceeding 12,000 feet, you’ll need to remain almost directly above the airport until you’ve climbed to at least 9400 feet msl. From there, fly southbound to intercept the 066-degree radial inbound to the Durango VOR (DRO). Continue climbing to the MEA or MCA before departing DRO on-course.
On a warm summer’s day, that may take some time because you’re climbing to over 9000 feet. It’ll take good mixture management to get adequate climb performance in a piston airplane. Your climb rate also may be impacted further by orographic turbulence common even early in the day during summertime in the mountains.
There’s no specific climb pattern stipulated, but I’d simply remain within the confines of the airport traffic pattern, continuing to climb until I can depart the immediate airport area. Don’t forget to make radio calls on the CTAF so others in the pattern know you’re there.
Flying A DME Arc
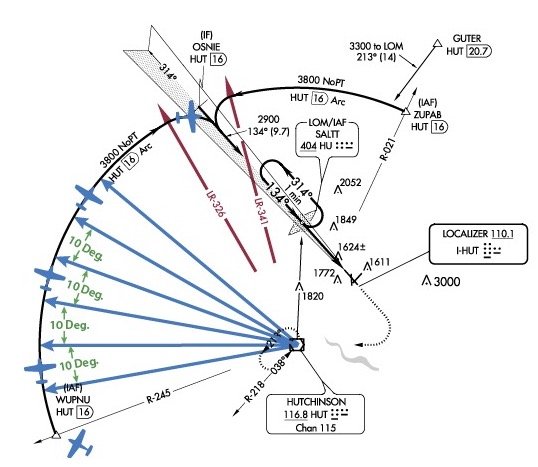
1. Intercept the arc. This often is at a published fix, but may also involve a vector to join the arc. You may have to “eyeball” the correct initial heading, which may be slightly away from the navaid forming the arc. Once the correct heading and distance from the navaid is established, rotate the OBS to the next ordinal 10-degree radial. Your autopilot, if any, should be in heading mode.
2. Change heading each 10 degrees. When flying a clockwise arc, the next radial will increase in value; it will decrease when flying counterclockwise. On crossing the next ordinal radial, advance the heading bug another 10 degrees and turn the airplane to that heading. Rotate the OBS another 10 degrees to the next radial. Repeat as necessary.
3. At the lead-in radial, change your primary navigation means to the approach’s navaid, usually a localizer or VOR, and begin the turn to the inbound heading. It’s your call on when to switch the autopilot to nav mode.
Tom Turner is a CFII-MEI who frequently writes and lectures on aviation safety.


