
One of the local GA airports in my area recently got an FAA improvement grant. They got new taxiway lights—real ones, to replace the old blue reflectors—and new paint for all of the surface and runway markings. The hold-short signs at the ends of the runway are now carefully mounted, bright red and well-lit at night. The taxiway signs are bright yellow or black. A couple of older pilots grumbled. “Now we look like San Francisco International Airport,” one said. He missed that old-time aerodrome feel. But he missed the point, too. A pilot from here flying into San Francisco International might be overwhelmed by its sheer size, but almost every sign and marking there would be familiar and the meaning known.
Lights and markings are important. My first instructor put it this way: “At night, make sure that you have blue lights on both sides,” he told me. “Otherwise you’ll be in the weeds.” That advice applies at SFO or ORD just as surely as it does at your nearby municipal strip. “And keep your nosewheel on that yellow line,” he went on. “That way, if you hit something, it’s not your fault.”
WHEN YOU START
As a student pilot, you rely on your instructor to guide you around your home airfield. A good instructor points out the paint markings and signs as you taxi, but your home field might not have received that big grant to improve the signage. Or you might be flying from a beautifully maintained grass strip that has no signs at all. That’s why you study up on markings and signs before you start cross-country flying.
Just like you can have a baseball game without a sacrifice bunt, you can have an airport that doesn’t have every possible sign. Did your first airport have a displaced threshold? Did it have an ILS critical area? Was it marked for land-and-hold-short operations? I haven’t checked, but even San Francisco International probably does not have every sign or marking known to the FAA.
As you fly farther and farther afield, you start to see more signs and more markings at the airports you visit. The FAA’s Advisory Circular AC 150/5340-1M, “Standards for Airport Markings,” lists all of the possible signs and paint markings, and is 175 pages long! And the FAA has many more pages devoted to a wide range of runway signage and marking resources.
Runway hold-short signs and markings are especially important. Nobody, including you, me and the FAA, wants to have stuff on the runway that doesn’t belong there. The consequences can be dire. Less seriously, a runway incursion can lead to the FAA telling you not to fly for 30 or 60 or 90 days.
OPTIONS
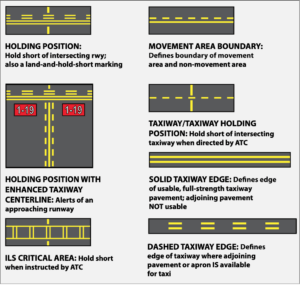
Some hold-short signs are only used on demand, like an ILS critical area, the surface near the glide slope or localizer antenna. An airplane near the glide slope antenna, or between the localizer antenna and the threshold, might bend the ILS signals. The critical area is marked by a red sign that looks like a runway hold-short sign, but it says “ILS.” The paint on the taxiway is different (see above). This hold-short line is marked by two parallel lines that go all the way across the taxiway, with pairs of lines aligned with the direction you’re taxiing.
According to Aeronautical Information Manual (AIM) paragraph 1-1-9, ATC should issue instructions to hold short of the ILS critical area when the ceiling is below 800 feet or the visibility is below two miles. Being there is not unsafe for you, but it can be unsafe for someone else.
ILLUSION ISSUES
Every pilot should be well-acquainted with the standard runway markings, including threshold markings, centerline, runway numbers and aim points. Instrument pilots need to understand much more. Here’s why.
Chapter 17 of the Pilot’s Handbook of Aeronautical Knowledge (PHAK, FAA-H-8083-25B) describes a long list of sensory illusions that are dangerous for pilots. Instrument training at every level talks about these, leading to the big conclusion, “Trust your instruments.”
Illusions are worse near the ground. Think about the transition from instrument flight to visual flight after an instrument approach. Remember the runway width illusion? (If not, see the sidebar on the next page.) When approaching a narrow runway, it can look like you are too high. In good visibility, you might be able to see objects on the ground, giving you a better idea of how high you are, but when the visibility is low, you can’t see the things that help you judge height.
That’s where AC 150/5340-1L steps in. It specifies “…runway threshold marking consists of a pattern of longitudinal stripes of uniform dimensions spaced symmetrically about the runway centerline.” These are the stripes parallel to the centerline that start near the runway threshold and end just before the runway numbers, as pictured in the image on the opposte page. They are generally 150 feet long and 5.75 feet wide, whether at San Francisco International or your local aerodrome. You can verify this by measuring the stripes using your favorite mapping application.
The number of longitudinal stripes indicates the width of the runway. A 60-foot-wide runway has three stripes on either side of the centerline; a 100-foot-wide runway has four, and so on. This makes a narrow runway look narrow, and a wide runway look wide, reducing the chance of illusion.
BUT THERE’S MORE
During instrument practice, you fly an instrument approach to a defined time or point and take off your hood. The visibility can be really good, so what you see is the airport just like you have seen it during your whole flying career. That’s totally unrealistic. My home field’s ILS runway is 9000 feet long, and after a practice approach you can usually see the grain elevator five miles away. That’s not very scary. In low visibility you won’t have a usable horizon. This isn’t so much of a problem because, wherever you go, all over the world, the runways served by low-visibility approaches look pretty much the same.
The simple act of painting all the runways the same is an amazing enhancement to IFR and night safety: You judge your pitch attitude and distance from the runway at SFO just like you do at home, because the runway looks pretty much the same.
The PHAK’s section on “How To Prevent Landing Errors Due to Optical Illusions” recommends using your altimeter to judge your height, and to use a PAPI or VASI if it’s available. They skipped one: land on an instrument runway with standard markings.
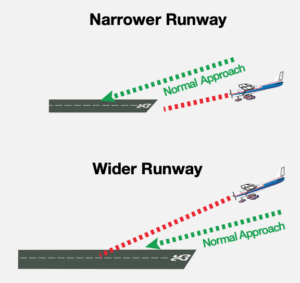
The FAA’s Pilot’s Handbook of Aeronautical Knowledge tells us, “A narrower-than-usual runway can create an illusion that the aircraft is at a higher altitude than it actually is, especially when runway length-to-width relationships are comparable. The pilot who does not recognize this illusion will fly a lower approach, with the risk of striking objects along the approach path or landing short. A wider-than-usual runway can have the opposite effect with the risk of the pilot leveling out the aircraft high and landing hard or overshooting the runway.”
Compensating for this illusion starts with understanding it exists, and then comparing the intended runway against your normal ones. Following the VASI/PAPI is never a bad idea. — J.B.
LET ME SEE THE LIGHT
The other day a student and I were approaching our home airport VFR in light rain. The flight visibility was six or seven miles. That’s enough visibility to be legal, but getting close to too low to be safe. We recognized a lot of landmarks and had a good idea where the airport was, but still weren’t seeing it. I asked the tower to turn on the approach lights (which they probably should have done anyway), and that made it really obvious where the airport was.
My airport has MALSR lighting: medium-intensity approach light system with runway alignment indicator. The FAA’s Aeronav terminal procedure charts identify the approach runway’s light system. Even the medium-intensity lights are very bright, and being a good neighbor usually means that the lights are off in the daytime unless requested. Or you can turn them on yourself at many airports using the pilot-controlled lighting system.
This system has a system of bright white strobes that flash in sequence, which looks like a ball of light moving toward the runway. Many pilots call it the “rabbit,” and asking the tower to “kill the rabbit” when they’re too bright is common.
Approach lights are great for finding the runway, but they are not enough to land. The relevant regulation is FAR 91.175, “Takeoff and Landing Under IFR.” This regulation says that you can only descend to 100 feet using approach lights alone. If you have an instrument rating, you may have practiced going that low when the visibility is good, but at minimum visibility 100 feet agl can be intense. You’re flying along in clouds or fog very close to the ground, and the fog starts to light up at regular time intervals. That’s the rabbit.
Visual indicators like VASI and PAPI are a big help in judging whether you are at the right height for your distance from the touchdown aim point. They work both day and night. But they have limitations. A VASI usually guarantees obstruction clearance for 10 degrees on either side of the runway centerline, out to four nautical miles. A PAPI’s limitations are tighter: 10 degrees on either side of the runway centerline, but out only to 3.4 nm.
Another set of lights that really helps are centerline lights, white lights spaced 50 feet apart until the last 3000 feet from the end. Touchdown zone lighting starts 100 feet from the threshold and ends 3000 feet from the threshold. That’s about half a mile, so at minimum visibility, you might not even see the end of the touchdown zone lights until you are well down the runway.
The FAA’s Pilot’s Handbook of Aeronautical Knowledge (PHAK) also has this to say about slope-related illusions: “Various surface features and atmospheric conditions encountered in landing can create illusions of being on the wrong approach path. Landing errors…can be prevented by anticipating them during approaches, inspecting unfamiliar airports before landing, using electronic glideslope or VASI systems when available, and maintaining proficiency in landing procedures.”
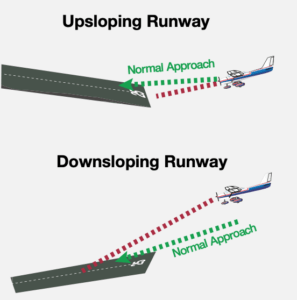
The PHAK adds, “An upsloping runway, upsloping terrain, or both can create an illusion that the aircraft is at a higher altitude than it actually is. The pilot who does not recognize this illusion will fly a lower approach. Downsloping runways and downsloping approach terrain can have the opposite effect.” — J.B
ODDITIES
Sometimes airports get clever with some: think of them as paint “hackers.” One frequent hack uses taxiway shoulder markings, which extend diagonally from the taxiway edge lights into the shoulder area. The safest way to think about them is to pretend that the shoulder is full of mud and weeds.
Airport operators use this marking to show airplanes where not to go. What happens if there is a soft spot in the pavement, or the pavement is loose enough that passing airplanes might send foreign objects flying? Paint a taxiway edge light around the bad area with the shoulder markings going into it. Airplanes should stay away from that.
MORE ODDITIES
While it seems that every situation that can happen on an airport surface is described in the AIM or the Standards for Airport Markings Advisory Circular, every airport is different, and you might see some kind of sign, light or paint that you don’t understand. When in doubt, ask.
And stay out of the weeds.
Jim Wolper is an airline transport pilot and mathematics professor. He’s also a CFI with single-engine, multi-engine, instrument and glider ratings.


