
Pilots tend to be pretty good at noting the airplane’s state, that is, whether it is high or low, left or right of target for instrument and visual approaches. Instructors are pretty good at teaching awareness of the airplane’s state, and pointing it out during flight training—“you’re left of course,” “check your altitude,” etc. In my instructional experience, however, most pilots are less aware of the airplane’s trend, and many instructors are not so great at teaching trend management.
Evaluating both state and trend is vital to precision flight—identifying not only whether you are high on the approach, for example, or even precisely on course and glide path, but also whether your current trend is to make a smooth correction, or to keep the needles centered, or maintain the PAPI’s red over white. Learning to detect and use both state and trend for all aspects of your flying is vital to being a smoother, safer and more precise pilot.
AN EXTREME EXAMPLE
Two died when the pilot of a Cessna 182 apparently lost control while flying the ILS Runway 16 approach into Panama City, Fla., on March 6, 2022. The ATIS reported a 200-foot overcast ceiling, visibility two miles, with light winds (six knots) almost straight down the runway (150 degrees).
The NTSB preliminary report, which is unusually detailed for a “prelim,” states: “Review of the ADS-B flight track in the final approach phase found that the airplane’s course deviated left and right from the initial approach fix to the accident site, which was 1.55 nautical miles from the runway threshold. The airplane’s altitude showed momentary descents and climbs while on final approach. The final ADS-B data point recorded the airplane at 75 feet mean sea level, 144 knots groundspeed, with a ground track heading of 130°.”
Figure 1, on the opposite page, from the NTSB’s preliminary report, depicts the accident site, the final approach course represented as the yellow line and the airplane’s flight track represented in the magenta line.
The controller advised the pilot of his deviations from the final approach course several times after the pilot was inside the final approach fix, as well as radioing a low-altitude alert when the airplane had descended well below glideslope. The pilot appears to have been constantly over-controlling left and right of course from his initial interception well outside the final approach fix.

WHERE AM I?
The part that almost all pilots seem to get right is evaluating whether the airplane is on-course and on-altitude or glide path. “I’m on altitude,” “I’m high” or “I’m low” is easy enough to detect—look at the altimeter or, if on an approach (visual or electronic glide path or glideslope, or a manual evaluation of glide path if no lights or needles are available to assist on final approach). “I’m on heading” and “I’m on course,” or “I’m left of course” or “right of course” are quick judgments made by looking at the directional gyro, heading indicator or horizontal situation indicator (HSI), the GPS “magenta line” or a display driven by a ground-based navigational aid.
The combination of vertical position relative to what’s desired (altitude/glide path) and horizontal (heading/course) compared to expectations is the airplane’s current state. As I said, however, detecting and evaluating the airplane’s current state is only one part of flying precisely.
WHERE AM I GOING?
In addition to knowing the airplane’s state, it’s equally important to know the airplane’s trend: “I know where I am now, but where am I going?”
Way back in the heady days when light-plane Loran navigation was new, I did a lot of private and instrument training. I’d show the difference between state and trend to my students with a quick exercise. I taught out of Sedalia in central Missouri, and the closest VORs were about 40 miles away—close enough for solid reception, but far enough away that a VOR radial is fairly wide. I’d have my student tune in the Butler or Napoleon or Columbia VOR and, once they identified the station and centered the needle, I’d have them fly a level, steep turn. Sufficiently distant from a VOR, you can fly a complete 360-degree turn and the needle remains centered, or very nearly so. My point: Having the navigation course or localizer centered (even using today’s GPS) tells you where you are at the moment, the airplane’s state. But it does not tell you where you are going, the airplane’s trend. Having the needle centered does not necessarily mean you are heading in the right direction. You could be 90 or even 180 degrees off-course and at that one moment you scan the indicator, you’ll see the needle centered.
The same is true with altitude or glideslope/glide path. The altimeter may be precisely on altitude or the glideslope perfectly centered, but if the vertical speed is not correct, then those values won’t stay steady very much longer. Detecting the trend—whether your attitude and vertical speed are such that you’ll remain on heading/course and altitude/glide path over time—is the second element of precision flying. But if you jerk the controls left or right, up or down, you’ll describe a flight path like that of the unfortunate Cessna 182 pilot. How do you manage trends for precision flight?
HOW FAST AM I GOING?
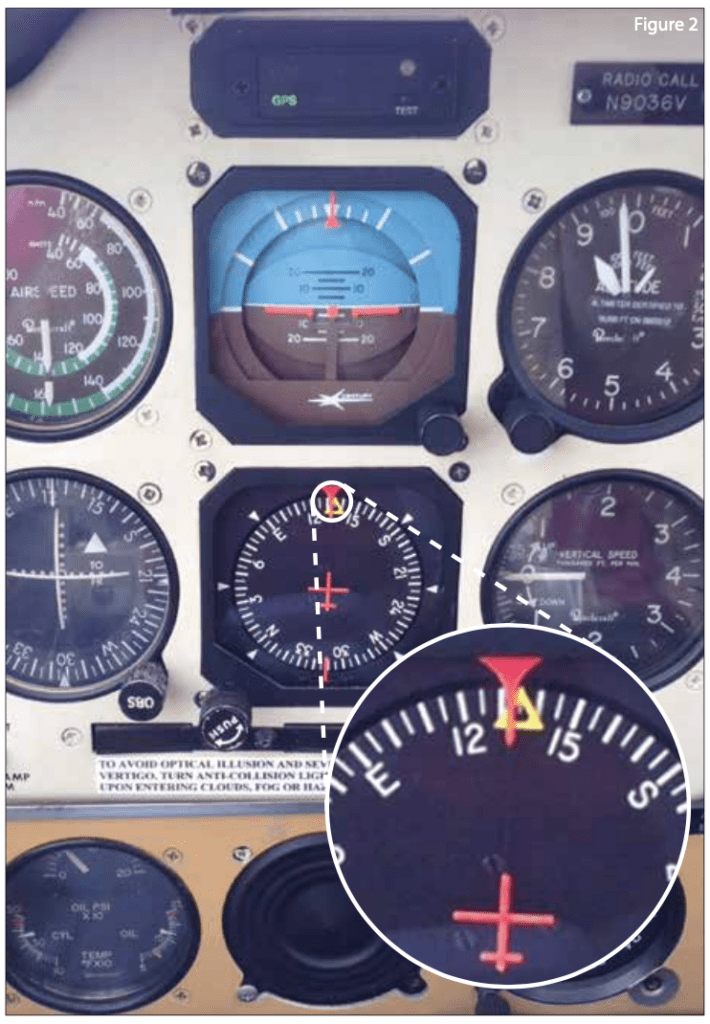
The third element is to maintain a heading and vertical speed that keeps the needles centered or the altimeter spot on, or input a small correction that establishes a trend in the right direction but at a controlled rate to avoid over-correcting. For example, it’s not a coincidence that most heading bugs are sized so their edges are about five degrees left and right of center (Figure 2, at left). If you are left of course, turn to the heading that is under the right edge of the heading bug, then hold that heading to establish a manageable trend to center the needle. Do not change the heading bug—you’ll return to the indicated heading once you’re back on course. If you’re right of course, turn to the heading under the left edge of the bug to establish your smooth trend to correct. As winds change, you may move the heading bug to what you estimate is a good wind correction, but after that still use the edges of the heading bug for corrections.
Many panels don’t have a vertical speed bug, but remember this: at a 90-knot groundspeed, the standard three-degree glide path requires a 500 fpm rate of descent. At 120 knots groundspeed, it requires 600 fpm. If your glide path needle is centered, maintain a 500-to-600 fpm rate of descent to keep it centered. In almost all light airplanes, your groundspeed will be in the 90-to-120-knot range inbound on the approach, at least in light winds. If you’re high on glide path, adjust pitch and/or power to increase vertical speed 200 or 300 fpm to reacquire the glideslope. Make a slightly steeper, controlled intercept at 700 to 800 fpm, a trend to reacquire glide path without overshooting. Once the glide path centers, return to the attitude and power setting that causes a 500-600 fpm rate of descent for a trend to stay on glide path. If you’re low, add power and adjust pitch for a reduced rate of descent, up to but not beyond level flight. Fly this shallower descent until the needle centers, then return to the pitch and power needed for 500 to 600 fpm.

CORRECTING
Watch video of a two-pilot crew flying an instrument approach and you’ll often hear the pilot monitoring (PM, the crewmember not actually flying the airplane) call out the airplane’s state, for example, “on course, one dot low,” or similar (some operations specifications would have the PM say “on course, correct up,” to avoid confusion about what the pilot flying (PF) needs to do). The PF would establish a controlled trend in the proper direction and replay aloud, “Correcting up” or similar. Although in the single-pilot world we’re almost always both the PF and the PM, I do it out loud as well: “Left of course, correcting right,” or “one dot high, correcting down.” Try it and see if it helps you become more controlled and precise.

TRENDSETTING
Whether you have the latest in electronic aids to analyze trends or are flying with a classic panel, whether you’re flying a long, visual final or flying an approach to minimums, constantly evaluating where you are, where you’re going and how quickly you’ll get there allows you to manage the airplane’s trend and command your aircraft with precision.
Tom Turner is a CFII-MEI who frequently writes and lectures on aviation safety.


