
Youve been in the clag for what seems like hours. The monochromatic gray outside the windows is broken only by the raindrops streaking up your windscreen and meandering back at a slower pace along your side windows. Youve turned off your strobes, but you can see the reassuring red and green glow of the recognition lights at your wing tips, reflected back from the thick grayness. Before takeoff, Flight Service told you a large low-pressure trough is blanketing the 288 entire area, with clouds, low ceilings and intermittent rain. You learned that your planned fuel stop an hour ahead is low IFR with no improvement expected and you know your filed alternate isnt looking much better. You are just getting ready to pull out some charts and develop Plan C when the unthinkable happens: Your engine hiccups, runs for a moment, coughs, and with a sudden shudder that wracks the entire airplane, quits completely. Who Ya Gonna Call? In the stunned silence that follows, you realize the sound of rain hitting the windscreen is louder than you would have expected. A millisecond later, you jump into action and run your emergency procedures checklist from memory. Nothing restores power, though, and the rest of the checklist can wait. Pulling back gently on the yoke to pick up a few precious feet of altitude, you reach over and select “NRST” (nearest) on your moving map GPS navigator. Obediently, it pops up the closest eight or 10 airports in order of their distance from you. Unfortunately, you realize the only airport within gliding distance is an uncontrolled, VFR-only field, lacking even an NDB approach. All is not lost, though, since, with only a portable or panel-mount moving map navigator, you 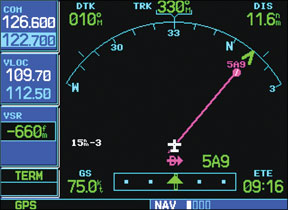
First, the disclaimer: The FAA makes no allowance for flying an instrument approach when there is no instrument approach to fly. The following instructions are intended only for use in an emergency that stands a good chance of getting you killed.
In other words, if the prop stops while you are in hard IMC, you have no choice but to land when you cant glide any farther. In such a case, you might find this article helpful. In fact, you might want to practice the suggestions here at a familiar airport with a safety pilot in good VFR conditions. If you are in hilly or mountainous terrain, or if you are unfamiliar with the local topography, these suggestions are meant to be followed only to maximize your chances of surviving what would otherwise be a fatal crash.
What You Need
The only equipment needed to fly such an approach is a GPS moving map navigator. The following instructions apply specifically to the GNS430/530; both the availability and specific procedures will vary when using other navigators. This is where intimate knowledge of and experience with your avionics will come in handy. If you dont have that, nows a good time-while youre sitting on the ground-to become more familiar with what your panel-mounted or portable “magic” can do for you.
In the event you find yourself trapped between the proverbial rock and a hard place described earlier, select “NRST” on your navigator and highlight the best choice you can find within gliding distance. If there is more than one airport meeting that criterion, a good rule of thumb is to select the one with the longest runway. If there is one within gliding distance that has an instrument approach, great, but if not, you still have the following options. (Dont forget: The closest airport might not be the better choice, since you may have to fly into a headwind to get there. In that event, wed definitely choose a downwind airport slightly farther away-Ed.)
Every navigator is, by definition, a “localizer”: Selecting an airport and pushing the Direct-To button will give you the course to steer and the distance to the airport runway you have selected, along with other information, including elevation and runway orientation. For example, lets say the airport you selected has a single runway oriented 4-22 and, for whatever reason, you chose Runway 22, perhaps because of the prevailing winds or because you are east of the airport and dont have the gliding distance to circle around for the approach to Runway 4. In any event, pressing the Direct-To button gives you the course to steer and a magenta line on the map page that leads directly to the runway.
Beyond “Nearest”
Unfortunately, this is probably not the course you want to fly. Flying directly to the midpoint of the runway, even at pattern altitude, will almost certainly find you still in the clouds and forced to fly a pattern based solely on your map page. What you really want to do is line up on the extended runway centerline, which will allow you not only to set up and stabilize your approach, but also to maximize your chances of avoiding cell towers, construction cranes and other obstacles. Because there is no instrument approach to this runway, your navigator will not give you that neat extended runway centerline: You will have to create it yourself.
Since you picked Runway 22, you know an extended centerline will have a heading of approximately 220 degrees. However, when you punched in Direct-To the airport, your navigator told you the course to fly is, say, 176 degrees. If you ignore this advice and make a right turn to approximately 250 degrees, you will be able to intercept the Runway 22s extended centerline on the desired 220-degree course at a 30-degree angle. This is closer to what youd be flying if it were actually a localizer. Since it isnt, and there is no needle to center, and there is no extended centerline or final approach course highlighted, the best way to locate this centerline is to note the position of your airplane on the moving map and extend the runway with your own imaginary line. In other words, eyeball it.
After you turn to your 250-degree heading, push the Direct-To button every few moments as you feel you are getting close to that imaginary line and the navigator will give you a new course to fly each time. As the course to fly gets closer and closer to 220 degrees, alter your heading gradually to intercept that magic 220-degree approach course, just as you would when the localizer needle starts to center on an actual FAA-sanctioned instrument approach. When the latest Direct-To course approximates 220 degrees, you will now have your own magenta-colored extended runway centerline and you will be aligned with the runway. Simply steering the compass course will take you down this line directly to that runway.
Another dimension
So far, our instructions have been relatively straightforward; select “NRST,” select the most suitable airport, select Direct-To and fly the airplane while you continue to try restarting your engine, completing the emergency checklist and making all preparations for an engine-out landing. But thats only half the story. How about the glideslope? The GNS430/530 have a vertical navigation page you can use to set up a Poor Mans glideslope.
Your next step is something you can do the next time you fly, since it will be a lot easier to do it then, rather than trying to set your navigator up during an actual emergency. Go to the last NAV PAGE (in the Garmin GNS430). There you will find the Vertical Navigation Page. Select Target Altitude. The default is 1000 ft above the selected waypoint. The waypoint will automatically be either the destination airport in an active flight plan, or the destination airport when Direct-To is selected. Change this default altitude to zero. You will also see a Target Distance window under the Target Position Label. The default value is four miles before the destination airport. Make this distance zero. By doing so, you have established a point on the runway that will function very much like an ILS glideslope, with three major differences.
First, the point from which the GPS is measuring distance and computing your descent is the airport reference point (ARP). At a single-runway airport, the ARP is the runways midpoint. For multi-runway facilities, the ARP is equidistant from all existing and proposed landing and takeoff areas. In the case of our single-runway, VFR airport, the GPS will reference the runways midpoint.
The second difference is that you will have no glideslope to follow on your navigator. Interestingly enough, the Vnav function of Garmins GPSMAP 295 portable navigator actually has a blue line extending horizontally across the compass rose, providing a synthesized glideslope to center.
Which brings us to our third difference. Keep in mind that, while we have established a glideslope by definition, there is an important difference: An ILS glideslope provides safe obstacle clearance, while the navigator, used in this manner, provides only a constant descent to the runway. There are no step-down fixes or course jogs to the FAF. That is why knowledge of the terrain around the runway is so important. A three-percent glideslope down an extended runway centerline may work for many, if not most, VFR-only airports, but in mountainous terrain, in the absence of radar coverage, the risks are so great as to be acceptable only if the alternative is almost certain death.
Also remember that both the portable and panel mount Garmin navigators automatically cease giving Vnav guidance 500 feet above the target altitude. Even if you break out at 50 feet with mile visibility, you still have a few seconds to adjust before you touch down. In an absolute worst-case scenario-darkness, unlit runway and zero-zero visibility-all may still not be lost.
The Worst Case
Some wag once made the observation that, “Its not speed that kills, its the sudden stop.” If one fails to fly the airplane following a malfunction of any kind in IMC, one will probably end up impacting the earth in a nearly vertical position, with an absolutely guaranteed loss of life to all onboard. If one is able to fly the aircraft to the ground, however, a vastly different outcome is possible.
Again using my Warrior as an example, a “best-glide” vertical speed of 720 fpm equates to 12 feet per second, which is just over seven nautical miles per hour. My plane has the energy absorbing S-shaped seat supports that will collapse under impact and absorb some of the G force of a vertical collision. I suspect that the fixed gear will be driven upwards through the wings and absorb additional shock. An engineer can probably tell you pretty closely the G forces acting on the human body decelerating from 7 mph to zero in approximately two feet. This is certainly a very survivable event.
We are then left to deal with the forward motion of the aircraft, hopefully no more than 60 or 65 knots at the time of impact with the ground. If there is a brick wall, large tree, cliff face or other immovable object on the ground right at the point of impact-the sudden stop-the deceleration rates horizontal component is vastly higher than the vertical, and will probably cause serious injury or death. If one is fortunate enough to land on a runway or in some other wide-open space, the plane can slide and dissipate energy through friction until it finally stops. In such a case, post-crash fire is the over-riding concern. Absent fire, the planes occupants will probably walk (or run) away from the crash.
This morbid discussion is intended to make a point. In an emergency, every attempt should be made, not just to fly the airplane, but also to fly the airplane to a location that maximizes the chance for survival of those onboard. If you are fortunate enough to have, and use, a GPS moving map navigator, it can be of immeasurable help in guiding you to a safer place, even if that safer place is a crash landing.


