
Axioms about landing abound in aviation. Sayings such as “flying is the second greatest thrill known to man; landing is the first” and “any landing you can walk away from is a good landing” are among the most popular. You also hear colorful 288 language applied to the landing process: A greaser is good; crow-hopping, porpoising, groundlooping are bad. And then theres the old adage proclaiming there are three simple rules for a smooth landing, but no one knows what they are. All of which might be true, but we can get consistently satisfying touchdowns by making several adjustments to our normal landing procedures. For example, in preparing for the Private pilot checkride, students repeatedly practice landings with names such as normal, short field, soft field and simulated engine-out. In between checkrides, however, pilots can fall into a rut, performing the same faulty approaches and making the same landing errors over and over again, sometimes depending on power to save the flare and touchdown. Unique or unusual circumstances that may require specific techniques notwithstanding, lets cobble together a hybrid landing methodology comprised of key elements drawn from the different types of landings we practiced as students. The main components of our “new normal” landing will include speed and altitude control, precision, the landing attitude and pilot involvement. Speed And Configuration As often as possible, lets actually treat the approach and landing as if it were (or could become) an engine-out scenario. To that end, fly the pattern the entire pattern, in fact, unless the situation dictates otherwise at the airplanes best glide speed. In general, smaller airplanes like the Cessna 150 will have only one best glide speed; larger airplanes with broader operating envelopes such as the Cessna 210, on the other hand, may have a range of best glide speeds, depending on weight. Set the appropriate glide speed as follows: Use pitch and trim as the primary airspeed controls. Naturally, that relegates power as the primary means through which well control our altitude profile. Suffice it to say that this assignment of pitch and power is consistent with the immutable laws of aerodynamics vis–vis the power curve. More importantly, this is exactly how operations are conducted in the most critical of landing environments (e.g., landing on the wobbling deck of an aircraft carrier, landing a floatplane on glassy water, landing on short, backcountry airstrips and after an engine failure). “Airspeed control” always has two components: the number we see on the airspeed indicator (ASI), and the corresponding attitude of the airplanes nose relative to the horizon. In the practice area, spend a few moments memorizing the pitch attitude corresponding to these two configurations: trimmed at best glide speed while maintaining level flight (for example, 75 mph and 1900 rpm in a Standard Decathlon), and trimmed at best glide speed while descending with idle power. As long as the flaps remain up, youll be operating within these pitch attitudes in the pattern. Once youve correlated pitch attitude with airspeed, spend more time managing your pitch attitude look outside! and less time chasing the airspeed needle. This will reduce the magnitude of airspeed deviations, improving the accuracy of your judgments during the approach. Glidepath control With pitch attitude/speed under control, well manage the approach profile with power, flaps (if available) and slips (operating limitations permitting). Well steepen 288 the approach by reducing power, adding flaps, increasing our slip angle or any allowable combination of these. Conversely, well shallow the approach by adding power and/or reducing our slip angle (if flaps have already been deployed, dont retract them unless executing a go-around). Since were thinking in terms of an engine-out approach, lets strive to intercept and fly along the airplanes glidepath. Thus we shouldnt change power, flaps, or slip angle unless we perceive ourselves to be above the airplanes glidepath. Force yourself consciously to visualize the approach. Look outside, assess the situation and update your judgments continuously. Repeatedly ask yourself, is a power reduction appropriate now? How about adding some flaps? Maybe entering a slip? If you judge the answer to be “no,” dont make any configuration changes yet. Wind, other traffic and the size of the pattern youre flying also will be factors to consider. Youre on the wrong side of the airplanes glidepath if you must add more and more power as you get closer to the runway; youre on the correct side if you must continually reduce power, add flaps and increase slip angle as you get closer. At some point in every approach whether its downwind abeam the numbers, or along the base leg, or somewhere on final put yourself in a position where you can glide to the runway. Then do it reduce the power to idle and coast on in. Youll realize several benefits by integrating elements of the engine-out landing into your “new normal” approach: 1. Simplicity and familiarity (just one key airspeed to fly in the pattern, while getting used to seeing out of the corner of your eye that speed on the ASI). 2. Improved accuracy in judging the approach, especially when you focus on the appropriate pitch attitude. 3. Elimination of mechanical actions in the pattern in favor of making changes based on what you perceive to be necessary. 4. Slightly higher, quieter approaches. Hitting Your Mark For our precision element, lets draw from the short-field landing. Selecting appropriate aim and touchdown points are essential on short fields. Thus, as part of our “new normal” landing, lets consciously choose these points. The touchdown point is where we would like the wheels (or floats) to contact the surface; the aim point, by contrast, is the point over which we have fully arrested the descent and where the airplane now begins to skim along in ground effect. The relationship between aim point and touchdown point not only varies from airplane to airplane, but it also depends on the wind. All other things being equal, a low-wing airplane will tend to float farther in ground effect than its high-wing counterpart; hence, the aim point will be a bit farther away from the touchdown point in the low-wing airplane. Similarly, the aim point will be farther from the touchdown point when landing in calm conditions than when landing into a strong headwind. And faster approaches flown in heavier airplanes will usually require more distance between the aim and touchdown points than slower approaches flown in lighter airplanes. Its not uncommon for pilots to fixate only on the touchdown point; realize, however, that precise landings hinge on the aim point. Pick the wrong aim point (or dont pick one at all) and youll more than likely miss the intended touchdown spot. Failing to arrive at a properly chosen aim point with airspeed and rate of descent under control means youll miss the intended touchdown spot. Manage power, flaps and slip to arrive at your aim point ready to flare. The Landing Attitude Maintaining a nose-up attitude throughout the touchdown and rollout is crucial to the success of a soft-field landing. Lets adopt this sight picture as our “new normal.” A few of the benefits of doing so include: 1. Increased aerodynamic braking during rollout (were exposing more of the airplanes belly to the relative wind). 2. Minimal-to-no weight on the nosewheel at touchdown and during rollout (this is typically the weakest part of the undercarriage in tricycle-gear airplanes). 3. Softer, slower touchdowns (who doesnt desire this?). Adopting this nose-up sight picture as part of your standard landing will also make the transition to other types easier. The soft-field attitude observed in tricycle gear airplanes, for example, is analogous to the three-point landing attitude in many tailwheel airplanes. It is also comparable to the attitude required to land a floatplane safely. Furthermore, holding the control stick or wheel aft throughout the rollout is good technique, regardless of the undercarriage. It also minimizes the potential to porpoise on landing. Moreover, youll be presenting a much prettier profile to other pilots, who are genetically predisposed to judge landings. Pilot-Induced Dither Rather than wasting nervous energy wiggling those all-but-useless ailerons during landing, practice wiggling the rudder instead. In other words, lets intentionally introduce some Pilot-Induced Dither (PID) into our landings. This is different from a Pilot-Induced Oscillation (PIO) as can be demonstrated in the practice area: In level flight, slowly, smoothly apply up to one-third of the available left rudder. Now switch and apply up to one-third of the right rudder. Return the rudder to neutral. The nose of the airplane swings left, then right, then left again in response to these lumbering inputs. This is PIO. Next, wiggle the rudder back and forth using several small-amplitude, high-frequency movements small enough and fast enough that the nose of the airplane does not deviate from its original heading. If the nose moves, your rudder inputs arent small enough and fast enough. Move the rudder such that the airplane does not respond. This is PID. Try dithering the rudder during landing lightly but quickly wiggle your feet during the flare, touchdown and rollout. Again, the objective is for control inputs so small and quick that the airplane does not respond but continues straight down the runway. Even though were dithering the rudder, on average it will be neutral when landing into a direct headwind. Over time, the dither should become nearly imperceptible. If you develop the ability to dither the rudder as described, youll notice the following: 1. Your landings will be softer, smoother, and straighter than before, whether youre flying a Cessna 150 or a Pitts Special. 2. Youll be more relaxed during landing (you have to be relaxed in order to be able to wiggle your feet throughout the landing; pausing the wiggle is a sign of tension). 3. Control inputs in the flare and touchdown will become smoother and more precise. Pilot Involvement Satisfying touchdowns require the pilot to be an active participant. Fixating, bracing for impact, tensing up on the controls and holding the breath are not uncommon. Unfortunately, these involuntary acts often lead to rougher, less-controlled landings. Two aspects to focus on are what youre seeing and what youre doing. Seeing: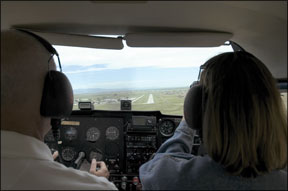
If the sight picture is off, make small corrections to fix it. For example, if your speed has increased, youre most likely high on the approach and diving to compensate. Return the nose to the correct pitch attitude. Adjust the profile by reducing power, adding more flaps and/or increasing your slip angle. If speed is decaying, youre most likely below the correct glidepath and pulling to stretch the glide. Lower the nose to the correct pitch attitude. Simultaneously increase power and/or reduce any slip angle to return to the correct profile.
In the roundout and flare, its best to keep your head locked forward. Move only your eyes to gather information now. Your straight-ahead vision yields pitch attitude information (elevator) and heading information (rudder). Your peripheral vision yields height-above-the-runway information (elevator bleed off airspeed to hold the airplane off the ground) and wind-drift information (ailerons).
The trick, of course, is to keep the airplane parallel to the runway centerline with the rudder (pilots of unmodified Ercoupes are excused); cancel any sideways drift with aileron; play with the pitch rate so the airplane simultaneously maintains the soft-field landing attitude and holds a constant altitude above the runway for as long as possible before touching down.
Doing:
“Play” is the operative word regarding rudder and elevator actions. Dont sit there waiting to react to something the airplane does. Be proactive on the controls. Make the airplane follow your lead. Your control movements should be relaxed and fluid. Unfortunately, tension on the controls often results in the jerky over-corrections that contribute to ballooning, crow-hopping and other problems. Oftentimes, pilots will instinctively play too much with the ailerons to the detriment of elevator and rudder movements. Keep in mind, however, that the ailerons typically and rapidly become the least responsive of our controls during landing. The elevator and especially the rudder, by comparison, remain effective long into the touchdown and rollout.Dont be shy about being an active participant throughout the landing process. If any approach isnt working out the way you want it to, go around. Experiment with the above recommendations one at a time. Integrate them as your proficiency and comfort levels increase. And enjoy smoother, more controlled landings as your “new normal.”


