
by Pat Veillette
On September 3, 2000, a Piper PA-32R-301 was headed southwest near South Kingstown, R.I., level at 8000 feet in IMC. The pilot was instructed to change frequencies; after he checked in with the next sector, no further transmissions were heard. After a series of altitude excursions, the airplane then made a descending right turn with rates of descent up to approximately 16,000 fpm. The wreckage path was 1900 feet in length, clearly demonstrating an in-flight break-up from overstressing the aircraft.
Like most light general aviation airplanes, the PA-32 was equipped with a vacuum-driven artificial horizon and heading indicator. The NTSB determined that the factors in the accidents probable cause included a sheared coupling on the vacuum pump, the pilot/owners failure to ensure the coupling was changed per the manufacturers recommendations, a lack of regulatory requirement to ensure compliance with the manufacturers recommendations, and a lack of regulatory requirement to ensure installation of a suitable backup system.
Partial-Panel Training?
Pilots of light GA airplanes are trained to put such vigilance and trust in the primary attitude instruments that a malfunction can quickly lead to loss of control. A review of available NTSB accident data from 1983 to 2000 revealed that vacuum pump/system failures either caused, or were factors in, 30 accidents, resulting in 65 fatalities. The NTSB states that, A complete pneumatic system loss is noticeable immediately on the gauge or within minutes by incorrect gyro readings. A slow deterioration may lead to sluggish or incorrect readings which may trap a pilot who is not constantly cross-checking all instruments-including the vacuum or pressure gauge.
The initial lack of recognition of conflicting instrument indication is problematic in GA. Light aircraft generally dont have reliable warning systems to get the attention of the pilot and warn of the possibility of a failing instrument. Furthermore, our initial flight training only reinforces this problem even more: During initial instrument training an instructor simulates a partial panel scan by covering the attitude indicator. Even with an adequate warning system, however, the vast majority of pilots are woefully lacking in partial-panel skills.
Unfortunately, the aviation industry has done itself a gross disservice over the years by failing to emphasize partial-panel skills for Instrument-rated pilots flying light aircraft. As the accident summarized at the beginning of this article highlights, most pilots cannot successfully recover from a vacuum or pressure system failure even if they quickly recognize it.This is especially true in a high workload environment, like immediately after taking off into IMC. Obviously, the chances of finding out that your instruments arent properly working after youve just entered a low overcast are rather small and the odds are stacked in favor of a fatal ending.
The Need To Preflight
There is no better time to check your flight instruments and vital systems than on the ground. Do I perform the instrument check before every flight, even if the sky is severe clear? Absolutely. Is this being just a bit too obsessive? Maybe, but let me give you some real life experiences. Out in the western U.S. where I live, flight visibilities are often in excess of 100 miles in the summer. Nevertheless, Ive been caught in haze from wildfires over two states away that become so thick that I had to resort to instruments even though technically the conditions were still VFR. Sometimes Ive had a flight delayed until darkness, or met with unforecast weather. Ive had all of these happen to me out in the real world, and they can happen to you, too.
Of course, these were flights when I didnt expect to go on the gauges, but performed a thorough pre-flight of the instruments and their systems, anyway. Failing to perform such an inspection when you know youll be on the gauges is either foolhardy or stupid, Im not sure which. Perhaps both. The sidebars on this page and opposite detail both external and in-cockpit inspections you should be performing before departing into instrument conditions.
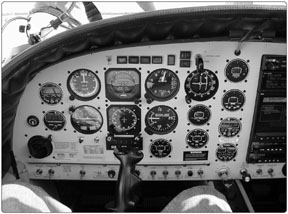
Setting Up Your Cockpit
Unless youre flying an all-electric airplane like a new Cirrus, your gyros or powered by either vacuum or pressure pumps driven by the engine. After engine start, the pump will begin turning-often at three times the speed of the propeller-providing a source of suction to spin the gyroscopic vanes within your attitude and heading indicators. The vacuum pump creates a negative pressure that is drawn through vanes, causing the gyroscope to spin at high speeds. Even so, the gyros need to spin at sufficient speeds in order to be stable, and with the relatively low power settings for engine start, warm-up and taxi, it will take a few minutes for the gyroscopes to spin up to speed.
The suction gauge indicates the amount of pressure produced by the vacuum pump and can give you an overall indication of the vacuum systems overall health. If it reads too low, the pressure drawn through the gyroscopes may be insufficient to keep them stable. This can be caused by clogged filters, something that is common in aircraft operated in dusty climates or where smoking is allowed. Low vacuum pressure would cause sloppy and unreliable gyroscopic instruments and can be a key indicator of looming failure. The schematic diagram (see sidebar) describes the vacuum systems components and how they work.
Once youve obtained the local altimeter setting, check that your altimeter indicates within 75 feet of field elevation. You can find the field elevation listed for the airport in a number of places, including approach plates and the FAAs Airport/Facility Directory. Some aircraft have an alternate static source mounted inside the cockpit for use if the static ports become blocked. As part of an IFR preflight, open the valve, check for a slight jump in the three pitot-static instruments-the airspeed indicator, altimeter and VSI-then close the valve.
With all of this complete, its always a good idea to set up the avionics before taxiing. Doing so allows the engine(s) that much more time to warm up, the gyros have additional opportunity fully spin up before the airplane moves and youre not going to be distracted while taxiing, doing a run-up or performing the before takeoff checklist.
With your clearance in hand, nows a good time to pull out a chart and set up the radios for the departure. Everyone has their own preferences regarding what goes where; just make sure that, if the #1 Nav is the one you use to get the initial fix, its set to take you there. If you have a high-end GPS navigator that accepts flight plans, its always a good idea to enter your full route before leaving the chocks.
Finally, your clearance may include a published departure procedure (DP) and this DP is probably in your systems database. Its always a good idea to select and activate the DP-or any other published instrument procedure-well before you need it.
Finally, dont forget the transponder or the communications radio. Regarding the latter, again, everyone has their own preferences-ground control and the tower frequency in the #1 flip-flop radio, for example, with the departure controller in the #2 comm. No matter your preference, try to set up the avionics early in your before-takeoff activities, not later.
Taxi/Takeoff Checks
While taxiing, verify the gyros react properly. For example, during turns, the attitude indicator should not bank more than five degrees and the pitch indication should remain stable. An attitude indicator precessing more than five degrees during a simple turn on the ground is definitely worth concern.This isnt an attitude indicator you want to take into the clouds until it is corrected.
As you taxi, check the compass. It should be full of fluid and swinging freely. If on a taxiway that parallels the runway, check to see that it indicates the proper direction.
The heading indicator should turn with the aircraft and hold known headings. Both the heading indicator and the compass should show the same known headings. Gyroscopic precession occurs quite often in heading indicators. This is easily detected by the heading indicator drifting within a short time. In general, the FAA considers three degrees of heading drift within a 15-minute period to be acceptable.
The turn coordinator is generally powered by the electrical system. It is deliberately designed this way to provide some redundancy in case of a vacuum system failure. The turn coordinator (or turn indicator) should also indicate a turn in the proper direction and the ball should slide to the outside of the turn.
During the run-up, check that the suction gauge is now within limits. The alternator or generator must be within limits. You certainly wouldnt want to take off with a failing electrical system.
If there is a possibility of entering clouds with temperatures below 10 degrees C, then you have the chance of airframe ice accumulation. If your aircraft is equipped with de-icing or anti-icing equipment, this is good time to test those systems. Exercise the de-ice boots to make certain that all of the chambers inflate in the proper sequence. The only time that testing your boots isnt advised is when the temperatures are extremely cold, close to -40 degrees C, because at these temperatures the boots are extremely stiff and may shred when inflated.
Just prior to takeoff, turn on the pitot heat. Upon taking the runway, do a final check of your heading indicator and magnetic compass against the runways direction. Not only will this serve as a last check for the stability of your heading indicator, it will help you double check that you are taking off from the correct runway. Nows a good time to activate lights, transponder, strobes and any other equipment you need for takeoff.
During the takeoff roll, check that all instruments are operating as they should prior to liftoff or proceeding into the clouds. Pay particular attention to the airspeed indicator. Remember, there is an embarrassing number of pilots who have forgotten to remove the pitot tube covers during the pre-flight walk-around. Also, small insects can crawl deep into the pitot tube and associated plumbing, blocking the system. These are two relatively common causes that would prevent the airspeed indicator from working, neither of which you want to find out about at 500 feet in the clag.
Conclusion
Planning and forethought are key to ensuring your airplane is ready to safely operate in IMC. Good maintenance and a healthy respect for what can go wrong wont hurt a thing, either.
Also With This Article
“The IFR Walk-Around”
“Pre-Flight Panel Checklist”
“Vacuum System Schematic”
-Pat Veillette is an aviation safety researcher who flies transports for a living.


