
by Ray Leis
As surely as your next annual inspection or flight review, spring is coming soon, to an airport near you. Are you ready? Is your airplane ready?Or are you simply going to kick a tire, light the fire and launch? After a few long, cold, dark months of sitting, there are some things you might want to consider before getting airborne again. And your airplane could probably use some attention, too.
Dont believe it? Consider the pilot of a Mooney M20K who didnt think leaving his airplane out all winter would be an issue. On March 11, 1998, in Klamath Falls, Ore., he became convinced otherwise.
According to the NTSB, the Mooney had been parked outdoors during the winter months, and had not flown much. Three days prior to the accident flight, the pilot did fly the airplane, finding a puddle of water (smell and taste tested) under the aircraft low point. He found an estimated total of a gallon of water in the two left tanks and drained them. The flight was uneventful. On the day of the accident, he pre-flighted the aircraft and drained another half cup of water from the left tanks.
The first leg of the trip was flown at 12,000 feet msl and the airplane was then refueled. After takeoff, the flight was cleared to FL240, where the pilot later reported the temperature as -27 degrees C. Soon, he noticed a little engine roughness. A number of trouble-shooting procedures were performed, without success. Approximately 5-7 miles from the Klamath Falls airport, the engine quit. Executing a forced landing under dark night conditions, he later stated that in the end, I just descended into total blackness. Subsequent inspection revealed several ounces of water remaining in the left wing tanks. No other anomalies were noted.
While water in the fuel system certainly should be a concern, the rest of the airplane needs a close inspection. Here are the top five things you need to worry about.
Overall Condition
Before grabbing a Phillips screwdriver and removing inspection plates and cowlings, start by pulling off all cabin covers, cowling plugs, pitot-tube sleeves and window shades. Put all that stuff aside, open all the airplanes doors and inventory the cabin, baggage compartment and any other nooks and crannies. Pitch any outdated charts, especially instrument charts and approach plates; you can get new ones at the FBO for not much money at the same time you ask if youve moved up on the hangar wait-list.
Do a thorough walk-around. Are the struts properly inflated? Probably not, since the cold winter weather contracts the strut O-rings and metal components at different rates, allowing the air or nitrogen in them to escape. Same thing with tires and tubes. Get your mechanic to pump up the struts with the recommended gas; you can put air in the tires yourself.
Move all the control surfaces through their full range of motion. Listen for any noises from the control linkages and be alert for any binding or uneven travel.
As you do your walk-around, carry a can of aviation-quality spray lubricant. Hint: The WD-40 you got at the Home Depot on the way out to the airport isnt aviation-quality. Use LPS or something similar and apply it liberally to aileron and rudder hinges, gear-door pivot points and any exposed piano hinges. Your objective here is two-fold: to displace any water that has worked its way into these areas and to get some lubricant in there.Gently work the hinge or control surface back and forth as you spray the lube. Refer to your airplanes shop manual for recommendations on any special lubricants. Dont forget to verify correct control movements and that the yoke does what it should when you move the surfaces.
Oh-during your walk-around, you checked the pitot tube and static system source(s) for blockages, right?
The Engine Compartment
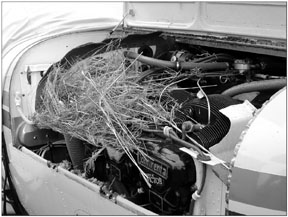
First, just bite the bullet and get the cowling(s) off. Yes, any bird nests must be removed to prevent fires. But thats not what were here for. Get a flashlight and aim it into all the dark, secret places Lycoming, Continental and your airframe manufacturer created. Youre looking for cracks, lost tools and rags, loose fasteners and anything else that doesnt belong. Use an inspection mirror, if necessary.
Get a helper and have him or her slowly push and pull the engine controls through their full range of movement. Use the spray lubricant to loosen up any linkage pivot points on the carburetor or throttle body. Check both for security while youre at it, and tighten any induction-system clamps. Check the crankcase breather tube for blockage.
Security, cleanliness and no blockages are what youre looking for in the air filter. Some types of filters are pleated, and they can develop tears and rips at the pleats. Again, using your helper, verify that the engines alternate air system actuates as it should.
Drive belts on alternators and generators also deserve some attention: Are they tensioned correctly? In good overall condition? Check electrical connections at the alternator/generator for security.
Of course, youll check the oil level and the log books to decide if this is a good time to change it and the filter.
Electrical System
Battery boxes should be checked carefully to make sure that the battery is secured, and that the terminals and drain lines are not corroded or plugged with ice. Clean up any corrosion in the battery box and make sure the cables are secure.
Unless you have a sealed battery, get some distilled water and bring the electrolyte levels up to the manufacturers recommended level.
Next, ask your helper to activate various lights and other circuits, individually, as you walk around the airplane. Regardless of whether you plan to fly at night, nows a good time to check all the position and landing/taxi lights for operation. Activate the rotating beacon and the strobe systems.Test the stall warner, also, as well as the pitot heat and any other electrical systems on the airplanes exterior.
Cabin And Panel
Once youve finished with the airplanes exterior and engine compartment(s), its time to climb in and assess the cabin and the instrument panel. This is when you want to take a calm, relaxed look around to make sure everything is as it should be.
Start by exercising the engine controls by pushing all the knobs and handles to both stops. They should have been exercised when we lubricated the engine-compartment linkages, but now were checking freedom of movement.Check any friction locks for correct operation. Dont forget carb heat, alternate air and cowl flap controls.
Move the fuel selector(s) through a full check of all positions. Be sure to select a tank with fuel in it.
Many airplanes have cabin-mounted pitot-static system drains. Now is good time to locate yours and open it up to see if any water got in over the winter. Similarly, check to see if the carpets are wet; if they are, remove them and investigate under the floor for any damage or corrosion.
Youve already exercised the flight controls from the outside, so nows a good time to check them from the inside. Smoothly and repeatedly run the ailerons and stabilator/elevator through their full ranges of motion, being sure that all extremes are checked. Manually run the trim up and down to its limits, also, then reset it to the appropriate takeoff setting.
Dial the current setting into the altimeter and note the elevation. If its off, by how much? Anything more than 50 feet is good reason to have an instrument shop check it out.
Check all the other instruments, also. Does the turn coordinator flag disappear and the gyro start turning when electrical power is applied? Is the magnetic compass full of fluid?
Finally, hit the master and avionics switches, turn on each box in your stack one at a time and make sure they all power up. All the circuit breakers should remain closed, of course, and all indications should be normal. Within the first five minutes after the hour, activate the ELT and listen on 121.5 mHz for the warbling tone.
First Flight
The first engine start after winter storage requires some extra effort. First off, if the ambient temperature is below 40 degrees F, its a good idea to thoroughly pre-heat the engine. Methods differ, but using a torpedo heater to blow hot air on the front cylinders for 20 minutes isnt what youre looking for.
Ideally, you stored the airplane in a heated hangar overnight, or have a heating kit installed. The idea is to slowly, evenly heat all the engine components and the oil. Since most engine wear occurs during the engine start, and since its a good bet that very little oil remains on expensive parts after the airplane has sat for a few weeks, pulling the prop through at least two complete engine revolutions is always a good idea. Be sure the mag switch is off and the engine controls are set to prevent starting, of course, but be prepared for it.
Once the engine is running smoothly, immediately check the oil pressure gauge. It might be slow to register, but if you dont see an indication after 10 or 15 seconds, shut down the engine and investigate. If everything looks good, power up the avionics and any other normally used systems.
Especially if its still cold outside, this is not a good time to be in a hurry. Hold the brakes and let the engine idle at a low setting, pointed into the wind for cooling. You want to let the oil and the cylinders warm up before asking your engine to do much of anything, so be patient.
Use this time to monitor the engine instruments, listening and feeling how the engine is running. Just as you took your time warming the engine, take your time running the checklist and doing the run-up. Linger a bit in single-mag operation to verify no serious vibrations occur, like might be caused by a bad or fouled plug.
If you have an engine monitor, check to see that EGTs rise on all cylinders when on a single mag. Is the mag drop smooth or rough? The quality of the drop is the most important observation.
A malfunctioning engine, during runup, is something to expect now and then. It never gets better, after lifting off the ground. If theres a problem, or you dont like a roughness, reject the runup and taxi back to the ramp.
From here, it becomes a simple matter of performing a takeoff and climbing out for your first flight of the season. On the takeoff roll, be alert for poor deceleration or an engine not putting out full power. And be sure to run some kind of checklist on yourself, too. The sidebar at left is a good place to start.
Also With This Article
“Detailed Exhaust System Checks”
“Pre-Flighting The Pilot”
-Ray Leis holds ATP, CFII, Commercial and glider certifcates, and is a Designated Pilot Examiner for all ratings.


