
I presented a webinar recently about techniques for flying stabilized approaches. During the question-and-answer period, one of the viewers asked me for a technique for flying a traditional non-precision approach profile, that is, a steep descent from the final approach fix (FAF) to leveling off at the minimum descent altitude (MDA) and flying level until reaching the missed approach point (MAP). I answered the question with recommended pitch attitudes, power settings, airplane configurations and airspeeds appropriate to his airplane type for the old-school “dive and drive”-style approach.
The next morning, I opened my email to find a long missive from another webinar viewer, taking me to task for describing this “unsafe” descent profile. After all, the viewer wrote, the FAA now calls for a constant angle, constant-rate descent from the FAF to the MAP—a stabilized approach—even on an approach procedure that does not include an electronic glidepath. I answered that person’s question as well, and thought it worthwhile to delve deeper into the skills and procedures needed to fly a stabilized, non-precision approach.
OLD VS. NEW PHILOSOPHIES
If your instrument rating is “of a certain age,” you learned all about the “dive and drive” approach profile. At the time, the now-superseded Practical Test Standards included this criteria for checkride success on a non-precision approach: “…the applicant…establishes a stabilized approach profile with a rate of descent and track that will assure arrival at the MDA prior to reaching the MAP.”
Contrast that with what’s in the current Instrument–Airplane Airman Certification Standards: “The applicant demonstrates the ability to…establish a stabilized descent to the appropriate altitude [and] for the final approach segment…to the Visual Descent Point (VDP) or Missed Approach Point (MAP).”
That’s a subtle but significant distinction. The old-school method was to fly a stabilized descent to MDA before reaching the MAP. Now, instrument-rating applicants are required to fly a stabilized descent that reaches the MAP just as the aircraft reaches the minimum descent altitude. Why the difference?
Non-precision approaches were the first type of “instrument let-down” procedures. It’s how Jimmy Doolittle made the first “blind” landing in 1929; it’s the sort of approach Captain E.B. Jeppesen began sketching in his little black book, eventually selling his notes to fellow airmail pilots and founding a worldwide charting empire. Using radio navigation, ded reckoning, or even a visual reference poking through the tops of the clouds, you confirm your position over a known point, and then descend along a known course or heading until reaching the lowest safe altitude above obstacles. If you have broken out of the clouds at that altitude, you visually acquire the airport and land. If you can’t see or find the airport, you fly on that known course at that lowest safe altitude until confirming (by time or another fix) that you’ve passed the runway. At that point you climb on a charted missed approach.
Contrast this with an approach featuring a glidepath: The objective is to descend at a relatively shallow angle along a path that ends with the airplane very low, just off the end of the runway, with the runway (almost) directly ahead. Without a glidepath, the objective is to descend to the lowest safe altitude as quickly as possible, hopefully to get below the clouds as far from the airport as possible to see a runway that can be anywhere from straight ahead to at right angles to your course. If visibility is poor, you then fly at that altitude until you see the runway or reach the MAP—again, as far away as possible—or you miss.
At least, that was the difference between flying a non-precision approach then as compared to flying a non-precision approach now. Philosophically and whether we have electronic vertical guidance or not, we’re taught and evaluated to fly both types of approaches at a constant angle of descent from FAF to MAP.

As this article’s main text describes, the “old-school” way of flying a non-precision approach involved something called the “dive and drive” method. The basic profile, depicted in the upper image at right, was to initiate a steep descent (dive) upon crossing the final approach fix and level off at the minimum descent altitude, then proceed (drive) to the missed approach point. As shown, the procedure was based on a terrestrial navaid, like a VOR or NDB, neither of which offered a glidepath. The problem? Some pilots forgot the “drive” part, and/or were too eager to get below the clouds, and continued their descent below the MDA.
The drive and dive method did have the benefit of possibly allowing the pilot to get below the cloud layer at an earlier point on the approach, with the idea that, maybe, doing so would get them into VMC and spot the runway when the constant-angle method wouldn’t, as depicted in the lower image at right.
When flown correctly, the “D&D” is safe. But there should be little doubt that an electronic glidepath and a constant descent rate to the runway offer fewer opportunities to screw up a non-precision approach.
THE BENEFIT OF STABILITY
The FAA’s Instrument Flying Handbook (IFH) explains the benefit of a stable approach (emphasis added): “Significant speed and configuration changes during an approach can seriously degrade situational awareness and complicate the decision of the proper action to take at the decision point. The swept wing handling characteristics at low airspeeds and slow engine response of many turbojets further complicate pilot tasks during approach and landing operations. You must begin to form a decision concerning the probable success of an approach before reaching the decision point. Your decision-making process requires you to be able to determine displacements from the course or glideslope/glidepath centerline, to mentally project the aircraft’s three-dimensional flight path by referring to flight instruments, and then apply control inputs as necessary to achieve and maintain the desired approach path. This process is simplified by maintaining a constant approach speed, descent rate, vertical flight path, and configuration during the final stages of an approach. This is referred to as the stabilized approach concept.”
In other words, a stabilized approach minimizes the many operational variables of a non-precision instrument approach, permitting the pilot to better see “the big picture” and safely manage the final descent to the MAP. That sounds good to me!
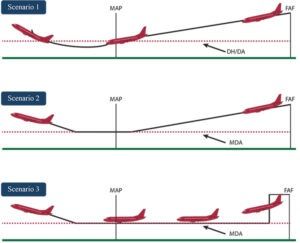
An approach with a decision height (DH) or decision altitude (DA) allows descent to that altitude and deciding whether to continue or go missed. Because the airplane will not instantaneously reverse direction from descent into a climb, if you initiate missed approach at DH/DA, the airplane will descend below that altitude momentarily before entering a climb (Scenario 1, above). That’s okay—this type of approach is designed and checked to ensure you’ll have adequate obstacle clearance even during this dip below minimums.
If the approach has a minimum descent altitude, however, you are required to remain at or above MDA at all times unless you meet the visual requirements to descend for landing. Importantly, you are not assured obstacle clearance below MDA. Consequently, if you fly a constant-angle descent to the missed approach point (MAP), you will have to initiate the miss prior to reaching MDA so that the airplane does not dip below it in the process of reversing from descent to climb (Scenario 2).
On an approach with a DH or DA—which requires vertical guidance—you may not “continue an approach” below this altitude, but you can decide at that altitude to begin your miss. In most airplanes, you’ll need to begin power-up and pitch-up 50 to 100 feet (or more) above MDA to avoid descending below it, effectively raising the minimums for such an approach by that amount.
If you break out right at minimums during this vertical course reversal, you are already powered and pitched up, and beginning your climbout. It would be extremely hazardous—and not the least bit “stabilized”—to then chop the power and push the nose back down in an attempt to land out of the approach. You still must apply power prior to reaching MDA to avoid descending through this minimum altitude, but it has the advantage of letting you get all the way to MDA before making a miss/continue decision (Scenario 3). This is also the profile you must employ for a circling approach—leveling off at MDA for the visual circling part of the maneuver.
VERY STABLE GENIUS
With an ILS glideslope, an LPV approach glide path, or even a GPS-derived advisory glidepath on an (otherwise) non-precision approach, flying this stabilized, constant-angle descent is easy. Set and hold pitch, power, flap and gear configuration to get the airspeed and vertical speed to maintain this vertical path, with minor adjustments as needed. But what if there is no electronic glidepath? That’s when you need to do the math to determine the vertical speed required for the constant-angle descent. To be very stable on the approach, you’ll have to exercise some genius “on the fly.”
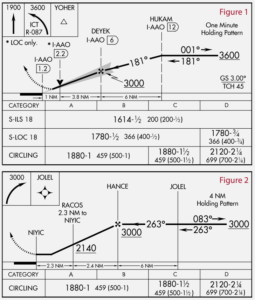
For example, let’s look at one of the approaches into my home field, Colonel James Jabara Airport, KAAO, in Wichita, Kansas. Assume the glideslope on the ILS Rwy 18 approach is inoperative, or we are unable to receive it for some reason. We have to fly the localizer approach with an MDA of 1780 feet (Figure 1, top of the opposite page). The profile view tells us it is 3.8 nm from the FAF to the visual descent point (VDP), which is about the point we will reach the MDA if we follow a constant-angle descent aimed at the runway touchdown zone. In that 3.8 nm, we must descend from 3000 feet to 1780 feet, 1120 feet in total. We need a 295-foot descent per nautical mile, or about 600 fpm at 120 knots ground speed.
That’s consistent with the rate of descent we’d expect to follow an ILS glideslope—at 90 knots ground speed, a three-degree glidepath requires about 500 fpm rate of descent; at 120 knots it takes roughly 600 fpm. So the process checks out. But what about a non-precision approach that is not coincident with a precision glidepath, such as the RNAV (GPS) E at that same airport (Figure 2, below right)? Like many non-precision approaches, it is a bit “tight,” that is, the procedure requires a fairly large loss of altitude in a short distance across the ground. From the FAF to the step-down fix requires losing 860 feet in only 2.4 nm. If instead you plot a constant angle from the FAF to the MAP, a distance of 4.7 nm with an 1120-foot altitude loss, the angle is shallower
But on this approach, you reach MDA just as you cross over the runway at a nearly right angle, having to visually acquire the airport and immediately begin a circling approach.
The point? Different approaches require different rates of descent when flying a constant-angle approach. This means you’ll need to use different power settings and possibly different pitch attitudes for each approach you fly, changing those variables as different winds affect your ground speed as you descend. You’ll need to do the math, and figure out the performance variables for different ground speeds, for every approach you fly.
ANOTHER WRINKLE
The IFH adds another wrinkle to a constant-angle approach, which is necessary to avoid wrinkling the airplane. When vertical guidance is merely advisory or there is no electronic vertical guidance at all, “…the pilot must continuously ensure the aircraft remains at or above any published altitude constraint, including step down fix altitudes, using the primary barometric altimeter.”
In other words, it’s your responsibility to determine if that advisory or calculated constant-angle descent keeps you at or above any altitude restrictions in place because of obstacles between the FAF and the MAP. If not, you need to do something other than a stable, constant-angle descent: calculate and fly one constant-angle descent from the FAF to the step-down fix, then a new constant angle from there to the next step-down, etc., until reaching the MAP. You also can do an intermediate level-off until passing the step-down fix—shades of the dive-and-drive approach.
It’s also important to recognize that a constant-angle descent does not always provide the lowest minimums…tacitly suggesting there are times when the “dive and drive” provides a better chance of completing an approach with a landing at your intended destination.
STABILITY AND SAFETY
I’m all about approach stability, and the “big picture” safety that results. I’m not so sold on a process requiring a lot of math in the cockpit, and making educated guesses about pitch, power and vertical speed that will change with every approach and even during descent to intermediate altitudes.
There is, in my opinion, a bigger safety advantage in using a fixed set of conditions for a higher but still easily controlled rate of descent (say, 800 to no more than 1000 fpm), that will virtually always get you level flight at MDA before reaching the MAP. Presuming you can continue visually, you can use the shallower 500-600 fpm technique that is close to what is typical on final approach in visual conditions. In this case, you need only know three combinations of power, attitude and vertical speed inside a FAF: one for a 500-600 fpm from FAF to MAP, one for an 800-1000 fpm stabilized descent from FAF to stepdown or MDA, and one to apply 50 to 100 feet above MDA that results in level flight at the same speed at the minimum descent altitude—the same configuration used in a circling approach.
But then again, my instrument rating is “of a certain age.”


Some good points to ponder. I just finished training a CFII candidate at Jabara. We flew this approach several times using both methods. One day wind was 250 29G34kts and moderate turbulence below 4,000msl. During the stabilized decent maintaining a constant rate was a challenge due to the turbulence. However, during the D&D approach, the turbulence had less effect on stability. Having spent 16 yrs flying the Wasatch Front and Rocky Mntns, l learned the value and hazards of the D&D technique. Often D&D was the safest procedure to avoid turbulence and strong wind speed and variable wind direction. Take a look at KEGE, Eagle, CO. which has two Non-Precision approaches: LDA 25 & RNAV GPS-D. Also look at the MAP and the procedure carefully. Being stabilized is critical to execute not only the approach, but more importantly, the missed approach. Having flown this several times (I recommend using a simulator for practice before flying to KEGE) the RNAV is best suited for the D&D technique.
Thank you for providing some very good advice.
“Now, instrument-rating applicants are required to fly a stabilized descent that reaches the MAP just as the aircraft reaches the minimum descent altitude.”
The above statement is incorrect. The Instrument ACS, within Area of Operation VI. Instrument Approach Procedures, Task A. Nonprecision Approaches, Skills:
IR.VI.A.S11- Establish a stabilized descent to the appropriate altitude.
AND
IR.VI.A.S12- For the final approach segment, maintain no more than a ¾-scale deflection of the CDI, maintain airspeed ±10 knots, and altitude, if applicable, above MDA, +100/-0 feet, to the Visual Descent Point (VDP) or Missed Approach Point (MAP).
These are separate Skills, “stabilized descent to the APPROPRIATE altitude” (initial, intermediate, final). The only altitude reference in S12 is to stay with “+100/-0” until the VDP (if applicable) or MAP. It states nothing about a stabilized descent to reach the MDA AND THE MAP at the same time!
It’s “dead” reckoning, not “ded.” But, you got me to look it up, which was interesting.
All the talk about the MAP, the MAP. Dude, NO ONE IS GOING TO LAND FROM THE MAP ON A NON-PRECISION APPROACH.
The MAP means jack when it comes to landing, it’s all about the missed approach PROCEDURE.
If I can’t see the runway from the VDP, it KINDA becomes the MAP, except it isn’t–I have go proceed to the MAP, which is often the runway threshold.
So I like very much the CDFA, which, it turns out, is not “Certified Divorce Financial Analyst” at all, but something different, which will bring me to the VDP at the MDA, and if I can see the runway environment (all that stuff in the FARs), then I can proceed, land, otherwise, it’s power-up, go missed.
This is a very good article on the current state of “step down” approaches. As next year will mark 50 years of flying, my certificates are “of a certain age”.
As a practical matter, If one of the my “relatively current” toys in the panel provides a glideslope (certified or otherwise) I will normally use it. When a glideslope is not available I use the dive and drive method. Many times with ragged cloud bases near MDA D&D will succeed better.