
I’ve introduced a lot of pilots to a lot of different types of autopilots in over 30 years teaching in high-performance aircraft. What began for me as a building-block teaching technique has evolved into the way I use autopilots myself: beginning with the basics and adding complexity. It puts the aircraft in simple automated control right away while giving me time to build complexity as desired from there.
Just as I introduce autopilot operation to students, I’ve found it useful in my normal flying to engage the autopilot first in the simple modes with little chance of mode confusion. That gets the airplane going in the basic directions (vertically and laterally) I want, reducing my flying workload. I’ll then add complexity by engaging various modes, as needed. But what are those modes?
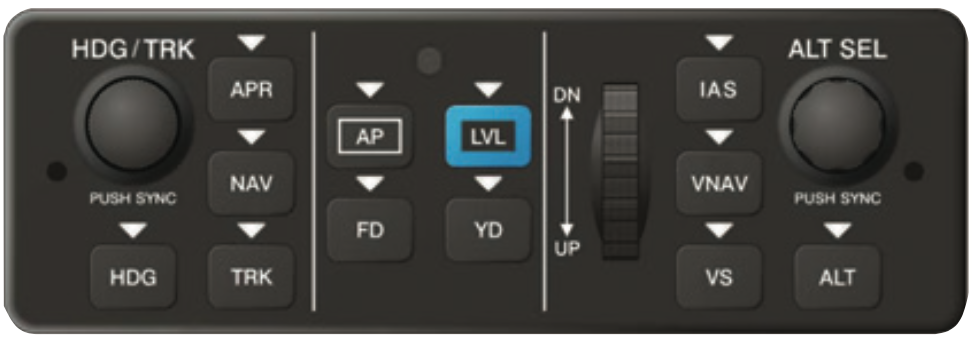
Autopilot Modes
Autopilots have two basic modes of operation: vertical modes and lateral modes. These are the two axes that make for a two-axis autopilot (to be a three-axis autopilot it must include a yaw damper as well). Depending on the specific autopilot and the avionics driving it, vertical modes may include:
- Attitude mode (holding a constant pitch attitude);
- Altitude mode (holding a constant altitude);
- Vertical-speed mode (holding a constant rate of climb or descent);
- Airspeed mode (holding a constant indicated airspeed);
- Altitude preselect (holding vertical speed or airspeed mode until reaching a preselected altitude, and then switching to Altitude mode to maintain it);
- Approach mode (greater sensitivity, plus glidepath).
Attitude and Altitude modes are easy. Hit the Altitude button when you’re at your desired altitude—although it’s smoother if you manually level off and trim before engaging the autopilot. Or turn on the autopilot without hitting the Altitude button and it will hold your current pitch attitude. Most autopilots default to Attitude mode when engaged unless you select one of the other vertical modes. You may have to manually trim to the autopilot’s annunciator commands in some types, but more and more automatic trim is part of the package.
The possibility of mode confusion exists when you engage one of the other vertical modes. You must make additional inputs to enter Vertical Speed, Airspeed (FLC) or Approach mode. If you’ve delayed inputting all the variables, or if you’re busy and make a mistake, then the airplane may go off in an unexpected vertical direction when you hit the AP (autopilot) button. You’ll have another “what is it doing now?” moment.
Lateral autopilot modes include:
- Wings Level or Roll Control mode (maintaining wings-level flight but not a constant heading);
- Heading mode (maintaining the heading under the heading bug);
- Navigation mode (following input from a navigation source such as a GPS navigator or a VOR);
- Approach mode (nav mode with more-accurate tracking);
- GPS Steering (nav mode adding turn anticipation and automatic sequencing).
If you’ve not selected any other lateral mode, most autopilots will default to wings-level or Roll mode. Assuming your heading bug is set before you engage the autopilot, it will immediately hold that heading, or turn to it and hold it if the bug is not centered.
Some of the newest autopilot models have an emergency Level button. From any flight condition, hit the Level button and the autopilot will return the airplane to straight-and-level flight without overstressing anything, making it a lifesaver in unusual attitudes. It puts the autopilot in ROLL (wings level) and ALTITUDE modes—basically the lowest level of complexity in the hierarchy of autopilot control. From this simple beginning the pilot can change modes as desired, turning basic aircraft control into the commands needed to land safely or return to the planned flight—another example of build complexity.
Autopilot Engagement
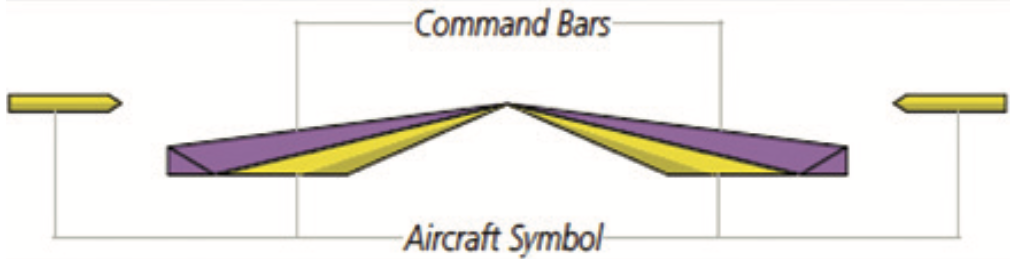
Before engaging the autopilot, establish the attitude and direction manually, and trim the aircraft. If already trimmed in level flight, push the ALT (altitude hold) button on the autopilot mode controller. The flight director (if equipped) will engage and indicate the level-flight attitude. If in a climb or descent, don’t push any vertical mode buttons. The flight director command bars will match the current pitch attitude.
I consistently use the heading bug even when hand-flying, so it should be centered on my current heading. I push the HDG (heading hold) button; the flight director command bars show a wings-level attitude on the current heading.
Push the AP (autopilot) button, the autopilot engages, holding the horizontal and vertical modes already selected. Confirm the selected modes and that the airplane is on the desired vertical and lateral guidance.
There’s very little chance of mode confusion engaging the autopilot this way. Oh, you might not have the heading bug centered and the airplane will turn steeply toward the bug. (Don’t laugh; I did this on my initial CFI checkride in a Cessna 182 RG when the examiner asked me to demonstrate the old Navmatic my instructor had never let me use.)
Now that the airplane is on the attitude and heading you want, you can add complexity if you wish by confirming the navigation source is programmed correctly and then selecting NAV (navigation mode) or APP (approach mode), as required.
GPS Steering
If your airplane is equipped with GPSS (“roll steering”), in all but the latest integrated systems, the autopilot must be in HDG mode for GPSS to work. Starting—and remaining—in the heading mode is precisely what you need to do to use GPSS in most installations, but it also introduces another mode confusion possibility if your GPS is not already programmed and GPSS is engaged. Leave GPSS off, enter heading mode, check the navigation programming and then turn on the remote GPSS switch.
Program the vertical mode: vertical speed, airspeed/FLC, and/or altitude preselect. Then engage the desired vertical mode. Confirm the selected modes are engaged and that the airplane is on the vertical and lateral guidance you want.
Cockpit automation, even in light airplanes, has advanced phenomenally over the past two or three decades. While a simple wing-leveler was a luxury to many when aviation Loran was new, today we debate with all seriousness whether at least a two-axis autopilot should be a minimum requirement for single-pilot IFR. It’s truly amazing—and somewhat frightening.
I use autopilots extensively. But I also want to keep my skills sharp. So unless workload demands otherwise, I hand-fly from takeoff to level-off in cruise. I especially like to hand-fly the last 1000 feet of climb through level-off and setting cruise power. I’ll use vertical modes for descent, but once I’m in the terminal area I hand-fly more often than not. If conditions are truly low, I’ll fly a coupled approach, but with the knowledge that I’ve stayed sharp by practicing by hand most of the time when the weather’s better.
I do all this using the Flight Director when the aircraft is so equipped. This fits right in with the build complexity technique—I’ve verified that the command bars are directing me where I expect them too before hitting the AP button to switch over to autopilot.
You might not do it every time. But practice flying the transitions by hand often enough you remain proficient…and to help you transition to ever-more-complex autopilot modes as well.
By Design
This technique also works in what is probably the highest workload time, a missed approach. It’s the basic sequence of events for a missed approach following a coupled approach if the airplane has a Go-Around button (sometimes called a Take Off/Go Around function, or TOGA). In most lightplane TOGA installations, hitting the button disengages the autopilot but moves the flight director command bars to a wings-level (roll control) seven-degree nose-up attitude (attitude mode). The pilot manually flies to match this optimal initial guidance. It’s then an easy two-button task (HDG and AP) to put the autopilot in these modes and confirm they’re working. Now that the autopilot is on, deal with navigating the missed approach procedure, including whether or not to exit GPS Suspend mode. When you’ve exited Suspend mode as applicable and have confirmed the navigation is set for the missed, stay in HDG if your GPSS requires, or turn on NAV if it doesn’t (or you don’t have it). Then set your altitude preselect if you have one.
If you don’t have the GA feature, a go-around would begin with deactivating the autopilot and beginning a straight-ahead climb—again, wings level and seven degrees nose-up in most cases. Hit HDG and AP and the autopilot engages on your current heading at your current pitch attitude. Do all the navigation tasks and transition to more complex autopilot modes afterward.
Some of the most recent autopilots include the TOGA feature with a significant difference: Engaging GA mode does not shut off the autopilot. It does, however, move the flight director command bars to a straight-ahead, climb attitude—defaulting to the simple roll control and attitude modes. From there, it’s up to the pilot to program, confirm and add autopilot modes. By design, the autopilot follows the build complexity technique.
Starting simple and building complexity eliminates most of the risk of mode confusion in all phases of flight. I can truly say I’ve not had any “What is it doing now?” moments since I adopted this standard operating practice.
Tom Turner is a CFII-MEI who frequently writes and lectures on aviation safety.


