
The concept was new to me when I first started teaching in high-performance aircraft: There are pre-chosen settings for aircraft power and configuration, i.e., flap and landing gear position, that result in predictable performance. Set the power, establish the configuration, and the airplane will perform as expected. Manage the drag (with gear and flaps) and power (manifold pressure and propeller, turbine speed or pressure) and the airplane will attain the proper airspeed and vertical speed for an approach or a missed approach.
288
My mentor-instructors taught me the techniques used by corporate and transport-category pilots work just as well in smaller aircraft—and in single-pilot airplanes, the workload reduction can be a lifesaver. Even so, they taught it by rote, as I did, too, for a very long time. Having flown with more and more pilots, I’ve learned there are definite reasons for the way I was taught to fly the airplanes I fly. And there may be different, equally valid reasons for doing things differently in other makes and models of airplane. With that in mind, let’s look at some of the choices you face every time you configure your airplane for an approach, and some of the considerations about the options you have available.
Begin at the end
Why might we choose the particular airspeed and configurations we do for an approach? When I trained for my instrument rating many years ago, I was taught to make approaches at 90 knots. Why? Because that made timing from the final approach fix (FAF) to the missed approach point (MAP) easier—timing for 90 knots’ groundspeed is included in the table on instrument approach charts. Forget that groundspeed is affected by wind, or that GPS has all but eliminated timing (except as a backup) on most approaches. Also, approach categories change at 91 knots. In many cases, the minima are slightly better for Category A airplanes, suggesting flight at 90 knots (or slower) in airplanes capable of safely flying that slow. I imagine many pilots still fly approaches at 90 knots, even in larger, heavier airplanes that stall faster and are more suited to higher speeds, because they were taught that way in a lighter training airplane.
Let’s say, however, you are flying a typical IFR airplane, and your VY or cruise climb airspeed is faster than 90 knots. If you fly at the slower speed and need to miss the approach, when you add power for the missed, the airplane’s nose will pitch up dramatically. The airplane is seeking to maintain its trimmed airspeed, but it can’t do so precisely—the pitch will come up excessively at first, overshooting the stable attitude for the trimmed speed with climb power, and the angle of attack may get perilously close to a stall. It may be no surprise that loss of control (LOC) during a missed approach is a prime FAA “area of emphasis” in fatal crash studies. Of course, LOC in this context is a euphemism for aerodynamic stall, and it seems stalls during missed approaches are frequent enough to make this a hot topic for FAA and industry mitigation efforts. The Loss of Control Working Group is the primary effort currently under way by the FAA/Industry General Aviation Joint Steering Committee.
To avoid the pitch-up tendency that may contribute to fatal loss of control, one technique is to fly your approaches at the individual airplane’s best rate of climb speed. That way, the airplane is already trimmed should you have to miss the approach. It won’t pitch to a speed close to the stall; it will tend to do what you want it to do with a minimum of pilot workload—permitting you to focus less on the “aviate” in “aviate, navigate, communicate” and spend more time on the sometimes-complex navigation requirements of a missed approach.
Approach set-up
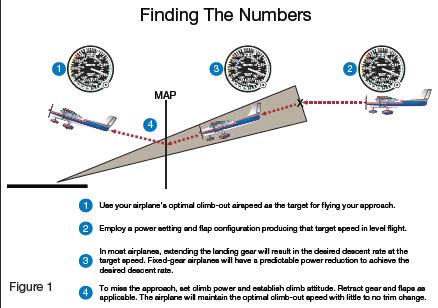
Using the airplane’s optimal climb speed as a target, it’s easy to come up with a power setting and configuration for flying an approach. I use published cruise climb speeds as optimal in this context: They’re a little faster than VY, but usually provide very close to the same rate of climb while assisting with engine cooling. (For more on choosing the correct climb airspeed and configuration, see the article beginning on page 12.)
To find “the numbers,” on a smooth-air day in clear skies, level the airplane at altitude. Engage the autopilot in altitude hold if it is available. Reduce power until the airspeed is slightly above your target speed, then make small power reductions until you’ve attained that speed. Remember to let the airplane stabilize at one speed before making more power reductions.
288
You now have a power setting that results in the optimal climb speed in level flight—the basis of “the numbers” for that airplane’s approach configuration. See Figure 1, above, for suggestions on how to establish your airplane’s approach configuration.
Flaps, or no flaps?
Should you use flaps? Pilots differ on whether or not to use flaps during an approach. Here’s what I do, and why: I use partial flaps for my approaches. Many airplanes have a partial-flap position labeled “Approach flaps” for this very reason. I use flaps because they increase stability by moving the wing’s center of pressure aft when extended. A further-aft center of pressure has the same effect as moving the airplane’s center of gravity further forward—it increases stability. With reduced airflow at slower speeds on an approach (slower than cruise flight, anyway), the increase in stability makes it easier to fly a precise approach.
I use approach flaps for a second, and I believe equally important, reason—doing so improves forward visibility. Extending partial flaps means most airplanes will fly at a slightly lower pitch attitude for a given airspeed. It may only be two or three degrees, but it makes a difference.
Try it yourself: On that smooth-air, clear-skies day, after you’ve found the power setting resulting in the optimal climb speed in level flight, take a good look out the front of the airplane. The nose probably will be on or slightly above the horizon. Next, extend partial (or “approach”) flaps and hold altitude. Add power (an inch or two of manifold pressure, or 100 to 200 rpm with a fixed-pitch propeller) to maintain the “optimal” speed. Look out the front of the airplane again. The nose will be low enough with respect to the horizon that you can see the difference.
288
Imagine flying at minimum descent altitude (MDA) on a murky day with rain streaming up the windscreen, peering out the front of the airplane, looking for a gray runway on an even grayer afternoon. Wouldn’t it be easier to find the runway in the gloom with a little more nose-low attitude?
I think flaps make enough of a difference in most airplanes to make them a required part of my approach configuration. Try it yourself and see if it makes a difference in the airplane you fly.
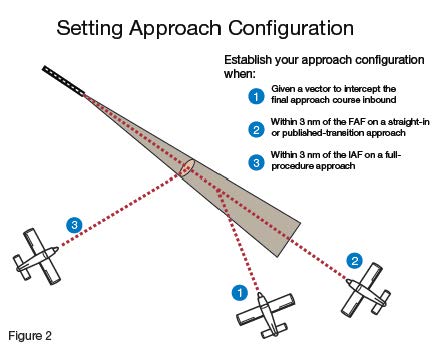
When to configure
A common question I get from my flight students is, “When do you set up the airplane in the approach configuration?” In general, I like to get the airplane stabilized in approach configuration prior to intercepting the inbound course on a vectored or published-transition approach, or before I pass the Initial Approach Fix (IAF) for a full-procedure approach. That way, the airplane is trimmed and stabilized in configuration before I have to do the precise navigation necessary for the approach procedure. See Figure 2, at left, for suggestions on when you should establish your airplane’s approach configuration.
Obviously, if you’re on a 10-mile straight-in, or have been given a vector to intercept the localizer seven miles out, you can delay slowing into the approach configuration until you’re closer in. The more familiar you are with the airplane and its behavior as you change power settings, configurations and airspeeds, the closer you may comfortably fly to the final approach fix (FAF) before transitioning to approach configuration.
What about the gear?
If I’m flying a retractable-gear airplane, I’ll leave the gear retracted until intercepting the glideslope or GPS-derived glidepath. If the approach does not have vertical guidance, I extend the landing gear at the FAF inbound. This is consistent with the concept of “gear down to go down,” which is designed to make extending the landing gear the motive force that causes the airplane to begin its descent toward the runway as a technique for avoiding the depressingly-too-common gear-up landing. In most retractable-gear airplanes, extending the wheels creates the right amount of drag to make an airplane flying level at approach speed begin a 500-to-600 fpm descent at that constant speed. Not coincidentally, this also happens to be the correct vertical speed for the standard three-degree glidepath.

288
Some airplane types have long landing gear cycle times. Some designs (notably, the high-wing Cessna retractables) experience a great deal of drag with the landing gear in transit: The main wheels of the high-wing Cessna retractables present flat discs to the slipstream during the extension (and retraction) process. Other airplane types extend their landing gear one leg at a time, introducing yawing motions until all three legs are down. In these airplane types, you might want to extend the gear before glideslope intercept or passing the FAF inbound, to get all that motion and drag out of the way before beginning the descent portion of your approach. Some pilots like to ensure the gear is down before the glideslope or FAF in any airplane type—that’s fine too, so long as you’re consistent and don’t forget.
If you extend the gear before the FAF, or you’re flying with the gear down-and-welded (or bonded), it will take a power reduction at glideslope intercept or when crossing the FAF to establish the necessary rate of descent. With a little practice, you’ll find the power reduction needed is very predictable. For example, using this technique in a Beech Bonanza requires a four- to five-inch reduction in manifold pressure. In a carbureted Cessna 172, merely applying full carb heat may be enough to initiate the descent.
Keep Your Speed Up
Fly into a large, tower-controlled airport, and eventually you’ll be asked to “maintain best forward airspeed” or “keep your speed up” to fit into the flow of traffic. Configuration management works in this situation as well. You do, however, need to do a little practice first.
Find another smooth-air, clear-skies day and level off at altitude, using the autopilot’s altitude hold function if so equipped. Keep the flaps and landing gear up.
In a retractable-gear airplane, find the power setting that results in an indicated airspeed just below VLE, the maximum landing gear extension speed (in some airplanes there may be a VLO, or maximum landing gear operating speed, that is higher than VLE). Record this power setting as your high-speed approach configuration.
Now practice making a methodical (quick, but not rushed) transition from this configuration to the “normal” approach configuration you previously defined. Start with the landing gear—your most efficient speed brake. Extend the gear, reduce power to your approach power setting and extend partial flaps as soon as airspeed permits.
In a fixed-gear airplane, add four inches of manifold pressure to the target speed you used for approach configuration in the earlier exercise. Record this power setting and indicated airspeed as your high-speed approach configuration. Now practice your airspeed transition—reduce power to the normal approach setting and extend partial flaps as soon as airspeed permits.
In both, once you begin the transition the airplane will rapidly decelerate toward the normal approach speed. In fact, because of the added drag and reduced power, the airplane will want to pitch down—seeking the faster, trimmed airspeed. You’ll need to actively manage your pitch attitude, first to hold altitude until intercepting the glideslope, then downward to maintain the glideslope. For a while, you’ll be in the paradoxical condition of having to push the nose slightly down (to acquire the glideslope) while trimming the nose up (from “best forward” speed to approach speed). Figure 3, on page 7, offers some suggestions on how and when to make these configuration changes when ATC asks you to “keep your speed up.”
When do you begin this transition? I start my transition when the glideslope is one dot above centered. As the airplane decelerates, I hold altitude with elevator input until the glideslope centers, then pitch downward as the airplane continues to decelerate and I trim off the pressures. About one-third of the way to the MAP, the airplane will be stable and trimmed in its approach configuration, just as if I’d flown it that way from five miles outside the marker.
Does this meet ATC’s requirements when a controller asks you to keep your speed up? Every controller I’ve asked says “yes.” And I’ve flown piston airplanes into Class B primary airports—including airline hubs Phoenix and Charlotte—using this technique and received thanks from the tower for the combination of getting to the airport fast and getting clear of the runway quickly. You might try another technique—I invite you to experiment—but this one seems to achieve the goal.
By the way, most autopilots manage this high-speed transition and glideslope capture quite nicely if you prefer to fly a coupled approach.
It’s also important to note that this approach configuration technique perfectly supports the concept of a stabilized approach. Airspeed and configuration remain constant from the final approach fix to the missed approach point, leaving the pilot to make only minor adjustments in pitch and power to compensate for wind. The pilot may then focus his or her attention to the navigation tasks as “aviation” happens quite predictably.
Configuration choices
Undoubtedly you’ll modify my techniques to suit your tastes and the specifics of the airplane(s) you fly. Unless you’re flying some oddball approach, they should serve you well.
If you need help identifying the “best” configurations and techniques for flying your airplane, find your favorite flight instructor and go identify them together, or seek out the experts in that aircraft’s type for their advice. With a little thought, investigation and practice, however, you can come up with a series of procedures that work for you.
Tom Turner is a CFII-MEI who frequently writes and lectures on aviation safety


