
There’s nothing quite like hearing the phrase, “vectors for the approach.” To me at least, this is a calming phrase from an approach or center controller that says, “You’re just about there; now we’ll take care of you.” On vectors, it’s easy to let your guard down and lose track of where you are and what’s going on, subconsciously delegating those things to that friendly controller.
But instead of a phrase that lulls you into thinking the controller has accepted some of your responsibilities as captain of your aircraft, however, hearing “vectors for the approach” should remind you there are several things you need to do to assure a safe arrival…and time is running out. What is a good checklist of things to remember while you are on vectors for the approach?
1. Orientation
The most obvious thing to think the controller is doing for you is that he or she is responsible for your navigation and orientation. In truth, this is only partly correct. The controller will use his/her judgment to issue you instructions that position your airplane in a place from where you can easily join the published approach, while at the same time sequence you between other participating airplanes to avoid conflicts. However, you retain responsibility for avoiding adverse weather—the controller may or may not be equipped to vector you around precipitation, and there are no turbulence or icing detectors in the control room. You still need to rely on your on-board equipment, your preflight and in-flight weather briefings, and your own weather knowledge to avoid hazards while on vectors. The controller may not warn you about non-participating traffic, either, and any time you are in VMC, you are responsible for seeing and avoiding other airplanes, including maneuvering to avoid conflicts as needed. You also need to know where you are so you’ll be able to respond correctly in the event of lost communications or a radar outage.
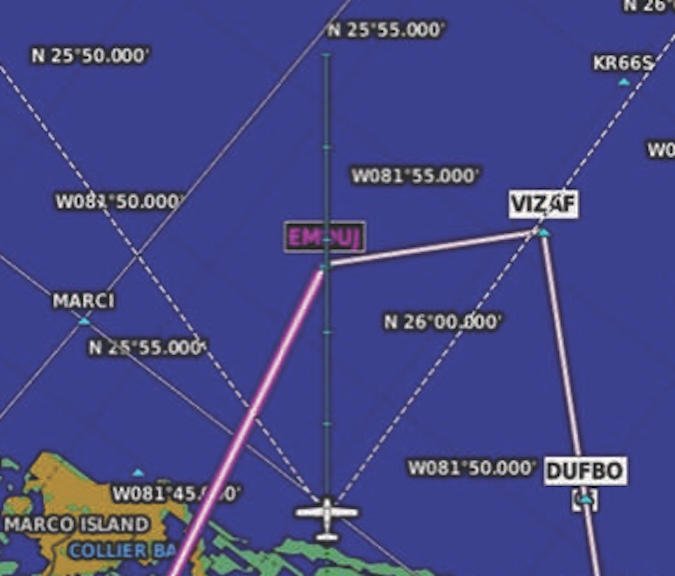
Now, moving maps make it extremely easy to maintain orientation while on vectors—if you track yourself in relation to published fixes on the approach. That leads to the second item on our on-vectors checklist.
2. Load the full approach
The word seems to be out that the convenience and apparent logic of using the vectors-to-final approach (VTF) mode when loading an approach into your GPS or FMS when flying a vector for the approach is a false economy of action. There are at least two reasons not to load the VTF option: First, it’s fair game for controllers to clear you direct to some fix other than the final approach fix (FAF) after providing vectors to the approach.
If you have loaded the VTF option into your RNAV system, intermediate fixes will not appear on the unit’s flight plan page. You’ll have to reload the approach with another option that includes that fix, usually with minimal warning and while you are close in. Second, with the other fixes depicted on the approach path on your map display, you can better see precisely where you are at all times. Loading the full approach, even if on vectors, helps you better see your position.
3. When to slow down
Most of the flight instruction I do is transition and recurrent training in high-performance, single-engine airplanes and light twins. One of the most common questions I get even from experienced pilots is, “When should I slow down for the approach?”
I show pilots a known set of airplane conditions, so called “by-the-numbers” flying tailored to their individual aircraft: power setting, flap position, gear position, attitude and trim setting that result in desirable flight performance for maneuvering in level flight at approach speed, transitioning to precision approach descent, transition to non-precision approach descent, intermediate level-off or level-off at minimum descent altitude, and transition to missed approach.
All by-the-numbers flying centers on the approach configuration. When a pilot asks when he or she should slow down for the approach, what he or she really wants to know is, “When should I transition to approach configuration?” On vectors, I begin the transition when I am given a heading and told “to intercept the final approach course.” I want to be configured, slowed and trimmed by the time I begin the turn inbound and resume my own responsibility for navigating inbound to the airport.
Many pilots like to slow down farther out, which is good if they are monitoring their position well enough that they don’t add a lot of time by slowing down too soon. I tell my students that the more familiar they are with their airplane and the better practiced they are at slowing from cruise to approach speed, the closer they can comfortably fly toward the airport before they slow down.
4. Approach checklist
The phrase “vectors for the approach” should trigger a confirmation that everything is set as needed for the final portion of your flight. If your airplane has an approach checklist, complete setup and then use the printed checklist to confirm your actions. If your airplane does not have an approach checklist, I recommend you make one tailored to your airplane’s equipment. In fact, I suggest you make your own tailored checklist regardless, because these days it seems that no two airplanes have exactly the same avionics (unless perhaps you’re flying behind a fully integrated G1000 panel or similar).
This checklist should be short and approach specific. I do this: “Number 1 nav is set, HSI is set. Number 2 nav is set, nav head is set. GPS: Approach is loaded and activated. GPS/VLOC mode is appropriate for the approach.” This fourth item on our vectors for the approach checklist takes us to the last item
5. Final approach briefing
I’ve reviewed and briefed the approach well before the point I’m on vectors. Once given vectors, however, it’s time to review the most critical information you need to know inside the FAF. I use the mnemonic A-D-M. That stands for review the final Altitude to the FAF where you’ll intercept the glideslope/glidepath, including any step-down altitudes; the Definition of the missed approach point, and whether it’s a decision height, decision altitude, a waypoint, a DME or GPS distance, or even a crossbearing or an elapsed time from the FAF if flying it old school; and the Missed approach procedure. The sidebar above has an example.
It indeed is comforting and confidence-inspiring to have a controller take you by the hand and issue vectors for the approach. Accepting that clearance is not an act of abdication, however. It’s a reminder that you have a short but vital checklist of actions to take to remain in full command of your airplane as you navigate yourself, with the help of the controller, through the approach.
Old-school orientation
Like many pilots, I earned my instrument rating before the introduction of GPS (or even Loran) into the cockpits of personal airplanes. I even remember my first flight with DME—it was a big step up for an IFR pilot!
When I became a simulator instructor in the early 1990s, our training device did not have a moving map for either the pilot flying the sim or the instructor working in the back. If we wanted our student to fly on vectors for an approach, we had to provide those vectors ourselves. Consequently, we became adept at orienting ourselves around an approach by using the other indications at our disposal: an ADF or RMI pointer, the HSI and its displaced needle, and even the glideslope indicator as we flew downwind on vectors.

An ADF or RMI, if you still have one, will point to a compass locator or NDB collated with the final approach fix if such a compass locator is still active. If all that sounds Greek to you, it’s because everything in the previous sentence (except the FAF) is on its way out, if not gone completely in most cases. But if they are there, the ADF (top) or RMI pointer will point to the FAF. As you fly downwind, you can watch the needle fall toward your wingtip and then continue aft. When the pointer points off your wing, you are beam the FAF; when it is 30 to 45 degrees behind your wing, it’s about time to receive a vector onto a base leg. Once on base, the pointer will be ahead of your wing and when it is about 45 degrees off your nose, it’s time for another vector to intercept the final approach course. Once you’re on that final vector the pointer will be just off your nose on the same side as the airport; the bigger the difference between your heading and the bearing to the station, the farther you’ll be from the FAF when you intercept the inbound course. If the needle is on the side of your nose opposite the airport, the controller (or more likely, me in the back of the simulator) gave you a bad vector and you’ll intercept inside the FAF. Ask the controller for another vector.
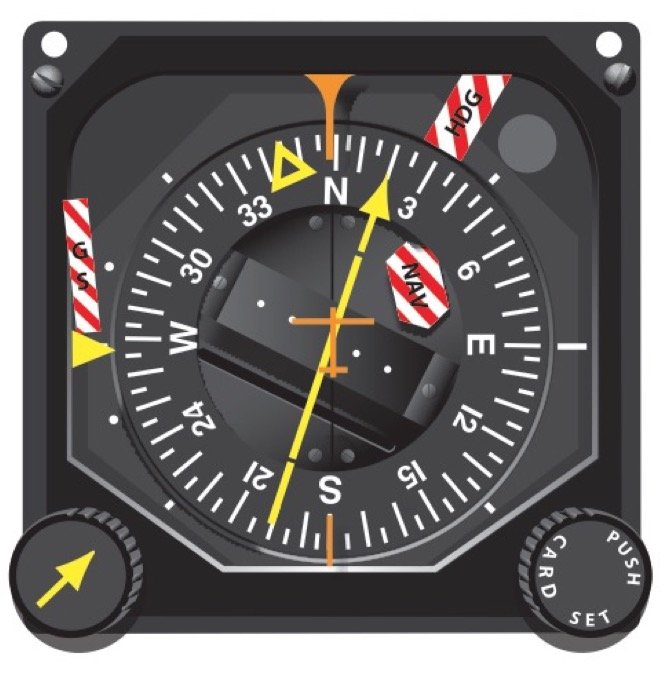
With an HSI (bottom), if you’ve set the inbound course and are being vectored on a downwind, the displaced course needle will be fully deflected on the same side of your airplane as the airport. It will remain there as you’re vectored on base, if your controller does a good job when you are given a heading to intercept the final approach course, your final heading will match the top of the displaced course needle. All you need to do is wait until it begins to move, then follow it to intercept inbound. If the displaced needle is anywhere you don’t expect while you’re on vectors for the approach, recheck your avionics setup. This is a common “a-ha!” for the pilot who forgets to change the GPS to VLOC mode for an ILS.
More on A-D-M
The Altitude, Definition of the MAP and the Missed Approach procedure are vital items for you to know from the FAF inbound. But they are also in the fine print on an instrument approach chart, and may change based on several variables on any given approach. It is a real challenge to find these items on the chart or your iPad as you bounce around in the clouds flying down the final approach course.
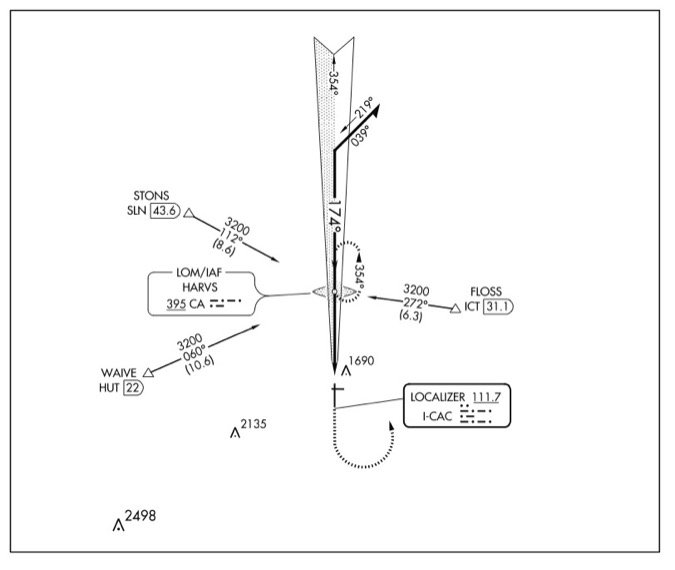
A technique I use is to make up a visual depiction of these items on a Post-It™ note, then stick it on the panel somewhere within my normal scan. That way, only the information I need inside the FAF is right there if I need a reminder while flying the approach. An added bonus: The act of writing down the A-D-M items seems to make it more likely I’ll remember them and not need a reminder at all.


