
by Paul Sanchez
Judging from the feedback we got from Februarys installment on getting the most out of a Garmin 430, its apparent that many operators are merely scratching the surface of what the box can accomplish. Before GPS, avionics were fairly simple devices. Even the sophisticated (for its day) KNS-80 RNAV receivers were units that could be used to their full capability with an hour or two of practice.
Advanced avionics pack a lot of function into a small unit. The compromise is menus and submenus, with buttons and switches taking on different roles depending on what menu is active. It takes a substantial amount of experience to get used to the operating logic, but the truly challenging task is learning all of the capabilities that lie within those submenus.
To help you get there, here are a few more tricks for operating the Garmin 430 in a dynamic environment, either IFR or VFR. Some of these lessons presume you have some experience in entering and activating flight plans. If you dont, the Garmin documentation is pretty good about explaining how to do that. We dont aim to reproduce the manual here, only to supply you with useful tricks that have immediate real-world application. Sure, theyre in the manual somewhere, but weve mined these nuggets for you in the interest of keeping you safe and violation-free.
You can practice these suggestions with the Garmin 430 flight simulator, available for free download from the Garmin web site. In fact, it makes sense to do that before attempting it in the airplane, unless you take along another pilot. Errors in switchology can lead to substantial heads-down time in the airplane at first, which is the last thing you want to deal with.
Flight Plan Page 1 Setup
The Flight Plan page has 3 columns for the Garmin 430 and 4 columns for the Garmin 530. The first column cannot be changed, as that is the list of waypoints. The second and third column can be different things, but I find the most useful are DTK (individual course lines on the flight plan), ETE for hours: minutes: seconds remaining at those waypoints.
On the Garmin 530 you have a 4th column of data so I would suggest that the third column be DIS (individual leg distances) and again the 4th column be ETE.
If you have a second Garmin 430 or 530, you could distinguish the Flight Plan display by having ETA (arrival time local) in the 3rd column on one of the boxes.
This is in part a convenience factor. Since passengers often ask how much longer or are we there yet, being able to tell time en route is important. It is also another way to keep up with delays that may affect fuel reserves. You may also want to know local time of arrival to determine such things as whether the FBO will still be open, whether youll make the meeting, or if youll bust a curfew.
Intercept Radials, GPS Style
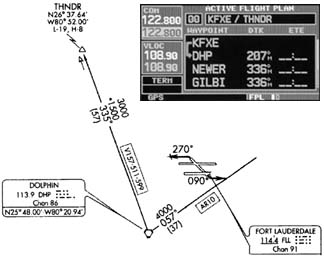
You are on the ground at Fort Lauderdale Executive. You have already filed for an IFR and you call Clearance Delivery for your clearance. They read back radar vectors to the FLL9.FLL with a THNDR transition, then as filed.
The problem lies in how to tell the navigation box what the plan is. You cant find the departure procedure in the database because it is a pilot navigation. Joining the THNDR transition is not the same as DIRECT to THNDR.
There is a trick to let you do it, however. If you were going to fly this clearance without communications, how would you do it? You would fly to the Dolphin (DHP) VOR first, then along the 335 radial for 57 nm to THNDR.
To get the Garmin to do the work for you, start your flight plan route with KFXE-DHP-THNDR-etc. Then, when its time to intercept the radial, place the cursor on THNDR in the flight plan page 1, press DIRECT twice, and the Garmin will ask you if you want to activate the DHP-THNDR leg. Press ENT for yes.
Thats different from flying the VOR because you are not switching from GPS to VOR to try and use the DHP VOR for navigation. This is especially important when you consider that THNDR relies on a VOR signal 57 nm behind you.
You can get even more accurate. Note from the en route chart that the 335 radial from DHP to THNDR is also V511, which passes thru NEWER and GILBI before reaching THNDR. I would put those intersections into the flight plan as well and activate whichever leg is appropriate to the assigned heading from the Miami TRACON.

Roll Your Own Localizer
One of the primary benefits of GPS is its accuracy, and a key component of that is the ability to help you land on a runway that does not have a published procedure. Most of the runways available for general aviation use dont have a localizer, and even fewer have glideslopes. But you can simulate them as an aid to navigation.
The method is to make up your own runway extension, using VNAV to help do circle-to-lands or even just plan visual approaches to the runway. The first step, covered in the February issue of Aviation Safety, is to set the VNAV reference point to 318 feet 1 nm before the destination airport. That is an important consideration because the vertical speed required (VSR) displayed on page 1 uses that point in calculating the target altitude and distance.
The next thing to do is create the runway extension. Lets say youre landing a Fond du Lac, Wisc., in less-than-ideal VFR conditions and the wind is blowing right down runway 27.
You could fly an instrument approach to another runway, then circle to land. But given the conditions you decide to make a visual approach, using the runway extension as an aid. Since this is just a learning exercise, lets say youre planning a straight-in visual approach.
KFLD is still the active waypoint, and you need to tell the Garmin 530/430 what course line you want to follow.
By pressing direct with KFLD as the active waypoint and moving the cursor down to the lower right corner, you can specify a 274 course to KFLD. The runway heading can be found in the airport diagram. Press ENT twice for the Garmin 430/530 to accept the plan.
Notice this does line us up quite well with runway 27, but remember that at some airports the distance will be off slightly since the threshold of the runway is usually not the same as the airport reference point in the GPS database.
From then on simply line up with the magenta, set your descent rate appropriate to your ground speed and compare what the VSR suggests.
If the VSR suggests 300 fpm and you have a ground speed of 120 knots, I would hold off on my descent until the VSR is about 600 fpm. If the VSR says that 2,100 fpm is required for the runway Id consider doing a go around or S-turns because we got too close and too high.
Snappy Departure Procedure
After the last installment, a reader inquired how to accomplish the Hanscom Six departure without striking out at BOSOX intersection.
This challenge is illustrated by looking at an IFR clearance out of Bedford, Mass. The Hanscom Six departure route description reads: All aircraft expect radar vectors to appropriate depicted NAVAID/fix. Maintain 2000 feet. Expect further clearance to filed altitude/flight level in 10 minutes after departure.
That would be great if it werent for the fact that this departure has 11 different VORs and 7 different intersections to get vectored to. What also increases the frustration factor (and decreases the safety factor) is each one of these NAVAID/fixes can result in instructions to fly 360, join the LWM 270 outbound, join airway V106.
In the old days, this would mean tuning the VOR to 112.5 MHz, setting a course line of 270 on the indicator, waiting for the needle to center and then making a left turn to 270 to join V106, setting the MHT 253 radial on a separate VOR receiver. Nearly all other information, such as distance to intercept and track vs course line is non-existent.
Now lets try solving this problem with a solution from the Garmin 430 toolbox. In your flight plan, have KBED-LWM-MHT-JOHNZ-GDM (etc for V106). Fly your heading of 360 using the heading bug, select LWM as your active waypoint and press the OBS button. Set your indicator to 270.
You will get a magenta line going from east to west, reaching LWM VOR, then a white line going westbound from LWM. Its easy to simply fly 360 until joining the white line (270 radial outbound), then turning left to 270.
The next step in your clearance it so join the V106 airway. To do that, activate the JOHNZ-GDM leg on the flight plan. Continue to use the heading bug to make sure that the aircraft track remains on 270 degrees, and when the aircraft reaches the magenta line between MHT and JOHNZ you are one the airway. Turn left to 253 to stay on it.
Note that at no part of this departure procedure did you use VOR information sent to the indicator, it was always GPS information – and a detailed plan at that.
Clearing airspace
You can stay clear of airspace (restricted, MOA, etc) without getting your wings clipped.
Any serious pilot would admit that this cant go here/cant go there airspace stuff is getting old. However, it is becoming quite common to find some kind of airspace along your intended route that goes through airspace that someone in the government has decreed a no go.
When dealing with airspace avoidance, you want to stay out of the Restricted/MOA/TFR/Prohibited area, but you do not want to be steering left/right all over the place not knowing if you are going to clear it or not, nor do you want to fly too far out of your way.
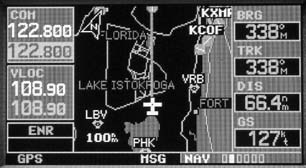
The solution is to use a tool in the Garmin 430 of creating a MAP+ waypoint. Lets say you want to fly from Okeechobee (OBE), Fla., to Kissimmee (ISM), Fla., from the south-southeast, but unfortunately that clips the R2901E airspace (Avon North), and ZMA Center says indeed it is active.
The flight plan is a simple KOBE to KISM direct route. The self-serve fuel was very cheap at KOBE and you would hate to ruin the day filling out a NASA form while having lunch in KISM.
On NAV page 2 on the Garmin 430, push the small right knob to bring up a cursor on the map. Turning the small knob to the right moves the cursor up and left moves it down. The large knob moves the cursor left and right.
Move the cursor up along your flight plan line, and when in the vicinity of R2901E, press the RNG down button to zoom in. When you at about a 5 nm scale, again move the cursor just to the northeast corner of R2901E airspace. Push the DIRECT button and you now have a course line to that location. Press ENT twice to confirm that you want to head to the MAP+ waypoint. This can even be entered in your flight plan.
Knowing what tool in the Garmin 430/530 will give you the solution to this ATC conundrum is why one Garmin-equipped pilot has an uneventful flight while another with the same gear resorts to punching DIRECT all the time, with woe and misery as his constant flight companions.
Also With This Article
“Flight Plan Page 1”
“Programming an Extended Centerline”
-Paul Sanchez is a CFII who specializes in instructing with advanced avionics.


Communication")