
At the last minute on final approach, you see an obstacle on the runway. You’ve initiated a go-around, but in your haste you let the nose rise too much, or even pull it up excessively for fear of hitting trees at the far end of the airport. The stall warning horn sounds but you don’t respond quickly enough, and the airplane begins to shudder—the “first aerodynamic indication” of a stall. One wing begins to drop. As you push forward to reduce the angle of attack and break the stall, do you coordinate rudder and aileron to level the wings or force yourself to hold the ailerons neutral and level the wings with rudder alone?
288
In other words, in stall recovery, is it aileron or rudder that gives you the most bang for your control-input buck? Your survival, and that of your passengers and the people beneath you, may depend on which technique you use.
Ailerons
“If you ever break your neck in an airplane, your ailerons will probably have much to do with it.” These wise words were written in 1944 by Wolfgang Langewiesche in his classic Stick and Rudder. Despite the many years we’ve had to study this tome and the many books and articles that have developed this theme, we in the “modern” age may have forgotten this in aviation’s gradual move from airmanship to systems management approach to instruction and currency, especially in high performance aircraft. Ailerons are used to bank the airplane, we all know. What many perhaps have forgotten (or maybe never learned at all) is that ailerons control bank by varying each wing’s angle of attack.
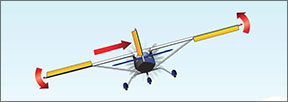
More importantly, ailerons do their thing by increasing the angle of attack on one wing, and decreasing it on the other. The wing with the greater angle of attack produces greater lift, so that wing rises upward. The opposite wing, with the now-reduced angle of attack, descends downward. Since (hopefully) the whole thing is connected solidly together, the airplane banks as a result of these changes in each wing’s angle of attack. The changing lift vector—lift, being generated “up” relative to the wing—now pushes the airplane to the side) causing the airplane to turn in the direction of the bank. This usually is all well and good, and is what ailerons are for.
A couple of less-beneficial things happen when you (or your autopilot) deflect the ailerons and bank the wing, however. One is an increase in drag on the wing on the outside of the turn (the right wing when turning left, and vice versa). Having to translate through a greater distance on the outside of a turn, this wing must go faster than the inside wing—anyone who ever marched in a parade band or a military formation knows all about the need for the outside element to go much faster than the inside. Consequently, the outside wing generates more parasite drag, the result of wind resistance. The drag of the outside, faster wing tends to hold that wing back, resisting the turn. Langewiesche relates this back to angle of attack when he says, “You can’t have lift without drag; More lift ‘costs’ more drag” when the wing is banked for a turn.
The more commonly cited, and greater, “bad” thing that happens in a banked turn is called adverse yaw. Look at a wing from forward of the nose of the airplane when the ailerons are fully deflected. You’ll see the downward-deflected aileron pretty obviously extends beneath the wing. The upward-deflected aileron, however, is in the lee of the wing’s camber, at least in most general aviation airfoil designs. (By the time most of today’s airplanes were designed, engineers knew to make the aileron’s downward movement less than its upward movement, dubbed “differential ailerons,” to help correct for adverse yaw). The downward aileron, therefore, creates a lot of extra drag compared to its counterpart. The right aileron is down in a left bank; the left aileron is down in a right bank. Therefore, the outside wing in a turn has the greater amount of aileron drag. Guess what? This causes a yawing away from the direction of the turn…pretty adverse to your purposes.
Rudder
We compensate for adverse yaw, of course, with the rudder. Langewiesche again: “The rudder is merely a device by which the pilot counteracts the adverse yaw effects that inevitably arise every time he banks and unbanks the airplane…. Misuse of the rudder is a factor in almost all accidents…the adverse yaw effect gives rise to a whole string of consequences.” Holding rudder in the direction of the turn will force the airplane’s nose in that direction. Holding the correct amount of rudder will precisely compensate for adverse yaw and, as Langewiesche writes, “…now the airplane is free to do what it ‘wants’ to do, that is, to turn into the bank.”
Moving the rudder, also, can level a banked wing by yawing the nose and using the effect of asymmetric drag to your advantage. Has the left wing dropped? Step on right (“opposite”) rudder and the nose yaws to the right. This makes the left wing the “outside” wing, increasing its lift relative to the right wing; the added lift levels the wings. This is especially useful when the wing is stalled or nearly stalled, because the ailerons may not be terribly effective when compared to the (almost always) quite larger rudder, perhaps aided by propeller blast.
The stall
So back to the question of this article: When the wing stalls, do we recover with rudder alone, or do we level the wings in a coordinated movement of aileron and rudder as we lower the angle of attack with elevator?
“Under some conditions, an aileron that is set to lift a drooping wing may actually stall that wing and drop it viciously,” so sayeth Stick and Rudder. “Ailerons don’t work well on a stalled wing…they are likely to drop the wing they are intended to lift and promote a spin.” Why?
As the airplane decelerates toward a stall (more correctly, as angle of attack increases), you might be quite able to keep the wings level with aileron control. This is especially true in airplanes with leading edge stall cuffs or vortex generators designed to keep airflow attached to the ailerons at high angles of attack. When the wing is very near its critical angle of attack, however, aileron deflection can become a Very Bad Thing by causing one wing to become the “critical wing” and stall before the other. Since the angle of attack for maximum lift development is not terribly far (in degrees) from the stalling or critical angle of attack, one wing may stall while the other is generating near its greatest amount of lift. This becomes a “snap roll” that, although thrilling in the hands of a seasoned aerobatics expert with sufficient altitude and energy to recover, is deadly to almost all the rest of us.
What About AOA Indicators?
Angle of attack (AoA, or “Alpha”) indicators are receiving a great deal of attention and press as government and industry search for a way to address the most common killer in general aviation: loss of control, a euphemism for stalls and spins. Most pilots learn to fly on the basis of indicated airspeed. Stalls, however, are a function not of airspeed alone, but the result of exceeding a critical angle of attack and can occur at any number of indicated airspeeds, depending on conditions.
All type-certificated airplanes have a stall warning system. Experimental amateur-built (EAB) airplanes are not required to have them, which may be a factor in the higher number of EAB loss-of-control crashes. Stall warning horns (or in very old airplanes, lights) are a type of AoA, of course. Stall warning systems, however, are obviously not enough to prevent loss-of-control events.
A well-programmed AoA indicator, it’s theorized, would be more effective at warning a pilot of an impending stall. Jet pilots use AoA: AoA indicators can display the optimal pitch angle for climb and approach, making the pilot less likely to nibble at the edge of a stall. Yet, I suspect that even if overnight all general aviation airplanes were equipped with an angle of attack indicator, and all pilots were trained on how to use them, we would still not see the improvement in stall-related crashes we want to achieve. For some of the reasons why, see the sidebar on the opposite page.
Answer the question
At the top of this article, we asked which control input is appropriate at the first signs of a stall: Coordinate rudder and aileron to level the wings or force yourself to hold the ailerons neutral and level the wings with rudder alone?
When near or in a stall, force yourself to keep the ailerons neutral and level the wings with the rudder. Sure, some airplanes with vortex generators or leading-edge devices may safely permit some aileron input in stall recovery. And some airplane types have a mechanical interconnect between the rudder and ailerons that make it impossible to move one without moving the other (they will usually have stall strips or other leading edge vortex devices to help compensate).
Other sources may differ on this technique. I suspect that the majority of today’s pilots at some point used the Cessna Pilot Center’s Manual of Flight as a primary text while learning to fly. The CPC’s “red book” was the standard in collegiate and local FBO instruction for at least 20 years. This manual, built around the Cessna 150/152 trainer, calls for using rudder and aileron to level the wings during stall recoveries. The technique works safely in some makes and models of airplane. However, unless your airplane type has specific manufacturer guidance calling for use of ailerons during stall recoveries, keep the ailerons neutral and level the wings with rudder alone if the wing begins to stall.
This is one of the most basic “techniques” articles I’ve written in a long time. But the accident history tells us that loss of control—stalls and spins—is GA’s biggest killer. And loss of control is the result of incorrect use of the ailerons and rudder. Every 10 years or so the FAA launches a “back to basics” program of one sort or another. We should never have to be reminded to go back to doing the right thing.


