
Loss of control in flight (LOC-F) is implicated in 51 percent of all fatal personal and business-use GA accidents, according to the NTSB. The preponderance of LOC-F events are aerodynamic stalls, according to NTSB member Dr. Earl Weener and as reported in his presentation at AOPA Summit in October 2012. Notably, fatal stalls are less common in instructional flight, perhaps because pilots are expecting them when training, and the instructor helps detect and respond to them.
288
In my almost 30 years of experience, stalls and stall avoidance are constantly emphasized and feature regularly in NTSB investigations. I suspect a lot of Aviation Safety readers have even more experience than me, and have seen the same emphasis and crash record even longer. Stalls (and the spins often resulting) have gained even greater notoriety in the wake of two recent air carrier accidents (Air France Flight 447 and Colgan Air Flight 3407), in which we learned that professional flight crews failed to identify stalled conditions and responded to them by doing almost the exact opposite of what they should have done in both events. We know there’s a problem with stall avoidance and recovery. But as an industry we haven’t figured out how to address it effectively.
The Alpha Principle
The “governing principle” of aerodynamic stalls is angle of attack, AoA, which is identified in aerodynamics texts by the Greek letter ƒp, or “alpha,” the standard geometric symbol for an angle. For the remainder of this article we’ll call it Alpha—because it’s short and trendy, but mainly because using a new term may help us think about stalls differently.
We all learn in primary training that Alpha is the angle between the onrushing relative wind and the chordline of the airplane’s wing. We frequently see a diagram like Figure 1 on the opposite page: The angle indicated in each drawing is the Alpha, and the critical Alpha—where sufficient lift is lost and drag is created the wing stalls—is about 17 degrees for most GA wings.
The way this is drawn, it appears the line representing relative wind is parallel to the ground. Especially when we’re first learning to fly, we might think (in our inexperience) that Alpha is determined by how high the airplane’s nose is pointed above the horizon. But let’s take these same drawings and animate them a bit, as shown in Figure 2, also on the opposite page.
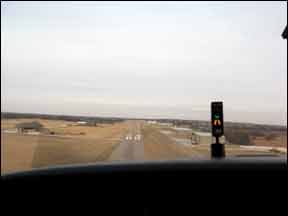
Visualize the airplane on short final or at the missed approach point on an instrument approach, when something requires the pilot to go around. As the pilot begins to pitch upward, the wing’s Alpha changes. If the pitch-up rate is too great, or if the pilot does not simultaneously add power as he turns the descent into a climb, the wing may reach critical Alpha while the nose is still pointed downward below the horizon.
Next, let’s consider a takeoff. Again, the wing translates through an increasing Alpha as the airplane rotates and lifts off. If the pilot attempts to lift the airplane off too early, or pulls the nose up too far right after takeoff, the Alpha may increase to the critical point. The nose may only be slightly above the horizon when the stall occurs.
Contrast this with the way we teach power-on stalls. At altitude, we perform clearing turns, slow the airplane and begin raising the nose. Then, we feed in power and pull back, usually until the nose is well above the horizon. The fact we generally practice stalls in a lightly-loaded airplane means it often takes an almost unrealistic nose-high attitude to make the wing stall.
The Law of Primacy— the way you learn something first is the way you’ll remember it—combined with the Law of Practice—the way we do things most often is the way we expect them to occur—reinforce the incorrect notion the nose needs to be very high above the horizon before a stall. The pilot who tries to lift a heavily loaded airplane from a high-density-altitude airport but then can’t outclimb obstacles because the wing enters a high-Alpha, high-drag regime, would discover otherwise.
To understand an important point of the Alpha Principle, then, visualize where the airplane is pointed compared to where the airplane is actually going. Making a quick or excessive change in pitch attitude (pointing the airplane) will not instantaneously change the direction of flight (where the airplane is actually going). The Alpha is the angle between the two. If the angle is great, the wing may stall—and 17 degrees isn’t that great of an angle.
Ahead, Load Factor One
Everything we’ve reviewed so far presumes we’re maneuvering at 1G. The critical Alpha remains the same regardless of G-load. But increasing the G-load means the wing will reach critical Alpha sooner. Why?
Imagine driving a car on ice and making a gradual turn to the left. If you turn the steering wheel gently, the car will turn on the ice. Turn the steering wheel rapidly, however, and centrifugal force will cause the car to skid to the right. The car now is pointed in a direction very different from the one it is actually traveling. Okay, you’re not putting a big G-load on your car in a quick turn (you are increasing it somewhat), but the effect is the same—“load up” the wing with G-forces and the direction the airplane is pointed will rapidly diverge from the direction it is going. The wing stalls.
So, what effect does G-load have on Alpha? Figure 3, above, is a diagram we commonly see in primary training. Using it and the added “example arrows,” we see that a 60-degree bank results in a roughly 40-percent increase in stalling speed. If at its current weight and flap setting your airplane normally stalls at 55 kias, in a 60-degree bank it will stall at about 77 kias. This diagram leads to the erroneous conclusion that increasing the bank angle also increases the stalling speed. This in turn causes instructors to pound into their students “make your traffic pattern turns shallow, especially when turning base-to-final, because if you bank too steeply, the wing will stall.” There’s good reason to follow that advice, but increased stalling speed really isn’t one of them.
Try this experiment: In clear skies and at a safe altitude, starting from well below your airplane’s maneuvering speed (VA), establish a bank angle greater than about 35 degrees and simply let go of the controls. The nose will immediately pitch down. Left unchecked, the airplane will enter a spiral, with increasing airspeed and bank, and a downright frightening acceleration in vertical speed (recover by leveling the wings before reaching VA, allowing the nose to come up to a normal climb attitude and applying forward control pressure as needed to avoid excessive pitch-up). As the nose drops, the G-load remains at roughly 1G. The wing does not stall because the airplane is pointed in the direction it is going (down). Stall speed does not increase because the G-load does not increase. To make the indicated speed at which the wing stalls increase with an increase in bank angle, you (or the autopilot) would have to actively work to prevent the airplane from descending into a spiral.
At first glance, Figure 4, above, is another typical chart one might encounter during primary training. This one, however, illustrates a 2G aerodynamic load. Why? Because a level, 60-degree bank turn (the steepest bank permitted on FAA practical tests, to avoid “acrobatic” flight) results in a 2G load. Let’s say your airplane still normally stalls at 55 kias in 1G flight. Load the wing to 2G and, following the blue arrows, you’ll find the stalling speed to be about 77 knots—the same 40-percent increase seen in Figure 3, presuming altitude remains constant.
An accelerated stall is one occurring at a higher indicated airspeed than it would at 1G. We generally practice accelerated stalls by banking the wing at low speed and holding the altitude—resisting the descent that would otherwise occur—and therefore increasing the G-loading. The extent to which indicated airspeed is increased when the wing reaches critical Alpha and the stall occurs depends on the increase in G load.
Use the (Stick) Force
A reader of my articles and Web site, www.mastery-flight-training.com, once proposed what may be a brilliant aid in avoiding inadvertent stalls. He suggested painting that portion of the pilot’s control column extending from the panel to the yoke with three colors: green, from the yoke to a line which corresponds to neutral elevator; yellow, from that point further forward on the column to what experience reveals is the normal position at VX speed; and red forward of that point. His idea is, in order to stall, you have to be resisting the airplane’s natural tendency to descend, so you have to be pulling aft. In his scheme, any time the red portion of the control column is visible, the airplane is about to stall. In any stall recovery, he says, push until the column is well into the yellow range.
There may be reasons not to paint your control column (although I’ve not come up with one yet) and the color-coding scheme wouldn’t work in most stick-controlled airplanes, but the reader’s point is well taken: Unless the autopilot or trim is running away, you have to be pulling on the controls to make the wing stall. The nose of the airplane may be up, down, left or right, but if you’re not pulling, you won’t reach critical Alpha. You’ll feel it in the stick force. Something else bad might happen (that spiral, for instance), but you won’t stall. Consequently, if the wing stalls, unload the wing by releasing back pressure to reduce stick forces.
Take a look at Figure 5, on the opposite page, which shows the relationship between Alpha and lift generation. At critical Alpha, the wing “stalls” but doesn’t stop generating all lift. Drag increases dramatically at critical Alpha, however, so the combination of reduced lift and increased drag makes it feel like the wing “stops flying.”
An important but often-overlooked point about the relationship between Alpha and lift development is that maximum lift occurs just below critical Alpha. If you reach critical Alpha and the wing stalls, all you have to do to generate the maximum amount of lift is to lower Alpha a degree or two to get back to the maximum lift point. In practice, you should lower Alpha by adjusting to normal climb attitude while simultaneously leveling the wings (to reduce G force) and applying climb (or maximum) power. Put the airplane back into its maximum climb performance configuration to recover with a minimum loss of altitude (which also happens to be the completion criterion in the Practical Test Standards).
Feet, Do Your Stuff
Avoid leveling the wings with aileron, however. Deflecting an aileron changes the Alpha for that portion of the wing. It can aggravate the stall and lead to a spin, when one wing’s Alpha differs from the other’s. “Pick up” the low wing with opposite rudder to avoid aileron-driven asymmetric Alpha.
This brings us back to the “shallow bank in the traffic pattern” advice. With the exception of the previous paragraph, everything we’ve covered so far in this article assumes the airplane is in coordinated flight, i.e., the slip/skid ball is centered. In uncoordinated flight, there is a difference between each wing’s Alpha. The wing will still stall at the critical Alpha, at whatever attitude, G-load and speed that occurs, but since the Alpha varies from one wing to the other, one wing will stall while the other is generating nearly maximum lift (because it is near but not quite at critical Alpha). The maximum-lift wing pushes while the stalled wing drops, and the airplane rolls (or violently snaps) over into a spin.
How does this support shallow bank angles in the traffic pattern? The greater the bank angle, the more rudder input it will take to maintain coordinated flight. If you’re sloppy with the rudder, it’s more likely you’ll have an asymmetric Alpha condition while you’re already slow, at a relatively high Alpha and with little or no altitude to recover if the airplane enters a spin.
Sure, instructors should be drilling “keep your bank angle shallow” in the traffic pattern. But they also should be insisting on good rudder coordination in the pattern (and all other times) unless you’re intentionally slipping the airplane (which requires precise speed and attitude control because you are at Alpha asymmetry).
High Alpha Maneuvering
There are times when it’s advantageous or even necessary to fly at high angles of attack—short-field takeoffs, balked landings and missed approaches, normal and short-field landings. Generations of flight instructors and aviation authors have emphasized the need for stall avoidance; untold numbers of pilots and their passengers have died because we fail to understand those lessons.
The NTSB tells us we haven’t licked the problem yet. To do so, we need to think less about the way we traditionally learn about stalls—the nose must be high; it’s all about airspeed—and more about angle of attack, the difference between where the airplane’s pointed and where it’s actually going.
What’s the best way to drive home this relationship? With an experienced instructor, go out and practice slow flight, what we used to call “flight at minimum controllable airspeed.” Fly slowly enough the stall warning is constantly activated and see what you need to do with the controls to hold airspeed and altitude in turns. Experiment—carefully!—with the changed performance resulting from coordinated vs. uncoordinated flight. Visualize the wing’s Alpha at all times, and how it changes with the variables. Then think about how those variables apply at different phases of flight—even when the nose isn’t radically upward.
With enough practice, you’ll make the required control inputs automatically when maneuvering at high Alpha. And that should keep you from adding to the NTSB’s Loss-of-Control-in-Flight accident record.
Tom Turner is a CFII-MEI who frequently writes and lectures on aviation safety.


