
by Pat Veillette
It was very foggy early on the morning of October 25, 2000, when the PA-28-140s pilot pre-flighted his aircraft at the Paul C. Miller-Sparta (Mich.) Airport (8D4). A local flight instructor later estimated visibility at about 1/8 mile at the uncontrolled field. Sixteen miles away, at Grand Rapids, Mich., the weather included fog with a vertical visibility of only 100 feet. The temperature was 13 degrees Celsius, as was the dewpoint. All of these were tell-tale signs of a thick blanket of fog.
The Instrument-rated pilot had accumulated 710 total hours of flight time with 430 hours in the Cherokee 140. This included 44 hours of simulated instrument and nine hours of actual instrument experience. He called the local Flight Service Station, obtained a full weather briefing and filed an IFR flight plan to Manassas, Va.
The Sparta Airport has one runway, 06/24. At the time, it was 3200 feet by 50 feet. The pilot lined up on Runway 24 and applied takeoff power. Less than a minute later, the Cherokees left wing hit a 30-foot tree, crushing the rest of the wings structure. The aircraft continued uncontrolled into the trees, coming to rest about 150 feet from the initial impact point. A post-crash fire consumed the cockpit and sections of both wings. The pilot was killed and his passenger was seriously injured.
When accident investigators visited the accident site, they quickly noted the rising terrain along the departure path for Runway 24 is bounded by trees. The stand of trees impacted by the aircraft is about 60 feet higher than the runway, 300 feet left of the extended runway centerline and about 1000 feet from the departure end of the runway. The NTSB determined the accidents probable cause was the pilots failure to maintain proper runway alignment on departure and his failure to maintain clearance from the trees. The pilots attempted flight into known adverse weather, his lack of instrument experience, the fog and the trees contributed.
While the conditions in this accident werent quite zero-zero, many of the same landmark risks were present. Short of not taking off, what could this pilot have done differently-or better-to ensure a different outcome? What skills should one develop to manage the risks of a zero-zero takeoff? How can Part 91 operators apply the same basic rules commercial flights use? The answers to the questions are not that difficult and, as is often the case, some common-sense planning and practice will minimize the additional risks associated with the zero-zero takeoff.
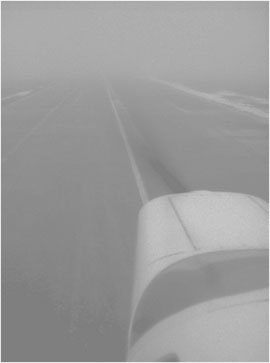
First, however, lets define what we mean by a zero-zero takeoff. In this case and in addition to weather conditions that truly have ducks walking instead of flying, the basic definition should include visibility that prevents a pilot from viewing the entire runway length during the takeoff roll and which is below the lowest instrument approach minimums for the airport. In other words, youll be flying by reference to instruments as soon as your wheels leave the ground-perhaps sooner-and there is little-to-no possibility that you can safely or legally return to the departure airport in case of a problem once airborne.
With these parameters in mind, lets look at what makes for a successful zero-zero takeoff.
Big Boys vs. Little Boys
Your pre-takeoff planning should include considering what you will do if, for example, the cabin door pops open shortly after liftoff or you develop engine trouble. Remember, part of our zero-zero definition involves an IFR departure from an airport below instrument approach minimums. In other words once you leave the runway behind, you wont be able to find it again. What is your back-up plan? Which airport will you use as a departure alternate if you realize you need to be back on the ground shortly after leaving it?
Also, under Part 91, you are perfectly entitled to take off in zero-zero conditions. However, operations under FAR Parts 121, 125, 129, or 135, for example, have rules governing when and under what circumstances a flight may depart during poor weather. So, if we want to approach the same level of safety as that practiced by commercial operators, we will set minimums for takeoff weather as well as have an alternate airport in mind.
Also, an airport qualifying for scheduled commercial air service under Part 121 must not have any obstacles within the immediate environment of the runway or the approach and departure paths. Not only are these airports guaranteed to be free of possible obstructions to navigation, but the air carrier must ensure that the aircraft has sufficient climb performance to adequately clear any obstacles that do exist along the departure path.
At some airports, obstructions poke up into the departure path. In these cases, the published data include specific takeoff minimums and departure procedures. For example, current procedures for Sparta list takeoff minimums of 300-1, but do not include specific departure instructions. Data for the Oakland/Troy (Mich.) airport includes the instruction climb runway heading to 1200 before turning. For airports lacking specific minimums, the FARs mandate one mile of visibility for airplanes with two engines or less; the number is one-half mile for airplanes with more than two engines.
While these published procedures are used by commercial operators, they are not required under Part 91. Yet, you may wish to consider applying some or all of them to your non-commercial operations.
Try This VFR First
Performing a zero-zero takeoff in VFR conditions is a good place to start your planning and practice. Use a wide runway with a safety pilot. Also, the two of you should switch seats while practicing this, so that both of you know whats going on from either perspective. You have a two-part objective. The first is to understand the fine tolerances involved in trying to control the airplane on the runway while under the hood. The second is to actually perform the takeoff by reference to the instruments and getting to liftoff speed without hitting anything.
On taking the active runway, line up as straight as possible on the centerline. Let the aircraft roll straight ahead so the nosewheel or tailwheel is tracking straight and then gently bring the aircraft to a stop. This isnt as easy as it sounds. Set your heading indicator to the nearest ten-degree increment (the thick line) because its much easier to fly a precise heading of 060 degrees than it is 063 degrees. Set the heading bug if you have one. Once youre ready and all pre-takeoff checks are complete (These should have been done before taking the active, right?), slowly open the throttle and proactively feed in rudder to counteract the torque from the engine.
During the takeoff roll, the primary task is to maintain your runway alignment. This means turning as little as possible and there is only one instrument in your panel providing immediate information on your aircrafts turn rate: the turn coordinator or turn-and-bank indicator. The attitude indicator is relatively useless during this portion of the takeoff roll because it will only display a change in bank and, with both main wheels on the ground, the airplane doesnt bank. Your scan should concentrate on the turn coordinator, and you should use it to keep the airplane as close to the runways centerline as possible.
Unless the visibility is really down the tubes or the stripes are so faded you cant see them, use the runway centerline as an additional tool to help maintain directional control. Understand, however, that youll lose this visual reference-and all others, like runway lights-once you pitch the airplane to its liftoff attitude.
As soon as the turn coordinator indicates the slightest turn, you need to counter it immediately with gentle rudder pressure. Your scan should briefly check the heading indicator, but as you will see while practicing in VFR conditions, its hard to detect a one- or two-degree turn on the heading indicator.
Its amazing what two degrees of heading deviation will do on your takeoff roll: Your safety pilot will squirm because a barely noticeable deviation will aim the aircraft right for the runway lights, especially on a narrow runway.
Up To Speed
As the aircraft reaches liftoff speed, apply back pressure to establish the aircrafts normal pitch attitude for an initial climb. This is usually between five and 10 degrees nose up but, in any case, should be determined now, in VFR conditions, before trying it in actual weather. Your most important task at this point is to keep your wings perfectly level and eliminate any yaw by keeping the turn coordinators ball centered. Any bank or yaw in the wings must be corrected immediately.
Some attitude indicators have a slight but definite gyroscopic precession upon rotation, falsely indicating over-rotation. You need to know if your attitude indicator has this tendency. If it does, ignore it.
If you have set the pitch trim correctly for takeoff, the aircraft will naturally seek an attitude resulting in the desired airspeed for the initial climb. Once again, knowing the airplane and practicing in VFR conditions is important.
As the airplane lifts off, you will need to increase the amount of right rudder pressure. This is because, in addition to P-factor, youve lost the friction between the landing gear and the runway. This friction resisted the left turning force and, now that its gone, the airplane will want to turn left even more. If you dont correct for these effects during the climb, the aircraft will yaw off to the left, toward possible obstacles outside the departure path, and your climb performance will suffer.
Initial Climb
Once the airplane breaks free of the ground, your primary job is to control it as it accelerates. At liftoff, your scan should shift to include the other instruments. Use the vertical velocity indicator and the altimeter to confirm a positive rate of climb. Dont be surprised if the vertical velocity indicator and the altimeter show an initial lag, or even a decrease. Thats normal because of the change in the pressure distribution around the aircraft as it climbs away from the ground. Youve probably never noticed it before because you were always rotating and climbing away from the ground with your scan outside of the aircraft.
The speed you should use at this stage depends on the airport environment. For example, if there are obstacles in or near the departure path, pitch the airplane to maintain the best-angle-of-climb speed (Vx) until you are above the highest obstacle in the area. Once you achieve that altitude, you can accelerate to the best-rate-of-climb speed (Vy) and stop worrying about hitting an obstacle. Doing so means you should stay glued to your instruments.
Dont do a thing except maintaining precise control of the aircraft until youve climbed to a sufficient altitude to avoid any obstructions. Then can you relax a bit and fly it like any other instrument departure, with one exception: You cant go back to the departure airport.
Choosing a Runway
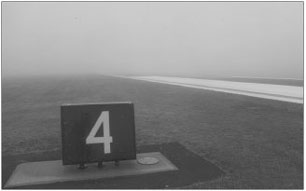
Its absolutely essential that you be able to identify enough of the runways surface to maintain directional control. Not only should you choose the widest suitable runway, but Id also want runway edge lights.
Runway edge light systems are designed to outline the edges of the runways during darkness or restricted visibility conditions. Not only will these lights help you maintain runway alignment, but they will also indicate the remaining runway length by changing colors from white to yellow during the last 2000 feet or half the runway length, whichever is less. Runway edge lights are spaced 200 feet part, so if you can see three sets of runway lights, then the runway visibility is approximately 600 feet.
Id also prefer a runway with centerline lights. These are usually available on runways served by a precision approach procedure. The lights are spaced 50 feet apart and are white until the last 3000 feet of the runway, at which time the lights alternate between white and red. In the last 1000 feet of the runway, all centerline lights are red.
Is the Runway Clear?
Anyone who has researched the March 27, 1977, accident involving two 747s at Tenerife understands the need to verify a clear runway in low-visibility conditions. In this accident, the captain of a 747 had no idea that another 747 was also on the runway when he applied takeoff power.
At towered airports without the latest airport surface detection equipment, the controllers presume the runway is clear when a takeoff clearance is issued. However, the controllers cant be certain the runway is clear in low-visibility conditions. A lost aircraft that made a wrong turn from a taxiway onto the runway or an errant vehicle could be hiding in the fog.
Poor visibility will also disguise other possible runway obstructions, including deer. In a short three-year period, there were more than 120 accidents involving deer strikes on the runway, and that doesnt include the large number of incidents or close calls involving deer or other animals.
The Real Deal
So, youre ready for a real, no-kidding zero-zero takeoff. In addition to your normal pre-flight planning, you need to think about a takeoff alternate, just like for commercial operators. A takeoff alternate needs to be within a reasonable distance and have suitable weather so you are assured of landing. An airport in a radar environment-to help expedite your arrival and provide additional back-up-would be nice, as would one with weather reporting, a big runway, precision instrument approach procedures and ARFF services. Dont forget that the pre-flight is especially important during a zero-zero takeoff. You want everything working perfectly. A thorough check of your instruments is absolutely mandatory (see the sidebar).
The zero-zero takeoff is an important item in your IFR bag of tricks. Understanding the risks and knowing how to minimize them removes the guesswork.
Also With This Article
“How The Big Boys Do It”
“Pre-Flight Instrument Check”
-Pat Veillette is an aviation safety researcher who flies transports for a living.


