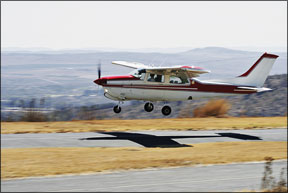
The short-field approach and landing is something we all learned as student pilots. Commercial students get to show some additional expertise. However, both the private and even commercial requirements are a bit relaxed and dont really prepare us for that maximum performance, white-knuckle experience of putting the airplane down on that postage stamp some joker sadistically calls a runway. 288 When we say “short-field approach and landing,” were really talking about two entirely different situations with different techniques. Obstacles at the approach end of the runway determine how we will make the approach-whether we can “drag it in” a few feet off the ground, or if we have to make a steep descent to clear the FAAs standard-issue 50-foot tree right at the runway threshold. Back to Basics Perhaps over the years since you last had to demonstrate your precision landing skills, youve gotten a bit complacent, adding a few knots here and there to your approach speed. Or perhaps youve transitioned to a higher performance airplane and you just feel more comfortable coming in a bit faster. Or maybe your home ‘dromes shortest runway is so long you could do a couple touch-and-goes before the end, and you just havent worried about a precision landing in years. If you fall into any of these categories-and most of us do-a review of the basics is in order before we talk about short-field techniques. Youve probably heard this before: “The best landings typically follow the best approaches.” Youve heard it before, because its true. Fly a proper pattern, make your pattern turns at the same distance from the threshold and altitude above the ground, maintain consistent airspeed control and youve made a good start toward the perfect short-field approach. To fly precision approaches youll need to hone your judgment on when/where to make the pattern turns. At your home drome youve learned where to make those turns based on local landmarks, but you need to do it without landmarks. So, go practice at some new airports. The traffic patterns objective is to turn final “on glide path,” as defined by the now nearly ubiquitous VASI or PAPI that typically provide a standard three-degree glidepath. So, for our purposes here, we want to roll out on final at a reasonable altitude, say 500 feet agl, right on the visual glidepath. Adjust and manage the pattern to achieve that outcome. You should practice so you can fly the same pattern consistently, at the same speed, altitude and position relative to the runway for each turn at whichever airport youre using. Regardless of the old argument about whether pitch or power controls altitude or airspeed, well stipulate that for a precision approach and landing its easier to think in terms of managing airspeed with the elevator, and managing descent rate and altitude with power. Just be aware that neither control is autonomous; if youre a bit fast and pitch up to reduce your speed, youll likely have to reduce power to maintain the glidepath. Similar adjustments are almost certainly required when flaps are added and with the additional sink rate in the turns. Before any serious effort to maximize your short-field performance, you should be very comfortable in slow flight. Were not talking 1.3 times VSO here; were talking right on the ragged edge of the stall, with the horn blaring constantly, where a few degrees of pitch or a little bit of power separates straight and level from a descent or even a stall. (If you need to bone up on flying in this portion of your airplanes performance envelope, see “Slow For Slows Sake” in our May 2009 issue.) Real comfort and skill in the extreme slow-flight regime will allow you to achieve maximum performance with your short-field technique because youll know where the exact boundaries are, and how to maintain a slim but safe margin. Of course, you should review the procedures listed in your airplanes manual. Well recommend general airspeeds and techniques, but you should always start with their advice where it exists. As you gain more and more experience and confidence, you may choose to adjust specific POH recommendations that might be a bit conservative. In particular, you may eventually find yourself flying the final part of the approach a bit slower than recommended, especially at lighter weights. In General Your approach should be normal until you roll out on final, typically at about 500 feet agl. By at least 300 feet agl you should be fully configured and stabilized at your final approach speed, typically 1.3 times VSO. As you gain expertise you may get comfortable going a bit slower, but be sure to leave sufficient airspeed for the flare or a go-around. Probably not less than 1.2 VSO is good advice until youre ready to drop your Super Cub onto that 300-foot gravel bar in the Susitna River, in which case youll probably slow to 1.15 times VSO as you commit to the landing at about 100 feet agl. Add a few knots in gusty conditions, but not more than half the actual headwind gust factor. Be careful with any speed changes, too, as they will most likely adjust your glidepath and could destabilize your approach. Regardless of your final target speed, be very careful of getting on the back side of the power curve: Even with full power, you may still be too low and slow, and the only way to increase speed is to pitch down. The general technique for short final and landing is to be well stabilized and to tightly manage your airspeed through gentle pitch adjustments, and to fly the correct glidepath with power adjustments. Pick an aim point and keep it at the same place in the windshield. If you remain properly stabilized all the way down, at a point 10-30 feet or so above the ground, youll notice your glidepath flattens and your aim point will drift below you. Youve just entered ground effect, and this is your cue to round out and flare. Do not round out too early. Smoothly pitch up into a normal landing attitude, gradually reduce power to idle and hold it. Youre not trying to squeak this one on; instead, youre after a no-finesse firm landing as close as possible to your target. A vertical speed at touchdown of 100-200 fpm sounds high, but is ideal. Any finesse or float will eat up valuable runway you dont have to spare. Leaves in the Wheel Pants? Well start our discussion of specific short-field landing techniques with an obstacle right at the approach end of the runway. Clich? Yes, but it does exist in real life. We have a friend who has a private airstrip on a hilltop in a clearing, surrounded by trees. Hes very good at maximum performance short-field technique because he has to be. His performance is nearly flawless and nearly identical, time after time. One day, he noticed a few sprigs and leaves caught in his wheel pants. He thought perhaps his approach that day got a bit low, so he went right up to correct it, only to get the same results. Then he realized that it wasnt his consistent approach that had gone awry, but that the trees had grown. Time for a trim. So, yes, there are airports where youve got that obstacle to clear as you give it your best short-field technique. Make your normal approach, rolling out on final on your practiced glidepath. If youre not familiar with the airport, consider making a bit wider pattern and a slightly extended final. On final, on glidepath, your aim point is probably obscured by the obstacle. Increase power to slow your descent rate until your path to the aim point is clear of the obstructions. Now, reduce the power to maintain that new glidepath. Dont let your view of the relationship between the top of the obstacle and your aim point change. If they stay in approximately the same relative position to one another until just before the obstacle, youre maintaining the optimum glidepath to hit your aim point while just missing the obstacle. After clearing the obstacle, maintain glidepath and speed into the roundout and flare. If your glidepath is very steep, you may blast right through ground effect, so when making steep approaches at low airspeeds, be extra vigilant that you maintain enough energy for the roundout and flare. Drag It In Landing on a short runway where you have an unobstructed path to the threshold requires a different technique on final. Plan your pattern for a final that is longer and lower than normal. Pick an aim point that is a few hundred feet before the runway. Set up a normal short-field approach to that point. At about 50 feet agl, though, start to bring in the power with the objective of leveling off at about 10 feet. It may take nearly full power, and here is where your slow flight practice will be particularly helpful, although you may get by with a bit less power due to ground effect. Maintain that until just before the runway and then smoothly pull the power and land. Once you get comfortable dragging it in while in ground effect and just above stall speed, youll find that you can consistently touch down in the first few dozen feet of the runway. Good practice for this back at your home field is normal pattern work to a low pass a few feet off the runway. In fact, the best way to think of it is a normal precision landing without the touchdown. Just use enough power to skim along a couple thousand feet of runway a few feet off the pavement. KerPlop! Okay, youve skillfully placed your airplane down on that short runway just a few feet from the threshold. Dont relax and begin breathing again just yet. Youve still got to stop. Gently pull the elevator back as far as you can without hitting the tail. Your airspeed should be insufficient to fly again, but it should lift the nosewheel (or plant the tailwheel). This attitude will provide aerodynamic braking due to the additional drag from the up-elevator, and without the nosewheel on the ground and with the increased down force from the elevator, youve got maximum weight on the main gear. It is advisable to raise the flaps. Right now you want to maximize weight on the main gear and typical flaps provide a lot of lift. Apply the maximum brake pressure but dont skid the tires. This will require some feel and experience to get just right. If you do start to skid, just relax some of the brake pressure. Also, be very careful about directional control. The last thing you want is to get stopped by a tree on the side of the runway. Leaving the Scene Now that youve landed on that incredibly short runway, at some point youll probably want to leave. Although good technique is important for the short-field takeoff, possibly over an obstacle, theres not much more to it than precise airspeed control. Obviously, you want to maximize the distance available for your takeoff. Be sure to start at the very end of the runway. Properly configure trim, flaps and the rest of the airplane for takeoff. Smoothly bring in full power while keeping the brakes on. (Although this “static” power takeoff hasnt been conclusively shown to measurably reduce the takeoff roll in all GA airplanes, it does result in noticeably greater acceleration, which is good enough for us.) Be aware of the runway surface, though, and the props tendency to pick up debris. Only use the static power takeoff with the shortest runways where youre not likely to incur any prop damage. Release the brakes as power reaches maximum and begin your takeoff roll. Best angle of climb speed, VX, is your friend. Smoothly and firmly rotate as you approach VX and climb out with that speed nailed. As little as a five-knot deviation from VX can have a significant impact on altitude gained for distance traveled. At VX, your speed is low enough that the additional drag from flaps and/or gear is minimal, so the best advice is to leave them in takeoff configuration until clear of any obstacles unless the manufacturer recommends otherwise. Once clear of the obstacles, clean up the airplane and continue the climb normally. Get In, Get Out So, there you have your short-field technique: Maintain a stabilized approach. Be consistent with your traffic pattern turn points and altitudes. Nail your airspeed. Maintain your aim point. Land at minimum airspeed after a very brief flare. Maintain elevator back pressure. Raise the flaps and apply maximum braking. Do all this correctly and youll be able to land in the minimum possible distance. So short, in fact, the results might be better than the minimum required takeoff distance, even with your best short-field take-off technique at VX. (You did check your takeoff distance charts before planning the landing, didnt you?) Frank Bowlin is a frequent contributor to