
When I earned my instrument rating many years ago, it was common to add the notation “No SIDS, No STARs” in the comments block of an IFR flight plan. This was primarily because these procedures were published in a separate book from instrument approaches at the time, and it wasn’t common for private operators to add the cost of these additional charts every 28 days. There was also a feeling that SIDS and STARs were “big airplane” procedures, not something we’d do in an owner-flown aircraft.
But instrument departure and arrival procedures don’t cost any extra with the flight planning software we have today. Using published procedures allows you to better plan for and predict your navigation tasks. With GPS-driven moving maps having become ubiquitous, flying a SID or STAR simplifies everything from copying a clearance to staying ahead of the airplane. Along the way, they can reduce cockpit workload while enhancing situational awareness. Single-pilot operators especially should include SIDs (and STARs) in their flight planning. Let’s look at why using published departure procedures can provide all these benefits for minimal investment of your time.
IFR DEPARTURE TRAINING
Taking off into IMC carries considerable risk. We have the task of transitioning from visual to instrument flight close to the ground, at a relatively low airspeed and, typically, with a higher angle of attack than at any other time during the flight. If it’s our first flight of the day, we’re doing this when we haven’t tested our skills yet, and we haven’t had the opportunity to verify the airplane will perform as expected. Because of the heightened risk, when the time came for my personally imposed annual type-specific training, I chose to focus on instrument departures, including obstacle departure procedures (ODPs) and standard instrument departures (SIDs).
Wanting a good workout on a variety of challenging scenarios, I contacted instructor Debbie Wadhams in Kansas City, Missouri. Debbie has worked as a corporate and charter pilot, flying piston twins and turboprops, so she was accustomed to flying the same departure arrival procedures I use in the A36 Bonanza I most commonly fly. She is a standardized instructor in the American Bonanza Society’s Beechcraft Pilot Proficiency Program (BPPP), which I run. She teaches in a Bonanza/Baron advanced aviation training device (AATD, or “simulator”) in Kansas City.
After we coordinated our schedules, Debbie sent me a detailed homework assignment to complete prior to our training date. Much of this assignment was to plan IFR flights from my home field at Wichita to several airports and return, planning a takeoff into IMC at each and filing SIDs and STARs where applicable. During our roughly five hours of training time together, Debbie provided great insights from her experience flying the same procedures I’d experience in simulation.
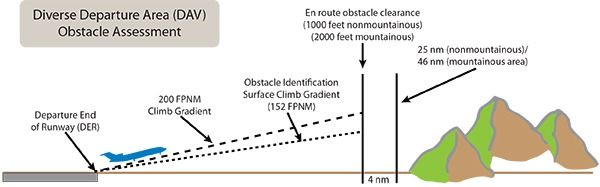
The FAA’s Aeronautical Information Manual (AIM) states, “A Diverse Vector Area (DVA) is an area in which ATC may provide random radar vectors during an uninterrupted climb from the departure runway until above the MVA/MIA, established in accordance with the TERPS criteria for diverse departures. The DVA provides obstacle and terrain avoidance in lieu of taking off from the runway under IFR using an ODP or SID.” (AIM Para. 5-2-9(b))
“Unless specified otherwise, required obstacle clearance for all departures, including diverse, is based on the pilot crossing the departure end of the runway (DER) at least 35 feet above the departure end of runway elevation, climbing to 400 feet above the [DER] elevation before making the initial turn, and maintaining a minimum climb gradient of 200 feet per nautical mile (FPNM), unless required to level off by a crossing restriction, until the minimum IFR altitude.” (AIM Para. 5-2-9(e))
KAAO–KMKC
Our first flight in the sim was a “simple” IFR departure from my home airport, Wichita’s Colonel James Jabara Airport (KAAO) to our training location at Kansas City, Missouri’s Charles B. Wheeler Downtown Airport (KMKC). There is no SID published out of Wichita. An IFR departure, then, means flying a diverse vector area procedure (DVA) or an ODP if one is published.
A DVA departure means that, after climbing on runway heading to 400 feet agl, you may turn immediately on whatever assigned heading or cleared route you’ve been given. An ODP will modify this to include specific heading or course and altitude requirements. Being based at KAAO, I know Runway 36 includes a DAV: climb to 400 agl and then turn on heading or course. Runway 18, by contrast, has an ODP: fly runway heading to 2000 feet before turning on course or assigned heading. A quick look at the takeoff minimums section of the Chart Supplement confirmed that these procedures had not changed. See the sidebar on the opposite page for more details.
Most Bonanza pilots would probably file GPS direct to KMKC, anticipating vectors. In the spirit of this exercise, however, I chose to file and fly the Jayhawk Six arrival (JHAWK.JAWK6), Emporia transition. That means I filed from KAAO to the Emporia VOR, and then the arrival into KMKC. On the day of my simulator training, real-world Notams included the closure of Runway 03/21. With strong northerly winds, Runway 01 was in use; because Kansas City Downtown sits close to the bluffs of the Missouri River and the city’s skyscrapers and Signal Hill radio antenna just to the south, there is no approach procedure into Runway 01. Consequently real-world conditions of 900 overcast, visibility five, required an RNAV (GPS) Runway 03 approach, circle to land Runway 1.
The flight, then, was this: Take off into IMC on KAAO’s Runway 18, climb straight ahead to 2000 feet, focusing on basic attitude flight (“aviate”) until passing 2000 and completing the turn on course (“navigate”) with only the barest necessary radio work to check in with ATC (“communicate”) before well above ground and on course toward Emporia. Using simulator time compression, Debbie then advanced me to Emporia for the circle-to-land approach at KMKC. During the circle, I reentered clouds and had to execute the missed approach, reintercepting the Runway 03 missed approach course and entering the published hold. Debriefing, we discussed how I would have flown to Emporia, and then followed the STAR to HOOZE, followed by radar vectors for the approach. We also reviewed the significance of the visual descent point (VDP) as it applies to straight-in and circling approaches. It was a realistic scenario that reflected just how the flight might had gone under the day’s actual conditions—and a good workout.
Departures into IMC continue to regularly crop up in NTSB reports. Usually the outcome is labeled controlled flight into terrain (CFIT), manifested in a failure to climb and a descent back into obstacles shortly after entering IMC. Sometimes it’s loss of control in flight (LOC-I), when the airplane stalls or the pilot lets it slide into a spiral, impacting terrain.
Instrument training, checkride evaluation and IFR recurrent syllabi focus primarily on instrument approach procedures. There is very little emphasis on IFR departures, and no specific requirement to include taking off into IMC on the instrument rating practical test or instrument proficiency checks (IPCs). We gauge our currency (and therefore proficiency) for IFR flight almost entirely in terms of the number of approaches we’ve recently flown, with no requirement to remain current in departures. My personal feeling is that we need an additional column in our logbooks: one for instrument departures, alongside those for approaches, holds and course navigation, to help us track our currency for IFR flight.
I won’t depart with a ceiling below 1000 agl unless visibility exceeds three miles. Between 600 and 1000 feet, I need great visibility—10 miles or more. My personal minimum ceiling for takeoff is 600 feet.
I really wanted to make the one-hour flight from KAAO to KMKC for my simulator training in the Bonanza. As late as 0500 before my planned 0800 departure, the ceiling was forecast to be at least 1900 overcast with 10 miles’ visibility. But between my 0500 weather check and eating breakfast, it went down to 500 and 2½, despite the forecasts. I made a quick decision and drove up for my simulator sessions. As I often put it, personal minimums are worthless if you abandon them when they become inconvenient.
KAAO–KRBD
We reset to KAAO for the next flight, to Dallas, Texas, Executive Airport—still known to older pilots as Redbird (KRBD). Debbie asked how I filed. I told her my experience is that ATC liked an initial fix close in before heading into another Center’s area. In this case, I usually file to the Pioneer VOR (PER) in northern Oklahoma. This sends me wide of the busy McConnell Air Force Base pattern before heading en route. Debbie agreed—she said her experience taught her that on a long GPS-direct flight, ATC likes a known initial fix so they can better plot your departure. So, my experience was borne out by hers, and validated at other locations as well.
From PER, I’d “fly” to an initial fix on the FingerSix Arrival, in this case the Will Rogers VOR (IRW) at Oklahoma City. “That takes you quite a bit out the of way,” she told me. Instead, her experience suggested filing GPS direct to a fix closer in on the arrival. In this case, she suggested KAAO-PER and then direct to RIGYA, the turning point after flying southeast from IRW. As we discussed, the idea is to fly a predictable route into the terminal area. It can’t hurt to file a shortcut; you might just get it.
For the return home from KRBD, I filed the Texoma Eight departure, with the Ardmore transition. Key to this SID is an initial heading and altitude to a specific altitude that varies depending on the departure runway. Reaching the safe altitude, you can engage your GPS navigator and follow the SID until the jumping-off point, in this case the Ardmore VOR in southern Oklahoma, then as filed. Debbie then told me the reality of an IFR departure from Redbird: Most of the time, you’ll be assigned the SID mainly for “lost comm” purposes, but once airborne you’ll be vectored to the east and then northward to avoid traffic from Love Field and DFW.
Finding the right SID or STAR for your route of flight used to be a challenge. It’s far easier now if you’re in the vast majority that use ForeFlight Mobile or similar tablet-based electronic flight bag/planning software.
For example, from the Maps page in ForeFlight and with your route entered, tap on your departure or destination airport as appropriate, then tap on Procedures at the right of the route box. You’ll be presented with an overlay of the available SIDs or STARs for the airport. Tap on the one that is going your way and enter it into the flight plan. If you’re really upscale, you’ll Bluetooth this directly into your panel navigator once you’re in the airplane. SIDs and STARs have never been easier. ForeFlight’s SID selection for KAPA is shown at right.
KAAO-KAPA
Next up was a flight into Centennial Airport (KAPA) near Denver, Colorado. The STARs into KAPA are either from the wrong direction for my route or apply only to turbine aircraft. Debbie’s trick: file direct to one of the lower-altitude fixes on a JET arrival, to make yourself more predictable to controllers and eliminate that sometimes “lost” feeling of being on extended vectors, knowing about (but often not precisely) where you are until intercepting an approach segment. I don’t like that feeling, so I took Debbie’s advice.
On the approach to Runway 35R, my instructor threw in an airplane disabled on the runway and instructions to sidestep to 35L. I was passing through 6500 when given this call; only having looked at the entire chart beforehand (not just the version of the approach I expected to fly) did I know it has special sidestep minimums; I was able to arrest my descent before reaching this MDA and change runways. Of course I re-entered IMC as I side-stepped and had to miss. What else would you expect in a simulator?
The Plain One departure is aligned with my route from KAPA back to KAAO. It’s straightforward, but still a good exercise in departure workload management. We had an important debriefing discussion about the lost communications instructions contained in this SID, a vital consideration with the nearby mountains.
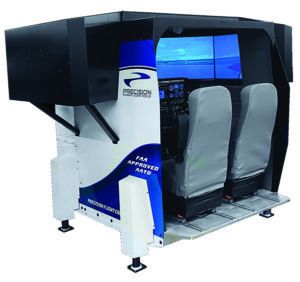
I’m a big fan of using simulators. A recent change to the FARs permits using FAA-approved advanced aviation training devices (AATDs) like the Precision Flight Controls DCX MAX-NG for IFR currency the same way we do an airplane—you can log the IFR procedures for currency without an instructor. Just like in an airplane, however, to catch any bad habits, and to learn more than you already know (instead of merely practicing the skills you already possess), you need the help of a good instructor.
The most effective use of a simulator, in my opinion, is for realistic scenarios that you cannot easily or safely practice in an actual airplane—a series of ODPs, SIDs and STARs at a variety of geographically dispersed airports as I did for my recurrent training, instrument failures, partial and total power loss, etc. The growing availability of AATDs has opened up this type of training to personal aviation like never before. You can become a better IFR pilot by flying a simulator under the tutelage of a good instructor.
KABQ-KAAO
After some partial-panel exercises, our last “flight” was a night VMC departure from Albuquerque, New Mexico’s International Skyport, back to KAAO. I personally avoid night IMC, and if flying at night I file IFR. This is especially helpful in an unfamiliar area with obstacles and terrain—like KABQ. It’s an extremely good idea under such conditions to stick to charted airways until well away from the mountains. After much consideration, I filed a route up toward Santa Fe, northeast to Las Vegas, New Mexico, and then eastward. It requires 9000 feet initially and a 12,500-foot MEA soon after departure. On discussion with Debbie, I would instead go southeast first with a 10,000-foot MEA. But for purposes of our exercise, I stuck with my initial, higher route.
There are no SIDs that really made sense for my route. Simulated winds were strong from the east and Runway 08 was in use. The temptation in great visual conditions, albeit at night, would be to depart and turn left to intercept my northerly route. But there are mountains out there in the dark. The purpose of this exercise was to check for and follow an ODP. In this case, the ODP calls for a climbing right turn after takeoff (after first climbing straight ahead to 400 feet agl), climbing west to the ABQ VOR west of town and climbing in a hold until reaching filed altitude and turning on course. I’d done my homework, so with a quick review of the takeoff minimums, I was ready—even when Debbie “failed” my GPS immediately after takeoff and I flew the departure and climbing hold “old school,” using the #2 VOR. In the real world, I would have simply returned to KABQ and called off the trip.
YES TO SIDS, YES TO STARS
This was a great training experience for me, and highlighted the value of perusing SIDs and STARs before takeoff. Single-pilot operators especially should include SIDs (and STARs) in their flight planning. Say “yes” to SIDs and STARs, and file them as part of your IFR flight plans.


