
By the time you read this, my Debonair should have a freshly overhauled engine holding down its nose. The story of how all that came to be is best told with a few adult beverages, but the bottom line is I will soon have a new hole in my wallet and a zero-since-major-overhual IO-520.
This isn’t my first engine overhaul with this plane, but it has been a while, so I sat down recently to review how I handled the previous one, update myself on the various recommendations and develop a plan for the plane’s next few flights. I came away with new appreciation and respect for test pilots.
INFANT MORTALITY
In my case, the result pretty much will be a firewall-forward overhaul or replacement of everything. Last year at annual, I had the exhaust and propeller sent out for inspection and repair as necessary, an IRAN. After the engine is reinstalled, everything else except the wet vacuum pump and the baffling will be new or overhauled. This actually increases the risks the first few flights pose. It’s called “infant mortality,” which describes the fact that new components can have a higher failure rate than those already in trouble-free operation. Ever had a new product fail out of the box? Same thing. So there’s more going on here than just breaking in some new cylinders.
The description of new or overhauled components reads like a parts list, which it basically is. In addition to the nuts, pins, clamps bolts, washers and rings required to keep a piston engine from tearing itself apart, there are new spark plugs, a harness kit, overhauled magnetos and fuel system, and even an overhauled starter. (The last overhauled starter on this engine gave up after way too few starts; it was replaced with one pulled from an in-service engine and never gave me a problem. Go figure.) The shop handling the engine’s installation also will be adding new hoses and engine mounts. So if anything can go wrong, it likely will in the first few hours of operation, at least until everything gets up to operating temperature a few times and all the bits learn to work and play well with one another.
All of which argues for much more caution in the first few hours of flight than with an in-service engine. I’ve got a plan for that, which is summarized in the sidebar on page 18. Basically, it comes down to keeping everything cool and staying over the airport for a couple of flights to check for leaks, and to have a runway ready in case someone forgot a cotter pin.
Once I’m satisfied there are no leaks and all the engine instruments suggest the overhauled engine is operating within expected parameters, it’ll be time to wring it out a bit, with some low-altitude, high-power flights designed to break in the new cylinders and piston rings.
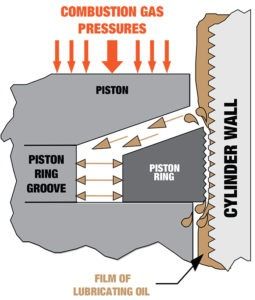
Much of the aircraft engine break-in guidance rightly focuses on the cylinders. For example, an older Teledyne Continental Motors (TCM) publication states “Piston ring seating is paramount to proper engine break-in” and “Piston ring seating means the rings and the cylinder wall must wear-in together to provide an effective seal for the combustion chamber and to keep combustion gas blow-by and oil consumption to a minimum.” Importantly, the recommended cylinder break-in procedures apply to new and remanufactured engines, complete overhauls, top-end overhauls and simple replacement of a single cylinder with a new one.
The graphic at right shows why, and what’s going on in the cylinder itself. A new cylinder’s wall typically is honed before installation, leaving the surface relatively rough. New rings have a similar finish. To properly seal the piston/cylinder interface, these two surfaces need to be worn down during initial operation. The trick is to force the rings against the cylinder walls during the break-in process, minimizing lubrication.
This is best accomplished by running the engine at high power settings, which generate the highest internal cylinder pressures, maximizing both ring expansion against the cylinder walls and friction. This naturally generates greater heat than normal. This part of the break-in process can be considered complete when cylinder-head temperatures stabilize.
CYLINDERS
In fact, a primary consideration for breaking in a new aircraft piston engine is seating the piston rings and wearing down the cylinder walls so the two components mate well. The sidebar below explains why new cylinders and rings need this treatment. How is this process best accomplished?
The gear-head answer involves trying to maximize internal cylinder pressures generated during the combustion event. The expanding combustion gases exert pressure on the top of the piston, driving it down in the cylinder and rotating the crankshaft, ultimately spinning the propeller. Those pressures are at their greatest when the engine is operated at high power settings. For a normally aspirated (i.e., non-turbocharged) engine, the highest power output is obtained at sea level, which of course is impractical to say the least. Instead, the idea is to fly at the lowest practical altitude at or near the engine’s maximum continuous power setting. This generates the desired maximum internal cylinder pressures and is the quickest way to seat the rings against the cylinder walls.
Of course, this operating mode also generates the greatest heat, which must be managed to remain at or below redline temperatures. There are three basic ways to manage that heat: effective mixture control, high airspeed and opened cowl flaps, if any.
When I broke in this same engine and its cylinders after an overhaul too many years ago, this is exactly what I did, after initial test flights and leak checks. I took off, climbed to 2500 feet msl, rolled the prop back a bit and fiddled with the mixture. My logbook shows it took only 0.4 hours on the tachometer to fly to an airport 62 nm away. By the end of that quick trip, all six cylinders showed signs of having broken in. What signs? A drop in cylinder head temperatures (CHTs).
This is just one reason a digital multiprobe engine monitor is worth its weight in gold. I literally watched the monitor’s display as first one, then another and soon all six cylinders showed a drop in CHTs. How much of a drop? If memory serves, it was on the order of 20 to 30 degrees F—for some reason, it appears I didn’t save the monitor data for that flight. The CHT drop was obvious and occurred over just a few seconds. At that point, I considered the cylinders to be broken in. I ran the engine hard for the next few hours, anyway, just to be sure, but I never again saw such an obvious change in CHTs with that engine, absent some input on my part.
For the simple reason the airplane has a new, untested engine under the cowling, proper risk management means we should approach the airplane’s first flight less casually than might otherwise be the case. Consider these suggestions for new-engine test flights, based in part on Lycoming’s Service Instruction No. 1427C and now-defunct Continental Service Bulletin M89-7R1. In all cases, manufacturer’s recommendations supersede.
Before First Flight
After an extensive pre-flight inspection, point the engine into the wind, start it and let it idle. Verify oil pressure immediately. With a constant-speed prop, cycle the control once to ensure fresh oil is in the prop. Perform a magneto check at idle to verify the ignition system. Operate the engine at idle for one minute, gradually increasing to 1000 rpm in three minutes. Shut down and inspect for irregularities.
First flight
Minimize ground time before takeoff. Conduct a normal run-up but without deeply cycling the prop control, if any. Conduct a full-power takeoff, with a lower-than-normal rate of climb allowing higher airspeed to maximize cooling. Climb above the traffic pattern, set power as desired and orbit the field. Closely monitor engine instruments, especially fuel flow, oil pressure, oil temperature and cylinder head temperature. After 15 minutes or so, land and perform another detailed engine-compartment inspection.
Jeb Burnside is this magazine’s editor-in-chief. He’s an airline transport pilot who owns a Beechcraft Debonair with a freshly overhauled engine, plus the expensive half of an Aeronca 7CCM Champ.
BEYOND CYLINDERS
Most resources identify the engine’s first 25 hours of operation as a continuing break-in period. After the initial break-in flight, when you look for CHTs to drop, indicating the rings are initially broken in, the next few flights are important, too. For example, Continental says that, after “initial ring seating,” CHTs “can remain slightly elevated for several more hours until complete ring seating has been accomplished.” Fully seated rings are indicated by “stabilized oil consumption and decreased cylinder head temperatures.”
Continental recommends alternating power settings between 75 and 65 percent every 15 to 30 minutes on subsequent flights. “Descent should be made at low cruise power settings with careful monitoring of engine pressures and temperatures,” the company adds, and to avoid manifold pressures below 18 in. Hg. except when landing. After five hours of operation, change the oil and inspect the filter. There will be metal in the filter. After another 10 hours, change the oil and inspect the filter again, then repeat at 25 hours total. By this time, oil consumption should have stabilized and minimal, if any, metal should be found in the filter.
Finally comes the question of whether to run the engine rich of peak (ROP) exhaust gas temperature or lean of peak (LOP) during these initial flights. It depends. Running LOP at high manifold pressure and rpm settings reduces internal cylinder pressures as well as temperatures. Going ROP maximizes those pressures at the expense of risking overtemping your new jugs. Our advice? Run it like you plan to fly it.


