
I will never forget my first time in true IMC. It was about halfway through my instrument training, during the winter months of New England. There were always challenges getting actual IMC experience; most of the quality clouds contained icing that prohibited any safe training.
Finally, it was a warm day with the freezing levels up above 10,000 feet. My instructor provided the typical advice: “Trust your instruments.” I knew IMC could be disorienting, but I was pretty confident. After all, I was deep into instrument training. Being under the hood was no problem.
GETTING THE WINGS WET
The ceilings were around 1000 feet agl, so it was not long after departure before we entered IMC. It struck me how I went from a typical climbout to using what felt like 100 percent of my brain power to keep the aircraft on its proper heading, climb attitude and airspeed. Our first turn was around 180 degrees, and I was really feeling the leans. I think I was actually leaning against my instructor, fighting the urge to turn the aircraft back to what my body was screaming “level” flight was. Eventually, I settled in, but I really appreciated how much my body and senses can mislead me. The solution? Trust your instruments!
Later, we were prepping for my instrument checkride, doing partial-panel work. Without being able to simulate a true instrument failure, my instructor was forced to plop an instrument cover or two over my six-pack. In training, you play with the cards you are dealt. Luckily (unluckily?), I experienced an actual instrument failure. It was not as simple as your CFI-I reaching over and covering that sucker up. In my scenario, I noticed I was about 50 feet high. I adjusted my pitch slightly, hearing my instructor in my head: “Small corrections!” I continued my scan to ensure my heading and speed were still where I wanted them.
Once I got back to the altimeter, I was still 50 feet high. My first thought was my correction was too small. I suspect I ended up pitching down about five degrees before I realized the altimeter was frozen. Even after my brain caught up with the failure, it was still a challenge to disregard the errant instrument. Knowing what causes these failures, how they present in the cockpit, and how to mitigate the risk is critical to safe instrument flying.
ALIMETRY ERRORS
High-to-low, hot-to-cold, look out below! This aviation axiom is a quick breakdown of the most common altimetry errors. Without going into too much detail, the basics of altimetry boil down to the altimeter measuring altitude through changes in atmospheric pressure as the aircraft climbs and descends. If the pressure and temperature remain constant, and there are no other altimeter failures or a static blockage, this works great.
Transitioning from an area of high pressure to an area of low pressure feels the same to the altimeter as climbing. If the altimeter is not set correctly, the aircraft could end up lower than the indicated altitude would portray. In a similar vein, flying in colder, denser air can cause the altimeter to show higher than the aircraft’s true altitude. So it is critical to ensure the altimeter is set correctly during all phases of flight. If there is excessively high or low pressure—so high or low that the altimeter cannot be accurately set—flight operations should not be conducted in that aircraft.
There are two critical reasons to ensure the aircraft’s altimeter is set. The first is traffic avoidance. If ATC has an IFR arrival at 3000 feet and a transient VFR aircraft below it at 2500 feet, even a few hundred feet of error on either aircraft could create hazards.
The second reason an updated altimeter is important is for terrain avoidance. When operating above mountainous terrain, atmospheric conditions can exist causing the altimeter to indicate up to 1000 feet higher than the aircraft’s actual altitude. Factoring in this, human error and downdrafts, it is prudent to give high, mountainous terrain as wide a berth as you can afford.
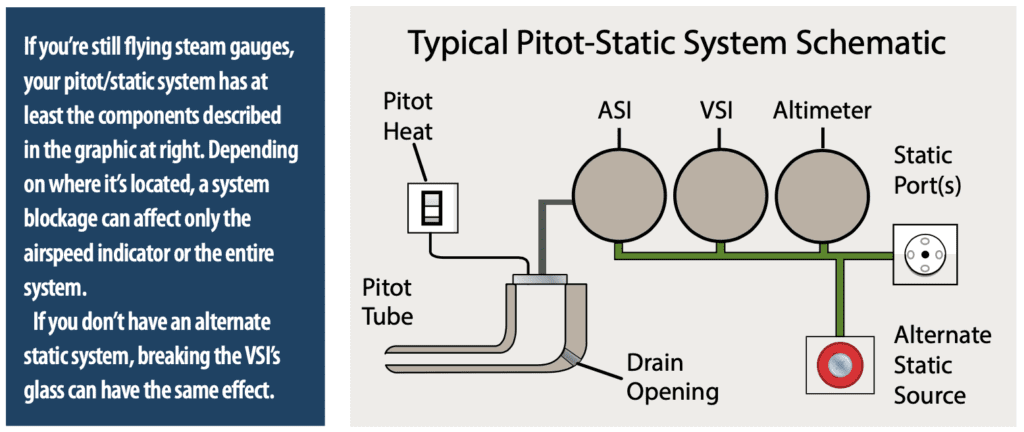
PITOT TUBE BLOCKAGE
A pitot tube blockage can be caused by dirt, moisture, ice or even bugs. And, of course, aborted takeoffs after a failure to note “airspeed alive” on the takeoff roll, only to later find the pitot-tube cover still on, almost mockingly. Assuming a proper preflight inspection, ensuring the pitot tube is free and clear, obstructions can still unfortunately occur during flight. There are a few possible scenarios.
Blocked pitot tube with unblocked drain hole: This would result in the airspeed indicator reading zero. Because the pitot tube would not be able to sense any airflow, and the drain hole would let any residual air out, there would be no pressure differential for the airspeed indicator to measure.
Blocked pitot tube with blocked drain hole: With trapped dynamic pressure, the airspeed will indicate whatever speed was showing when the blockages occurred. If the aircraft’s static port remains unblocked, pressure will increase as the aircraft descends and decrease as the aircraft climbs.
If static pressure decreases during a climb, the trapped ambient pressure with allow the diaphragm to expand, showing an increase in airspeed. Conversely, descending into denser air will force the diaphragm to close, showing a decrease in airspeed. In short, the airspeed will act in a manner similar to an altimeter.
STATIC PORT BLOCKAGE
Blockages of the static port will affect all pitot/static instruments.
Airspeed Indicator: If the static port is blocked but the pitot tube remains clear, the ASI will function but not with accuracy. If speed remains constant, and the aircraft climbs or descends, the static pressure will result in changes to your airspeed indication. It’s the same principle as a blocked pitot tube but reversed.
A climb will result in a decrease in atmospheric pressure entering the pitot tube, which will result in the ASI indicating decreasing airspeed, causing the ASI to act as a “reverse altimeter.” As long as the pitot tube is not blocked, changes in airspeed will reflect on the ASI, but not accurately.
Vertical Speed Indicator: With no changes to static air, there can be no differential pressure for the VSI to work with. With no differential pressure, the VSI will be stuck at zero, and you’ll marvel at how well you’re maintaining altitude.
Altimeter: The altimeter will freeze at whatever altitude was indicated when the static port was blocked.
An instrument taxi check is an essential tool to ensure everything is working prior to takeoff. There are many ways to effectively conduct one, but as long everything is checked in a sensible flow and it is completed before takeoff, the exact method is dealer’s choice. What to look for:
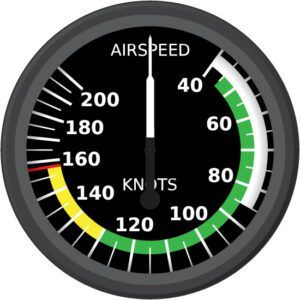
Airspeed Indicator
Until beginning the takeoff roll, it’s unlikely the ASI will show you much when taxiing. Still, it should indicate a lack of airspeed unless the wind is really honking and the airplane is pointed into it. Check it early in the takeoff roll to be sure.
Vertical speed indicator
The VSI should indicate no climb/descent rate on the ground. Some VSIs have a front-mounted adjusting screw you can use to zero the instrument, or you can use its on-the-ground indication as zero.
Altimeter
Once properly set to field elevation or local barometric pressure, the altimeter should continue displaying that value until liftoff. The FAA’s Instrument Flying Handbook (FAA-H-8083-15B) says, “If the indication is off by more than 75 feet from the surveyed elevation, the instrument should be referred to a certificated instrument repair station for recalibration.”
RISK MITIGATION
One of the reasons a practiced instrument scan is so critical is early detection of errors and failures. One of the benefits of simulator training is the ability to “soft fail” instruments, or at least more accurately simulate a failure. Covering instruments with sticky notes or instrument covers may be the best we can do with in-aircraft training, but it is flawed in two ways.
First, it eliminates the requirement of identifying the failed instruments. As discussed above, pitot/static errors and failures alone can present in a number of ways. Secondly, covering the instruments is a great mitigation strategy once failed instruments are positively identified. Trying to mentally phase out erroneous information in your scan is extremely challenging, and it is beneficial to remove them from the equation all together. By covering the instruments for you, the instructor essentially completed the first two steps for mitigating instrument failures.
Once airborne, there are many resources available to pilots faced with instrument failure. Many transponders indicate the altitude they are reporting. This can be used to quickly cross-reference suspected altimeter inaccuracies. The GPS often provides groundspeed, which can help minimize the impact of an inaccurate ASI. Information like this is available now more than ever, with EFBs and technology like the Stratus III ADS-B In receiver that includes a backup attitude/heading reference system (AHRS) and does not even require a cockpit modification. These tools should never be used for primary instrumentation but are a fantastic backup.
Lastly, it is worth reviewing your aircraft’s procedures regarding the pitot/static system. Many aircraft contain an alternate static source. Due to the airflow surrounding the aircraft, the pressure in the cabin is typically lower than external pressure. Because of this, the altimeter and airspeed will indicate high, and when the alternate static source is opened, the VSI will indicate a temporary climb. Know what the manufacturer recommends for use of pitot/static heat, and ensure that you are always compliant with those procedures.
INSTRUMENTAL INSTRUMENTS
I have always marveled at the beautiful simplicity of the pitot/static instruments. Such straightforward concepts, and incredibly reliable. So reliable that we can take their accuracy for granted. Unreliable airspeed and altitude can be extremely difficult to combat and have even been root causes for major aircraft accidents. Being able to detect and diagnose errant indications is critical. I recommend practicing simulated instrument flight with different pitot/static failures and finding out what resources are available in your aircraft. Prepping for these scenarios potentially can be lifesaving.
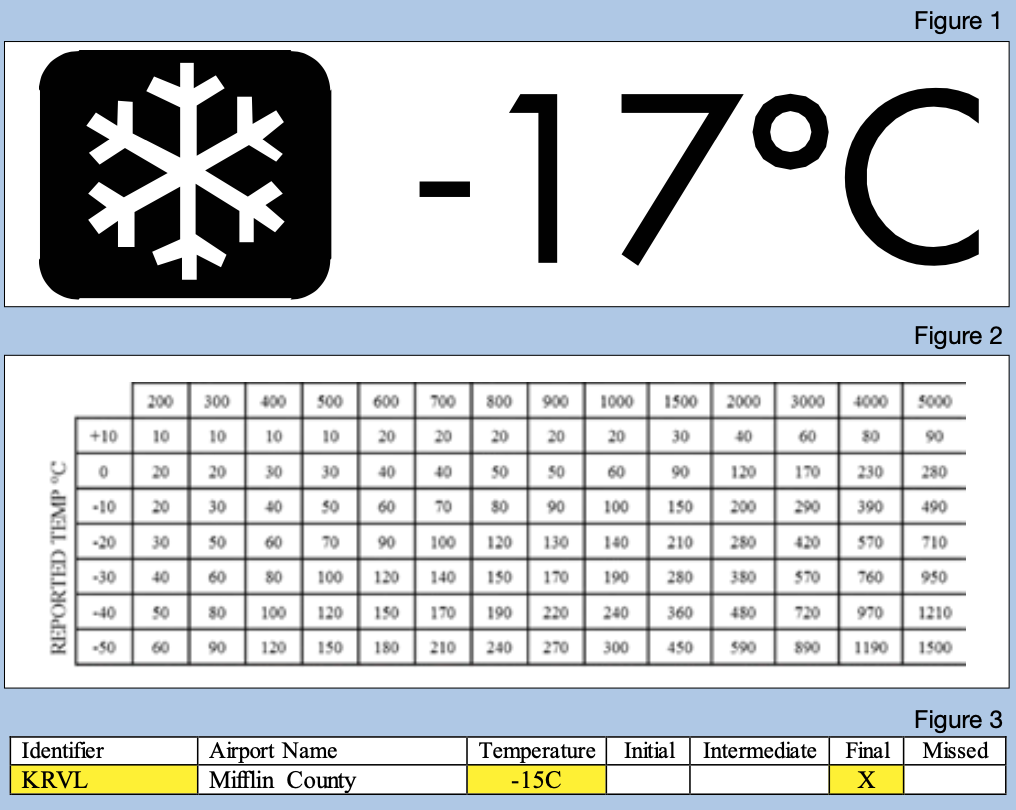
We have already discussed how cold weather can cause air density-related altimetry errors. This is particularly hazardous because the aircraft will be lower than the indicated altitude, potentially reducing safety margins. If you have flown in a cold-temperature environment, you may have seen the snowflake above in Figure 1 reproduced much smaller in the notes section of an approach plate. If you reference the legend for terminal procedures, you will see the chart in Figure 2.
Additional information is required. The FAA publishes an updated list of cold weather-restricted airports, which would be a great thing to keep a copy of. It shows the temperature threshold for the required correction, and to which phase(s) of the approach the correction needs to be applied (Figure 3). Consider shooting an approach to the Mifflin County Airport in Reedsville, Pennsylvania (KRVL). The MDA is 2200 feet msl, and there is a stepdown fix at 2500 msl.
I have always been one to just round up rather than attempt to extrapolate. If you round up to 3000 feet and -20 degrees on the chart found in the TERPs legend (Figure 2), the correction will result in adding 420 feet to the MDA and any step-downs. This is a substantial correction, and highlights how cold temperatures can drastically affect altimetry.
AIR DATA COMPUTERS
Air data computers (ADCs) provide pitot/static information to electronic flight displays, commonly referred to as glass cockpits. An ADC uses the same input as traditional pitot-static systems, but processes it differently. The ADC receives pitot/static data, and computes the difference between total pressure and static pressure to present air data on your flight display. Additionally, the ADC may provide data to other equipment. These systems offer a number of benefits to pilots, such as trend vectors on airspeed and altitude tapes. These allow pilots to see where the aircraft state is headed and make small changes to keep the aircraft in the desired path.
An ADC can still fail, and it is important to know how to rectify the failures, or how your scan will be adjusted if the it does fail. Some larger aircraft contain two ADCs, so that if a single unit fails, there is a backup unit. If this is the case in your aircraft, note what happens to your automation if you swap them. I have seen this disconnect the autopilot, swap the vertical and lateral sub modes to pitch and roll, or have no effect on the autopilot whatsoever. Other airplanes contain backup instrumentation. If this the case, it is worth attempting to be proficient at the required adjusted scan. This is probably a challenge, but some flight schools have things like templates to block only the failed instrumentation on your PFD. Where there is a will, there is a way!
Ryan Motte is a Massachusetts-based Part 135 pilot, flight instructor and check airman. He moonlights as Director of Safety when he isn’t flying.


