
Despite their increasing obsolescence, vacuum pumps remain installed aboard the vast majority of piston-powered aircraft, providing the energy to spin the gyroscopes in flight instruments like attitude indicators and directional gyros. Even newer aircraft sporting factory-installed “glass” panels may have a vacuum (or pressure) pump powering one or more backup instruments. Odds are, the airplane you fly has at least one, and the odds that it rarely gets serviced are even better.
A common theme in many of my previous articles for Aviation Safety is that aircraft systems require regular service and system component replacement at regular intervals, according to manufacturer specifications. This also is true for vacuum/pressure pumps, which can be impossible to inspect without disassembly, which typically can’t be done in the field. Perhaps more so than many other aircraft systems—except perhaps the powerplant(s)—ignoring this system until it fails could lead to catastrophe, or at least significant inconvenience and expense.
If you’re under the cowling already, check the pump for security and obvious damage. Also check the outlet side of a vacuum pump, usually an elbow aimed upward, for graphite dust. Once the engine is started, note the vacuum system gauge reading. It likely won’t be in the green yet, but should be just below it.
Vacuum pressure will already be spinning the gyros, but adding power to taxi should bring the gauge into the green. While taxiing, check the attitude indicator for stability—it shouldn’t indicate a bank of more than five degrees. The heading indicator, once set after engine start, should agree with the compass.
At run-up, the gauge should be solidly in the green, with any flags on the instruments or separate alerting systems indicating proper function.
SYSTEM DESCRIPTION
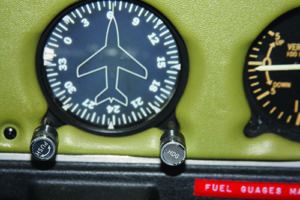
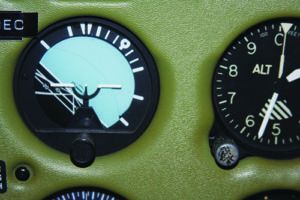
The vacuum/pressure system of a modern piston-powered aircraft typically consists of an engine-driven, rotary-vane pump, a regulator and filters, the instruments and accessories powered by the system, and hoses or tubing needed to connect everything. Essentially, the pump creates a vacuum downstream of the instruments, sucking air through the system and spinning a rotating wheel with integral cups that turn when there is sufficient vacuum. The rotational speed of the gyroscopic instruments is governed by the amount of vacuum supplied to the instruments.
A typical pump can be installed to provide either pressure or vacuum. When other equipment, like pneumatic deicing boots, autopilot servos and/or inflatable door seals also are aboard the aircraft, the pump typically is installed as a pressure system. Piston twins generally have one pump on each engine, with associated filters, valves and gauging providing redundancy.
MAINTENANCE
During an annual or 100-hour inspection, this system should be carefully examined. Things to look for include security and cleanliness around the pump, including any fluid leaks, which must be corrected. Verify panel-mounted gauge readings with a calibrated instrument and adjust the system to the correct value. Inlet air filters should be replaced at 500 hours or annually, whichever comes first. Inspect also for deteriorated hoses, loose fittings, and installation of system components according to airframe manufacturer guidelines.
Like many components, vacuum/pressure pumps have a defined service life, measured in operating hours and/or years. Even if the pump is working well and shows no signs of failure, it’s not a bad idea to replace it prophylactically on a regular basis to guard against failure on a dark and stormy night. Do your research and due diligence on replacement as manufacturer’s recommendations may vary according to the engine and airframe the pump is installed on as well as how it’s used. Keep the pressure/ vacuum adjusted to the airframe manufacturer’s specifications. Check for system plumbing leaks on an ongoing basis by looking for carbon dust as a telltale sign of a leak. Record the vacuum or pressure readings on a regular basis and consult a mechanic for maintenance if any significant changes are observed.
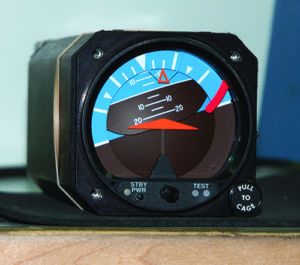
Properly operating gyros may only operate two to three minutes before becoming unreliable in the event of a vacuum failure. Unfortunately, the typical pneumatic gyro doesn’t incorporate a failure indicator, like the instrument flag shown on the electric attitude indicator at right. They also don’t “die” quickly but begin to decelerate, lingering on until they begin presenting erroneous information. More than one unsuspecting pilot has followed a dying gyro system into unusual attitude or control loss.
Knowing instantly when a malfunction occurs and taking immediate action can make the difference between successfully handing the emergency and not. That usually requires an alerting system, or keeping a sharp eye on the gauge as part of your scan.
If you suspect a failing gyro, cross-check your attitude or heading. Cover the dying instrument(s) to minimize distractions. If IFR, inform ATC. Changing altitudes, finding a clear area between layers, descending or diverting to VFR weather and/or declaring an emergency are all options to consider.
WHY VACUUM SYSTEMS FAIL
Other than normal wear, premature failure of a vacuum/pressure pump really comes down to not following manufacturer instructions regarding maintenance and replacement. A pneumatic pump’s service life can be greatly affected by air leaks in the system, which make the pump work harder to supply the proper vacuum, which generally is 4.5 to 5.5 inches Hg to the gyroscopic instruments.
Dirty or clogged filters may be indicated by decreasing vacuum readings, which also cause the pump to work harder, decreasing its life. Other factors that may decrease a pump’s longevity is insufficient cooling air, frequent operation at moderate-to-high altitudes and frequent use of deicing boots operated by the pneumatic system.
Fluid contamination is another cause of premature failure. So-called “dry” vacuum pumps—not the “wet” style lubricated by engine oil—incorporate vanes made from a graphite compound and rely on dry internal conditions for proper operation. Any oil residue, hydraulic fluid, fuel or even soap and water entering during an engine wash can destroy the internal components of a dry pump.
Foreign object damage is another killer of vacuum pumps, typically caused by small pieces of hose that break off internally and are drawn into a pump. This can break the carbon vanes and shut down the system in short order. Old, hardened rubber hoses such as those behind the instrument panel are prone to internal deterioration and should be replaced with the proper aircraft-grade material somewhere between the 5-and-10-year mark.
Some pumps are designed to be operated in only one direction and are manufactured to require a specific volume. If the incorrect pump is installed or is operated opposite its specified rotation direction, shortened pump life and possibly insufficient volume to operate the gyroscopic instruments can result. Install only the pump intended for use in your aircraft and engine combination. Normal vacuum pump life, while not an exact science, could be 600 hours or possibly up to 1000 hours, depending on the quality of maintenance received and the demands placed on the system.
If you have experienced premature pump failures, then it is time for some serious troubleshooting before throwing on another pump. When replacing a vacuum pump for any reason, always inspect the system for possible air leaks and general cleanliness, including deteriorated hoses and associated small chunks of rubber from failing hoses.
Always use the proper torque for mounting a pump as well as replacing the gasket and the lock washers with new ones each time. Some installations require a special wrench to properly tighten the mounting nuts as access may be limited. Use the correct tool; do not improvise. Replace all filters and adjust the regulator with a properly calibrated gage, then finally make the proper logbook entry.

The biggest problem pilots have with partial-panel operations is realizing the system has failed. One reason is the typical practice session begins with the instructor covering one or both of the gyro-driven instruments and announcing the exercise. That’s not how it happens in real life.
Cross-checking your flight instruments is part of a good scan when flying in IMC, and it’s one that many of us simply aren’t good at. But if you even have the tiniest suspicion something may be amiss, here’s what you can do:
- Fly the airplane.
- Overcontrolling is something you want to avoid, and one way to minimize the tendency is to relax your grip on the yoke.
- Check the vacuum system gauge and/or the voltmeter/ammeter, plus circuit breakers, to determine where the problem may be.
- Fly the airplane.
If neither system appears to have failed, it may be the instrument itself. After confirming straight-and-level:
- Fly the airplane.
- Increase pitch a couple of degrees and verify proper indications of airspeed, altimeter and vertical speed.
- Return to level, then enter a five-degree right bank (to minimize chances of entering a spiral) and verify attitude, heading and turn indications.
- Fly the airplane.
REPLACEMENT PUMPS
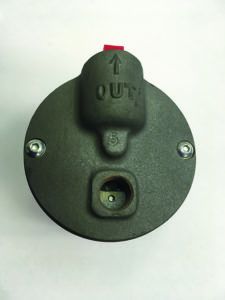
Several enhancements to the manufacturing process as well as materials used in the overall vacuum or pressure system have come about in recent years. Improvements in pump design and additional manufacturers have made vacuum pumps more reliable, competitively priced and better able to withstand severe conditions. The addition of a wear indicator port has allowed for inspection of the internal components of the pump, thus making it possible to determine when to replace the pump prior to failure. See the sidebar above for more details.
New ways to peer into a pump’s innards should not be used as an excuse to defer maintenance. Overhauled or new pumps are available at competitive prices, so the changing of a pump prior to failure has now become more feasible. It’s not a difficult or lengthy job, and any A&P should be able to change a pump..
While on the subject of overhauled pumps, some were never intended to be overhauled. Others can be successfully overhauled using exacting procedures and testing to be sure the pump is providing full volume after the work. A local mechanic may not have the equipment, workplace or parts to properly overhaul and test a pump, which kind of defeats the purpose of overhauling the pump so it won’t fail.
If you are intent on purchasing or exchanging an overhauled pump, buy from a reputable firm with a warranty. As the saying goes, you get what you pay for. Serious IFR fliers should consider choosing from a variety of generally more reliable new pumps, which really are only slightly higher in price than an overhaul exchange unit.
For the most part, we’re stuck with the vacuum/suction gauge is our primary source of information on a pump’s relative health. If you’re going to remove and disassemble a pump to check it, you’re probably better off just replacing it and sending in the old one as a core. If only there were some kind of window into the pump’s innards we could use to inspect it without removing it.
Enter Tempest Aero Accessories, which markets a wide range of common aircraft parts. Some models of Tempest’s vacuum pumps feature a wear indicator port, circled in red, which the company says “is a visual aid to help determine the vane length during service. It does not indicate actual life expectancy of the pump. Determining the vane length at set times during service is beneficial to help determine the vane wear rate which may vary due to operating conditions.”
BACKUP SYSTEMS
Even with proactive maintenance and monitoring, pumps will still fail. That’s when a timely alert or warning can come in very handy.Gauges are not always easy to read, or are not kept in a frequent scan pattern during IFR flight. Low-vacuum warning flags in gyro instruments are now available when purchasing new gyros and should be considered. A low-vacuum indicator switch and light is also available for low cost that will warn instantly of low vacuum or system pressure.
Several backup pneumatic systems are available at reasonable cost, with choices including a second engine-driven or electric pump, or an intake manifold tap. Check with your mechanic as to the options available and prices for your specific aircraft. If you have a standby vacuum system, review its operating instructions occasionally and ensure that all scheduled maintenance procedures are followed.
Electric gyros also are an option, and the FAA allows replacing the turn coordinator with a suitable one (see Advisory Circular AC 91-75). Keep in mind that an electric gyro will have its own maintenance requirements. That said, a new generation of multi-function electronic instruments is available that can be configured with their own backup batteries. If money is no object, all your pneumatic instruments can be replaced with electric ones, allowing you to do away with the vacuum pump entirely. However, some autopilots and deice systems depend on pneumatic power to operate, so it may not be feasible to go all-electric and remove the pump.
Finally, do not continue to operate an aircraft even VFR with a pneumatic system failure. Should a pneumatic system fail when operating day VFR, it may not be an emergency, but you should act responsibly and land to have the problem corrected. Keep in mind that the failure may not be something simple like a broken drive coupling or fractured vanes. Also consider that gyroscopic instruments can be damaged if they are spun down or static and are subjected to shock damage from rough air, or even rough runway surfaces. If it fails, restoring the system to operation before flying the aircraft again will help protect your gyros.


