
After a few hours in the clag, pushing buttons and keeping the magenta line more or less centered, you’re vectored for the approach at your destination, fly the procedure, descend and spot the runway, just as everyone said you would. There’s a big, beautiful runway right there in front of you. What’s next? Conventional wisdom, along with your training, says you land on it. But that may or may not be what you want to do. In fact, you have a lot of options.
Sure; you can land, and that’s what you’ll most likely do, after performing a final landing checklist. You also can go around, for example, flying the missed approach procedure. Maybe your landing clearance was cancelled as you broke out due to a debris-contaminated runway, thanks to the preceding arrival, and that’s what ATC wants you to do. You can circle, maybe to land on the same pavement but from the opposite direction. You also can cancel IFR, or even obtain an SVFR clearance, and proceed to your real, nearby destination. Each of these options has upsides and downsides, but no matter which one you choose, you need to be prepared for it. That occurs during your approach briefing, which is best done at altitude, while you’re straight and level and have some time, before descending and flying the procedure.
When landing out of an instrument approach—and without having canceled IFR—the FARs mandate a few requirements we need to consider and ensure we have met. They’re designed to ensure obstacle clearance, especially at night, and guide you to the runway aiming point. Before leaving the MDA or DH/DA, for example, FAR 91.175 says:
✓ Descend to the runway at a normal rate, using normal maneuvers. Part 135/121 must touch down within the touchdown zone.
✓ Flight visibility must be at least as prescribed in minima table.
Unless you’re flying a Cat II/III approach, you must have at least one of the following visible and identifiable:
✓ The approach light system (red terminating bars or red side row bars must be visible to descend below 100 feet above touchdown zone elevation).
✓ The threshold, the threshold markings and/or the threshold lights.
✓ The runway end identifier lights, the touchdown zone lights and/or the runway lights.
✓ A visual glidepath indicator (VASI/PAPI).
✓ The touchdown zone, touchdown zone markings and/or the runway, or the runway markings.
THE LANDING
Nine times out of 10, you’re going to want to land out of the approach, straight-in. Simple, right? Most of the time, yes. But that presumes you’ve flown a stable approach, have completed at least an approach checklist and the runway environment is in sight. If all those tests are met, you still have a couple of things to do correctly before touching down. The sidebar at the top of the opposite page has a checklist of the things you need to achieve when landing under IFR. If you’ve already cancelled IFR, you may still want to apply some of those items.
Of course, we know not to leave the decision height/decision altitude or the minimum descent altitude without having the runway environment in sight. Before descending below those altitudes, there’s a list of things we have to see, found in FAR 91.175 and summarized in that sidebar. When using a synthetic vision system, see FAR 91.176.
As a Part 91 operator, where on the runway you land and how you get there from the proper altitude and position are up to you. You can dirty up and slow up, aiming for the numbers and make the first turn-off. But that may not be the most stable way to get to the runway. If you are following a glidepath from the final approach fix to the runway, you might want to consider staying on it, for example. Same for a VASI, PAPI or other visual glidepath aid, to ensure obstacle clearance.
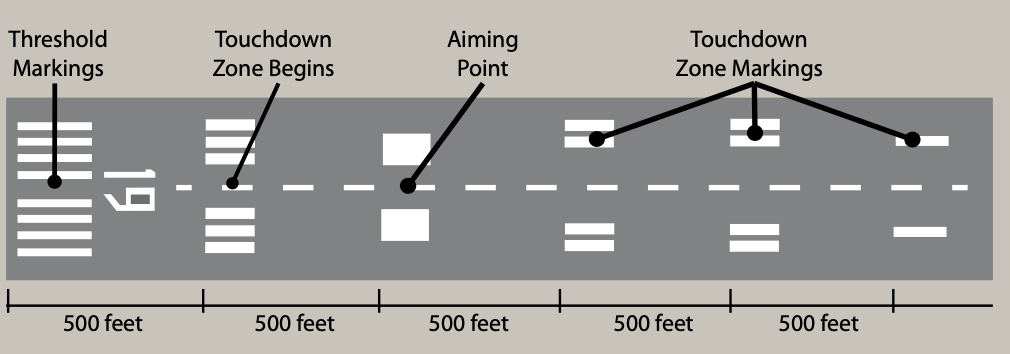
When approaching an instrument runway, the aiming point will be about 1000 feet from the threshold and marked by two broad, rectangular stripes (see the graphic at right). For a Part 135/121 flight, FAR 91.175 says you must land within the runway’s touchdown zone, which begins 500 feet from the threshold and is marked by rectangular bars aligned with the runway and set another 500 feet apart. The touchdown zone itself extends 3000 feet beyond or to the midpoint of the runway, whichever is less.
Lastly, don’t forget a final pre-landing check: gear, flaps, etc.
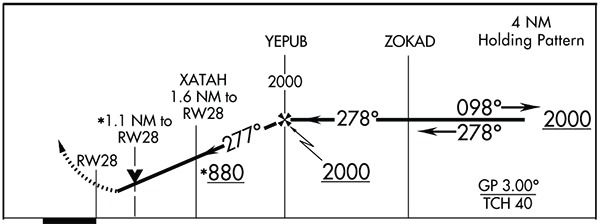
The VDP is a relatively new feature of non-precision approaches. It’s charted along the final approach course with a large “V,” as shown at right. It is the point “from which a stabilized visual descent from the MDA to the runway touchdown point may be commenced.” Upon identifying the VDP and presuming the runway environment is in sight, its location assures a safe, stabilized descent. Note that the VDP is advisory—you don’t have to use it—and it may not assure obstacle clearance.
THE MISS
If you’ve already broken out of the clag and have spotted the runway environment, it’s unlikely you’ll have to miss the approach. But stuff happens—including an airplane that becomes disabled on the runway or ATC revoking your landing clearance on a seeming whim—and a trip around the terminal area may be in your future. On one level, this shouldn’t be a problem, since you’ve already briefed the full approach, including the miss, and you have lots of fuel (right?). But flying the miss can become a problem if you’ve already begun a circle-to-land maneuver.
One of the challenges is that obstacle clearance for the missed approach is guaranteed only when flying along the depicted path. Conceivably, you could be a couple of miles away from the final approach path when the need to go missed forces the change-up. If you’re circling at the published altitude and within the defined area, it might not hurt anything to start a climb, but you need to amble back toward the final approach path—or the missed approach point (MAP) itself—before joining the missed approach path outbound. Doing so guarantees terrain and obstacle avoidance.
Even if you’re not circling, starting the miss before reaching the MAP may not be a good idea. Let’s say you’ve broken out and have the runway in sight from, say, three miles out. Then, for whatever reason, you need to go missed, the first part of which requires a climbing turn. If you begin the turn before reaching the MAP, obstacles and/or terrain may be in the way. Fly to the MAP, then begin the miss.
Some non-RNAV approaches may have more than one missed approach procedure, especially if the primary miss is based on an unrelated navaid. Even so, ATC always has the option of issuing a missed approach clearance differing from what’s published. Keeping mind that an approach clearance also is clearance to execute the appropriate missed approach, you should know which missed approach procedure you’re cleared to execute before leaving the final approach fix. If ATC didn’t give you alternate instructions, fly the primary procedure that’s charted. While you typically won’t see a published alternate miss on an RNAV procedure, you still will need to sequence your navigator ahead for it by pressing the OBS or other appropriate button.

It’s important to keep mind that much of the discussion regarding what to do after we break out on an instrument approach presumes we haven’t canceled IFR. If we have, and the weather allows operating VFR—or we’re in Class G airspace—concerns about where and how we land, missed approach procedures and circling minima don’t apply. But there are some really good reasons not to cancel IFR before landing.
Foremost, of course, is marginal weather. I’ve had many flights where I genuinely didn’t know until I touched down if I was going to land out of the approach. And I’ve gone missed at non-towered airports below radar coverage and after canceling, then had to get back on the frequency and share with ATC the great news. Canceling IFR without knowing that weather or some other plot twist will require using the capability a clearance affords us is poor planning.
CIRCLING
With the proliferation of GPS-based RNAV approaches over the last several years, the circling maneuver—and the associated typically higher minimums—aren’t used as much as they used to be. Still, any time we’re maneuvering for a landing out of an approach while still operating IFR, we’re circling, even when we’re flying a traffic pattern at a non-towered airport. If the weather’s good enough, and we don’t feel like flying 20 or so miles out of our way to fly a straight-in approach to our favored runway, circling is certainly a viable, sound option.
But like everything else associated with an IFR arrival, we need to plan for it. Perhaps first among the steps we take when breaking out is to monitor our altitude. As long as we’re still operating under IFR, we need to be at or above the published circling minima for the speed at which we plan to circle. It’s important to note that, even if the airplane we’re flying can circle at, say, the 90-knot maximum for category A—and therefore the lowest circling minima—we may not want to fly that slowly when maneuvering. It’s easy and common for a Bonanza, Cirrus or twin driver to be flying the circling maneuver at 130 knots, placing the maneuver in category C. If so, the airplane needs to be at the higher category C visibility and altitude minima.
Another thing we need to think about when circling is in which direction we’ll turn when breaking out, and when we’ll do it. The circling minima themselves give us some guidance, and we should have a good idea what the actual ceiling and visibility are before leaving the final approach fix. What we do with that information determines how successful the circling maneuver will be.
For example and when given the option, pilots sitting on the left side of the aircraft are more likely to turn in that direction when asked to make a 180-degree turn (which probably has a lot to do with standard traffic patterns). Yeah, the direction in which we circle often is determined by the runway we plan to use for the actual touchdown, but what if we just want to land in the opposite direction?
The approach plate itself may offer guidance, with a note that circling at or above a certain category or in a certain direction isn’t authorized.
For the moment, put aside the folly of developing an elaborate plan just so you can get into a VFR-only airport selling inexpensive fuel when the weather is down. Why can’t you just file IFR to Cheap Gas County? You can, but a nuance in the FARs applies and, of course, you might not get in.
The nuance comes from FAR 91.169, which states you always need to file a flight plan listing an alternate airport, except when the destination has a published approach and the weather forecast offers reasonable hope you’ll get in the first time. The trick is that, in our example, Cheap Gas County doesn’t have an approach, so you always need to file an alternate.
Getting into a VFR-only airport under IFR requires either visual conditions or ceiling/visibility allowing you to find it while at or above ATC’s minimum vectoring altitude, which pretty much is the same thing. Unless you cancel IFR, you’ll be conducting a visual approach. A contact approach, which requires a published procedure at the airport, isn’t available. If you cancel IFR, you might be operating VFR in controlled airspace under IMC.
DIVERTING
After all is said and one, the runway in front of us may not even be on the airport we want to land at. We might be planning to scud-run our way to our outlying private runway or hop over to Cheap Gas County where we can save all of fifty bucks when we top off. There are some tricks involved with this plan.
The first one is whether the weather is good enough to permit us to do it at all. One scenario is shooting an approach to get under a deck, breaking out into poor visibility but decent ceilings at or above the local ATC facility’s minimum vectoring altitude and motoring off to Cheap Gas. Springing something like this on ATC at the last moment won’t endear you to anyone, and you might simply get an unable, followed by a climb-turn-and-maintain clearance. Working it out beforehand, including the route and altitude, is far preferable, and ATC will be there if the viz caves on you and you need to get back into the system. A plan like this is far easier to implement over flat land; it may not be at all possible over less-friendly terrain.
If that’s not an option and you plan to cancel the IFR clearance on breaking out, you need to have done some homework—preferably in a chair that’s not moving—to establish at which altitude(s) you can safely fly the diversion, some idea of the minimum visibility you’ll accept, the route to take and whether there is any problematic terrain along the way. That typically will require using a sectional to determine both the airspace and therefore the weather minima, plus to plot obstacles.
PLANNING IS KEY
Throughout this discussion, I’ve tried to stress the need for planning what you’ll do when you break out after an approach. Normally, it’s a no-brainer: land straight-in. Sometimes, it’s not, and we may have to do some broken-field running. What we shouldn’t be doing, though, is making it up as we go. Before we leave the final approach fix inbound, we should have a pretty good idea of how things are going to work out and what we’ll be doing when we break out. That should include some idea of where we’ll break out, too, which can make or break our little plan.
But things don’t always work out the way we planned. That’s why we study and brief the approach and its nuances, including the runway environment, the missed approach procedure(s) and circling minima—among many other items—preferably before we leave cruising altitude.
It’s nice to have options, and that’s one of many things the instrument rating affords pilots who earn it and use it.


Communication")