
If you’re lucky, you’ve gotten some of your aviation education from an instructor with extensive real-world experience. One CFI who fits that description—having flown freight, charter, airline and corporate without ever giving up teaching in the 35 years he’s had his certificate—likes to remind students of the difference between procedure and technique. The former is what you have to do; the latter is how you choose to go about doing it. Before landing, for example, a constant-speed prop should be moved to its full-forward high-rpm setting to prepare for a possible go-around. Whether it’s done after turning final, on base or immediately after reducing power on downwind is entirely at the pilot’s discretion, provided it gets done. Reasonable arguments can be made for each alternative.
For whatever reason, this distinction tends to get lost teaching and testing certain maneuvers. One example is the 180-degree power-off spot landing, part of the practical tests for commercial and flight instructor certificates in single-engine airplanes. The goal is straightforward enough: Having chosen a point on the runway (e.g., “the departure end of the second stripe”), pull the power to idle abeam it on downwind and touch down on centerline no more than 200 feet beyond (but not short, which is an automatic bust). The written test standards say very little about how to accomplish this miracle (see “May” or “Shall”, below). However, a good many instructors and at least a few DPEs invest their preferred methods with an inviolability that approaches dogma. Some prefer lowering the gear before the initial power reduction and advancing the prop just after. Others insist on leaving the gear up until the runway’s made; some even set the prop to low rpm to minimize drag.
This Is Not a Drill
The idea of demonstrating any power-off landing maneuver is to leave the throttle at idle, unless momentarily clearing the engine. The energy you use to reach the runway after beginning the maneuver should be based on your altitude, not fuel in the tanks. Some of the disputes probably arise from misunderstanding the nature of the exercise. Yes, the ability to make a precision landing at minimum airspeed is valuable after any power loss that isn’t above a mile-wide turf farm, but this is not a simulated engine failure. (You can be certain the checkride will include one, though.) Rather, it’s a performance maneuver demonstrating exact energy management and a practical grasp of aerodynamics. Putting the airplane where you want it without benefit of thrust requires planning, close monitoring and lots of practice.
The fact that it’s not an emergency drill means that there’s no obligation to maximize glide performance. You only need to get far enough away to make it back again. What matters is hitting one of the combinations of airspeed, configuration, ground track and turn radius that will put the airplane into the flare a few yards short of the target point.
Gear Up?
Arguments for leaving the gear up focus on glide performance. So does the practice of moving the prop control to its low-rpm extreme, knowing it will need to go full forward on short final. A case can be made for this, especially when weight or density altitude promise a higher-than-typical sink rate or winds are unusually strong. In those circumstances, it makes sense to conserve altitude as long as possible. And while this is emphatically not a simulated emergency, learning a single response to the loss of thrust simplifies decision-making if it happens for real.
Arguments against extending the wheels include the fact that lowering the gear after turning final guarantees that the airplane’s downwind glide away from the runway is more efficient than the final-approach glide back to it. By flying away from our intended landing spot more efficiently than we glide back to it, we increase the chance of coming up short. That’s not a disaster during practice, but it’s certainly inconvenient on a checkride. By removing that crucial step to the time where the pilot is focused on making it to the runway, it also significantly heightens the risk of forgetting to put the gear down at all, GUMPS check notwithstanding. That’s a definite bust whether the examiner notices in time or not. Likewise, going to low rpm makes it easier to forget to advance the prop before touchdown. Regardless, pilots should knowhowto wait on the gear and pull back the prop to extend a glide, which is just as important as knowingwhento use these items in the toolkit.
Gear Down?
Instructors who advocate configuring for landing on downwind claim several advantages. The rate of descent (though not the angle) remains constant, simplifying monitoring and adjustment of the flight path. Finishing the configuration checklist early frees the pilot’s attention for that monitoring and adjustment, and of course having the gear already down and the prop at high rpm almost eliminates the threats of landing gear-up or overloading the engine during a go-around.
The chief drawback, of course, is the faster early loss of altitude. In models with unimpressive glide ratios, a conventional rectangular pattern may be somewhere between alarming and impossible, with the airplane losing 350 of its last 400 feet in the turn from base to final. Any hesitation acknowledging a short approach can have unpleasant consequences, while those of poor coordination during an attempt to stretch the glide can be much worse. A continuous horseshoe-shaped turn from downwind to final feels more controlled, but can also come up short.
A 2011 accident in Maryland prompted a flurry of e-mails between instructors and examiners managed by the Baltimore Flight Standards District Office (see When Things Go Wrong, below). Some asserted that in the accident aircraft, a straight-winged Piper Arrow, teaching students to extend the gear on downwind verged on criminal negligence. Others (including the author) with extensive experience in the same model beg to differ.
Trial and (Mostly) Error
No single technique is perfect for every airplane, but specific variations are optimal for individual designs. More than for most maneuvers, consistently nailing the test standards requires really understanding how your aircraft responds to changes in weight, winds and density altitude. Developing that begins with setting initial benchmarks, then experimenting. A CFI who’s given a lot of dual in the same tail number can help identify the starting point, but calibration’s an individual effort.
Begin by flying the downwind a little closer to the runway than usual. As with everything else, you’ll change that later if it doesn’t work. Pick out an easily identifiable landing target and do yourself a favor: Don’t try to put it on the numbers. Choose a spot that allows you to land on the runway even if you’re significantly short. (If you can’t resist, show off putting it on the numbers after you’ve got things dialed in.)
Our preference is to try extending the gear on downwind first, to see if it works. If it does work for your airplane, it will simplify things going forward. If it doesn’t, this is the time to find out. However, if the DPE you expect to fly with has well-known preferences, you might just plan to learn it that way. You can’t be failed for meeting the ACS with a technique the examiner doesn’t favor, but this can result in particularly close scrutiny through the rest of the ride. It often pays to ask the examiner his preference/expectations, but don’t be surprised if the response is “as described in the ACS”.
Once abeam the target, throttle back to idle and pitch for best glide. We also recommend putting the prop full forward right away and sticking with that if it works. See how long it takes to lose the first 100 feet. If the airplane’s coming down fast, start a continuous 30-degree-banked turn—no more than 45 degrees, please—onto the extended centerline within the first couple of seconds. If the airplane likes to glide, try squaring off the corners. Altitude’s more easily lost than gained, so plan to come in a little high.
Keep the flaps up unless you’re obviously going to be long, and don’t hesitate to add power or go around if it feels like you’re too low too early. Assuming you’re still gliding after rolling wings-level on final, anticipate floating during the flare by aiming for a point 100-150 feet closer.
Once you’re down, a full stop—don’t forget to clear the runway before cleaning up the airplane—and taxi back gives you time to discuss with your instructor or examiner what worked and why. Save the touch-and-goes until you’ve wrapped up the problem-solving phase and moved on to polishing.
When Things Go Wrong
The 180 power-off makes repeated appearances in the accident record, particularly in the histories of models that see a lot of service as complex trainers. The difference between normal frustration and bent airframes usually comes down to the pilot’s reluctance to break off an approach after it’s clear it’s coming up short. (CFIs demonstrating the maneuver aren’t immune to this, either.) Instructors expecting students to exhibit commercial-grade judgment sometimes wait too long to intervene…and extreme crosswinds don’t help, either (but then, when do they?).
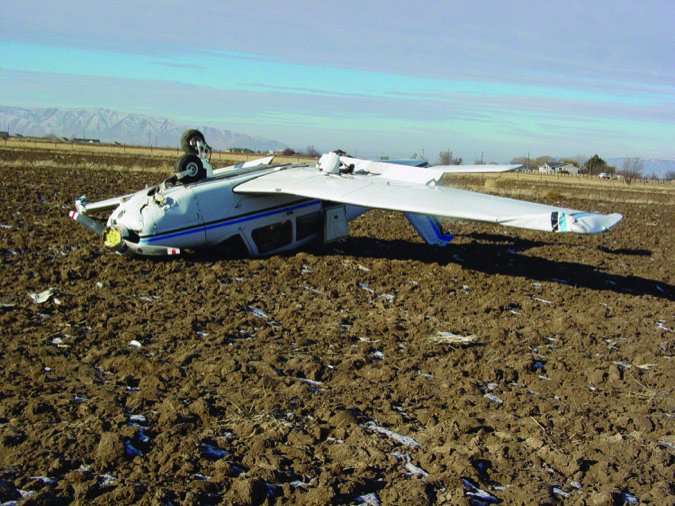
The 2011 accident that stirred up examiners serving the Baltimore FSDO involved a 180-hp Piper Arrow with three on board: a commercial-rated CFI candidate, his instructor and a third commercial pilot in the back seat. The candidate tried to demonstrate the maneuver to a 3216-by-50-foot runway despite a 70-degree left crosswind of 22 knots with gusts to 27. He extended the gear on downwind but allowed airspeed to decay; his last memory was adding power. A witness saw the airplane “very low” on a “tight” approach before the left wing hit the ground and it cartwheeled. The Delaware State Police airlifted all three to shock trauma centers. They survived.
Practice, Practice, Practice
If your first try came up short—the more common outcome, in our experience—did you really hold best-glide airspeed throughout? If not, that’s the first thing to fix. If you’re still short, try starting the turn earlier. If that’s not enough, edge the downwind closer to the runway or switch from squared-off corners to the horseshoe. If the airplane really can’t get around in time even if you start banking the instant you reduce power, either try keeping the gear up or find a lighter CFI. If you’re close but just a little short, extending the first notch of flaps in ground effect might bump you across the finish line.
If you were long, extend the downwind a little more. Put out flaps earlier on final, or even on base if you’ve really miscalculated. Flying slower than best-glide speed increases both angle and rate of descent, and there’s nothing wrong with throwing in a forward slip (which, in fact, the test standards specifically acknowledge).
In the words of one veteran DPE, the 180 power-off isn’t something you’ll master on the third try. It can be frustrating. The balance of details that put you within 20 feet with five knots down the runway won’t work in a 15-knot crosswind. Expect to need dozens of repetitions while learning to compensate for all the factors that change from flight to flight, within the framework of a technique that works for the particular machine you’re flying.
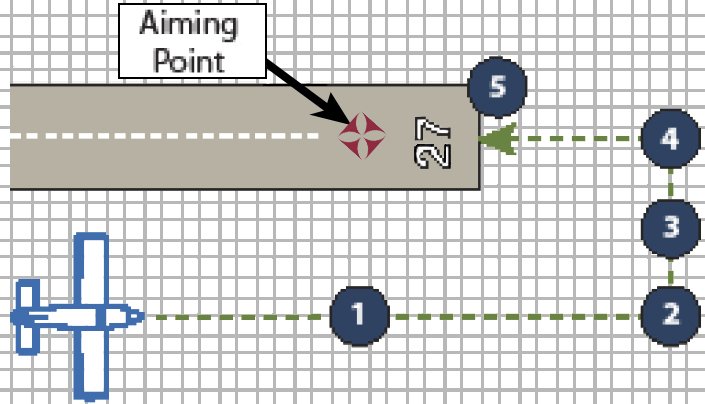
1. Key Downwind Point. Reduce power to idle and pitch for best glide speed.
2. Begin continuous turn to final. Use no more than 45 degrees of bank.
3. Base Leg Key Point. Judge progress and adjust bank angle, flaps, gear, etc., as necessary.
4. Roll out on final. Adjust glide with flaps, gear, etc.
5. Short final. Perform GUMPS check, gear down, flaps as necessary. Slow to 1.3 VS0. Begin landing flare 100-150 feet short of aiming point.

In law, those words distinguish what’s allowed from what’s compulsory. The FAA’s Airman Certification Standards for the commercial pilot certificate define just a few ironclad requirements for the 180-degree power-off spot landing. In addition to the expected knowledge and risk management elements plus checklist use and radio calls, the applicant must demonstrate the following skills:
D. Miller
At a minimum, “correctly” configuring the airplane means getting the gear down and the prop control full forward, but the candidate decides when to make those configuration changes. (A strictly chronological reading would suggest doing both on downwind, exactly the opposite of the technique many CFIs prefer to teach.) And it’s unreasonable to expect any single answer to work equally well for every combination of temperature, wind, weight and glide characteristics.
– Plan and follow a flightpath to the selected landing area considering altitude, wind, terrain and obstructions (CA.IV.M.S3).
– Position airplane on downwind leg, parallel to landing runway (CA.IV.M.S4).
– Correctly configure the airplane (CA.IV.M.S5).
– As necessary, correlate crosswind with direction of forward slip and transition to side slip for landing (CA.IV.M.S6).
– Touch down within -0/+200 feet from the specified touchdown point with no side drift, minimum float and with the airplane’s longitudinal axis aligned with and over the runway centerline (CA.IV.M.S7).
David Jack Kenny still owns the 180-hp Piper Arrow he flew on his commercial checkride in 2004 and advocates dropping the gear before closing the throttle. He also holds commercial privileges for helicopters and was previously the statistician for AOPA’s Air Safety Institute.

